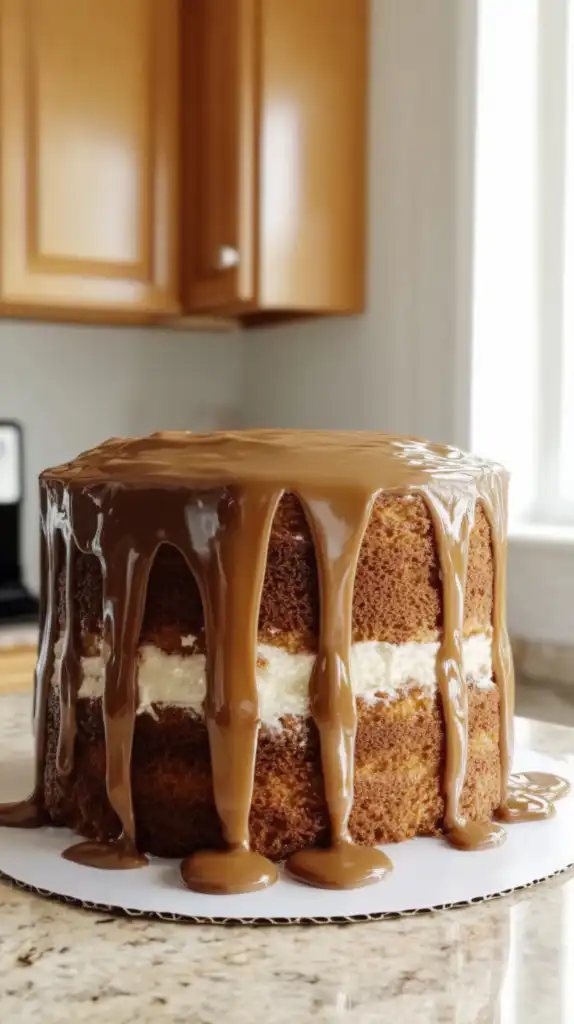
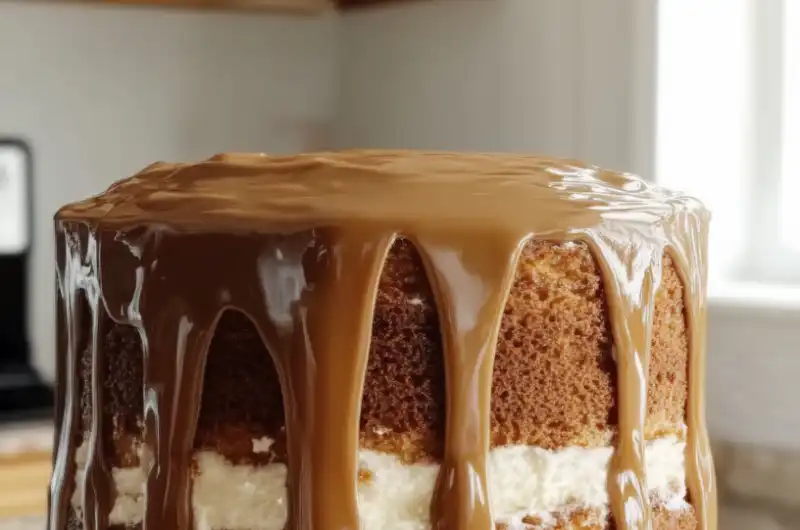
Coffee Cream Layer Cake Recipe is for serious coffee lovers who want that gorgeous dramatic drip cake look without needing professional decorating skills, and I’m obsessed with how this one turns out every single time. The four layers of moist coffee-flavored cake alternating with fluffy stabilized whipped cream create this stunning naked cake where you can see all those beautiful layers from the outside. Then you pour coffee icing over the top and watch it cascade down in these perfect vertical drips that make everyone think you’re a professional baker. The coffee flavor is bold without being bitter, and that combination of tender cake, light cream filling, and glossy icing creates the ultimate celebration cake for any coffee fanatic.
What Is Coffee Cream Layer Cake?
Coffee Cream Layer Cake Recipe creates a four-layer cake made with coffee-infused butter cake split into thin layers, filled with stabilized whipped cream, and topped with pourable coffee icing that drips down the naked sides. What makes this cake special is the naked cake style where the sides are left unfrosted so you can see those gorgeous alternating layers of coffee cake and white cream. The coffee icing creates dramatic vertical drips when poured over the chilled cake. Think of it as the ultimate showstopper for coffee lovers that combines impressive presentation with incredible flavor in every bite.
Ingredients Breakdown
Let’s break down all the ingredients for this stunning Coffee Cream Layer Cake Recipe. I’ve organized everything by component so you can prep efficiently.
For the Coffee Cake:
- Unsalted butter (1 cup): Creates rich, tender cake.
- Instant coffee granules (2 tablespoons): Bold coffee flavor throughout.
- Hot water (1 cup): Dissolves coffee and adds moisture.
- All-purpose flour (2 cups): Structure for tender crumb.
- Granulated sugar (2 cups): Sweetens and keeps cake moist.
- Kosher salt (¼ teaspoon): Balances sweetness.
- Baking soda (2 teaspoons): Rise and tender texture.
- Buttermilk (½ cup, room temperature): Tang and tenderness for your Coffee Cream Layer Cake Recipe.
- Eggs (2 large, room temperature): Structure and richness.
- Vanilla extract (1 tablespoon): Rounds out coffee flavor.
For the Stabilized Whipped Cream Filling:
- Full-fat cream cheese (2 ounces, room temperature): Stabilizes whipped cream.
- Granulated sugar (½ cup): Sweetens the filling.
- Heavy whipping cream (2 cups, cold): Creates fluffy filling.
- Vanilla extract (½ teaspoon): Flavor enhancer.
- Kosher salt (1 pinch): Makes flavors pop in your Coffee Cream Layer Cake Recipe.
For the Coffee Icing:
- Unsalted butter (¾ cup): Rich base for icing.
- Instant coffee granules (1 tablespoon): Coffee flavor in the drips.
- Half-and-half (¼ cup, room temperature): Thins icing to drip consistency.
- Vanilla extract (2 teaspoons): Rounds out flavor.
- Powdered sugar (4 cups): Sweetens and thickens icing.
Creating Your Showstopper Cake
Alright, let’s make this stunning layered cake. The process takes time but each step is straightforward.
Bake the Coffee Cake
Preheat your oven to 350°F. Grease two 8-inch round cake pans and line the bottoms with parchment paper for easy release.
Melt the butter in a medium saucepan over medium heat. Add the instant coffee granules and hot water and whisk until fully dissolved. Remove from heat and set aside to cool slightly.
In a large bowl, combine the flour, sugar, salt, and baking soda. Pour the warm butter coffee mixture over the dry ingredients and stir until fully combined for your Coffee Cream Layer Cake Recipe.
In a separate bowl, whisk the buttermilk, eggs, and vanilla together until smooth. Pour this over the batter and whisk until smooth and well combined. The batter will be quite thin.
Divide the batter evenly between the two prepared pans. Bake for 24-26 minutes until a toothpick comes out mostly clean. Cool completely in the pans, then turn out onto a wire rack.
Using a long serrated knife, slice each cake layer horizontally in half, creating 4 equal layers total. Place all 4 layers flat on a parchment-lined baking sheet and freeze for at least 2 hours or overnight. Frozen layers are easier to work with.
Make the Stabilized Whipped Cream Filling
Place your stand mixer bowl and whisk attachment in the freezer for 15 minutes to chill thoroughly. This helps the cream whip better.
Add the cream cheese and sugar to the chilled bowl. Beat on medium-high until completely smooth with no lumps remaining, about 2 minutes for your Coffee Cream Layer Cake Recipe.
Pour in the cold heavy cream with the mixer off. Mix on medium until soft drooping peaks form. Scrape the bottom of the bowl to catch any unwhipped cream. Resume mixing on medium until firm stiff peaks form. Fold in the vanilla and salt gently with a spatula.
Assemble the Naked Layer Cake
Place the first frozen cake layer on a round white cake board. This makes moving and serving easier. Spread one third of the whipped cream filling over the surface in a thick generous layer, spreading all the way to and slightly beyond the edges so the white cream visibly protrudes beyond the cake diameter on all sides.
Place the second layer on top and press gently to adhere. Spread another third of cream again slightly beyond the edges for that naked cake look. Add the third layer and remaining cream the same way, making sure cream extends past each layer for your Coffee Cream Layer Cake Recipe.
Place the fourth and final layer on top, pressing gently. Do not apply any frosting or crumb coat to the sides. Leave the sides completely bare so the alternating coffee cake and white cream layers are fully visible from the exterior. This naked cake style is what makes it stunning. Refrigerate for 30 minutes to set.
Create the Dramatic Coffee Drips
Melt the butter over low heat in a medium saucepan. Add the instant coffee, half-and-half, and vanilla. Whisk until completely combined. Remove from heat.
Whisk the powdered sugar into the butter mixture until completely smooth with no lumps remaining. The icing should be fluid and glossy. Cool for 5-10 minutes until slightly thickened but still very pourable.
Remove the chilled cake from the refrigerator. Pour the entire coffee icing very slowly and generously from the center of the top, allowing it to pool and spread to the edges naturally, then cascade down the sides in long dramatic vertical drip streams all the way to the cake board for your Coffee Cream Layer Cake Recipe. Do not spread or touch the icing. Let gravity pull it down completely.
Let the icing drips set at room temperature for 20 minutes, then refrigerate uncovered for at least 1 hour before slicing. This allows the icing to firm up while staying glossy.
Serving This Stunning Cake
This Coffee Cream Layer Cake Recipe is best served chilled, sliced into wedges that show off those gorgeous four layers. I love serving it at celebrations and coffee-themed gatherings because it looks so impressive with those dramatic drips and naked sides. The combination of coffee cake, fluffy cream, and coffee icing creates perfect flavor in every bite. For a complete layer cake spread, serve it alongside other celebration cakes like my Chocolate Fudge Layer Cake to give guests variety. Use a sharp knife dipped in hot water and wiped dry between cuts for the cleanest slices through all those layers.
Pro Tips for Success
- Freeze layers before assembly: Frozen cake layers are much easier to handle and stack without breaking for your Coffee Cream Layer Cake Recipe.
- Room temperature ingredients: Especially cream cheese and eggs. They blend better and create even texture.
- Chill mixer bowl: This helps whipped cream reach stiff peaks faster and more reliably.
- Let cream extend past edges: This creates that visible white cream ring that makes naked cakes so pretty.
- Don’t frost the sides: The whole point is showing those layers. Resist the urge to cover them.
- Cool icing before pouring: Too-hot icing runs too fast. Let it thicken slightly for perfect drips.
- Pour from the center: This creates the most natural-looking drip pattern around the entire cake.
- Refrigerate before serving: The icing and cream need time to set for clean slicing.
Common Questions Answered
Can I make this without coffee?
The coffee is pretty essential to this Coffee Cream Layer Cake Recipe since it’s the main flavor. However, you could substitute the same amount of cocoa powder for a chocolate version, or omit the coffee entirely for vanilla cake. Just know it won’t have that signature coffee flavor that makes this cake special.
How far ahead can I make this?
You can bake the cake layers up to 2 days ahead and keep them wrapped in the freezer. The assembled cake with cream filling keeps covered in the refrigerator for 1 day before adding the icing. Add the coffee drip icing 2-6 hours before serving for the freshest look and best texture.
Why is my whipped cream deflating?
This usually means the cream cheese wasn’t fully softened or the cream wasn’t whipped to stiff enough peaks. Make sure the cream cheese is room temperature and beat it smooth before adding cream. Whip the cream until it holds firm peaks that don’t droop for your Coffee Cream Layer Cake Recipe.
Can I use a different icing?
The pourable coffee icing creates those signature drips, but you could use chocolate ganache or caramel sauce instead if you prefer. Just make sure whatever you use is fluid enough to drip but thick enough to create those vertical streams down the sides.
Why This Recipe Works
Coffee Cream Layer Cake Recipe is the ultimate showstopper for coffee lovers because it delivers dramatic presentation with incredible flavor in every layer. The naked cake style shows off your work and looks professional without requiring advanced decorating skills. The combination of moist coffee cake, fluffy stabilized cream, and glossy coffee drips creates perfect balance of flavors and textures. Whether you’re celebrating a birthday, hosting a coffee party, or just want to make something stunning, this cake delivers impressive results every single time.
For more layer cake recipes and celebration desserts, check out my Pinterest page where I share all my favorite showstopping cakes.
Coffee Cream Layer Cake Recipe
Course: DessertCuisine: AmericanDifficulty: Medium12
servings45
minutes25
minutes380
kcalIngredients
- For the Coffee Cake:
Unsalted butter (1 cup)
Instant coffee granules (2 tablespoons)
Hot water (1 cup)
All-purpose flour (2 cups)
Granulated sugar (2 cups)
Kosher salt (¼ teaspoon)
Baking soda (2 teaspoons)
Buttermilk (½ cup, room temperature)
Eggs (2 large, room temperature)
Vanilla extract (1 tablespoon)
- For the Stabilized Whipped Cream Filling:
Full-fat cream cheese (2 ounces, room temperature)
Granulated sugar (½ cup)
Heavy whipping cream (2 cups, cold)
Vanilla extract (½ teaspoon)
Kosher salt (1 pinch)
- For the Coffee Icing:
Unsalted butter (¾ cup)
Instant coffee granules (1 tablespoon)
Half-and-half (¼ cup, room temperature)
Vanilla extract (2 teaspoons)
Powdered sugar (4 cups)
Directions
- Bake the Coffee Cake
- Preheat your oven to 350°F. Grease two 8-inch round cake pans and line the bottoms with parchment paper for easy release.
- Melt the butter in a medium saucepan over medium heat. Add the instant coffee granules and hot water and whisk until fully dissolved. Remove from heat and set aside to cool slightly.
- In a large bowl, combine the flour, sugar, salt, and baking soda. Pour the warm butter coffee mixture over the dry ingredients and stir until fully combined for your Coffee Cream Layer Cake Recipe.
- In a separate bowl, whisk the buttermilk, eggs, and vanilla together until smooth. Pour this over the batter and whisk until smooth and well combined. The batter will be quite thin.
- Divide the batter evenly between the two prepared pans. Bake for 24-26 minutes until a toothpick comes out mostly clean. Cool completely in the pans, then turn out onto a wire rack.
- Using a long serrated knife, slice each cake layer horizontally in half, creating 4 equal layers total. Place all 4 layers flat on a parchment-lined baking sheet and freeze for at least 2 hours or overnight. Frozen layers are easier to work with.
- Make the Stabilized Whipped Cream Filling
- Place your stand mixer bowl and whisk attachment in the freezer for 15 minutes to chill thoroughly. This helps the cream whip better.
- Add the cream cheese and sugar to the chilled bowl. Beat on medium-high until completely smooth with no lumps remaining, about 2 minutes for your Coffee Cream Layer Cake Recipe.
- Pour in the cold heavy cream with the mixer off. Mix on medium until soft drooping peaks form. Scrape the bottom of the bowl to catch any unwhipped cream. Resume mixing on medium until firm stiff peaks form. Fold in the vanilla and salt gently with a spatula.
- Assemble the Naked Layer Cake
- Place the first frozen cake layer on a round white cake board. This makes moving and serving easier. Spread one third of the whipped cream filling over the surface in a thick generous layer, spreading all the way to and slightly beyond the edges so the white cream visibly protrudes beyond the cake diameter on all sides.
- Place the second layer on top and press gently to adhere. Spread another third of cream again slightly beyond the edges for that naked cake look. Add the third layer and remaining cream the same way, making sure cream extends past each layer for your Coffee Cream Layer Cake Recipe.
- Place the fourth and final layer on top, pressing gently. Do not apply any frosting or crumb coat to the sides. Leave the sides completely bare so the alternating coffee cake and white cream layers are fully visible from the exterior. This naked cake style is what makes it stunning. Refrigerate for 30 minutes to set.
- Create the Dramatic Coffee Drips
- Melt the butter over low heat in a medium saucepan. Add the instant coffee, half-and-half, and vanilla. Whisk until completely combined. Remove from heat.
- Whisk the powdered sugar into the butter mixture until completely smooth with no lumps remaining. The icing should be fluid and glossy. Cool for 5-10 minutes until slightly thickened but still very pourable.
- Remove the chilled cake from the refrigerator. Pour the entire coffee icing very slowly and generously from the center of the top, allowing it to pool and spread to the edges naturally, then cascade down the sides in long dramatic vertical drip streams all the way to the cake board for your Coffee Cream Layer Cake Recipe. Do not spread or touch the icing. Let gravity pull it down completely.
- Let the icing drips set at room temperature for 20 minutes, then refrigerate uncovered for at least 1 hour before slicing. This allows the icing to firm up while staying glossy.