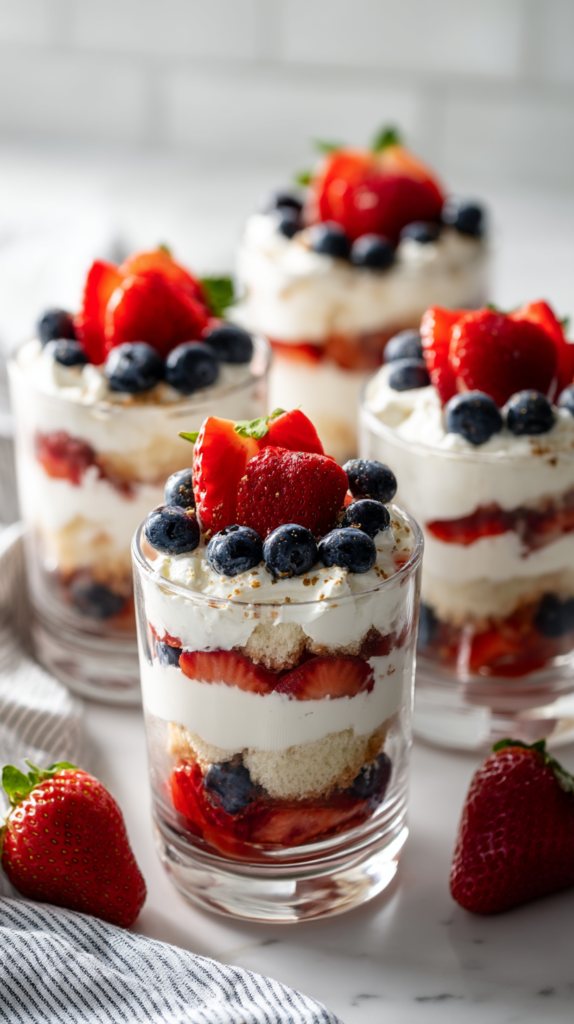
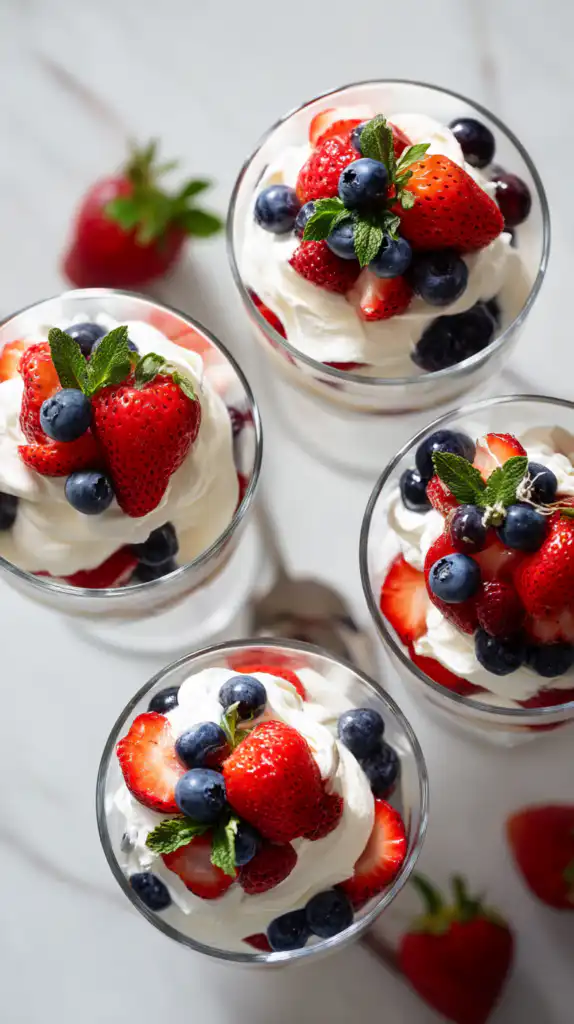
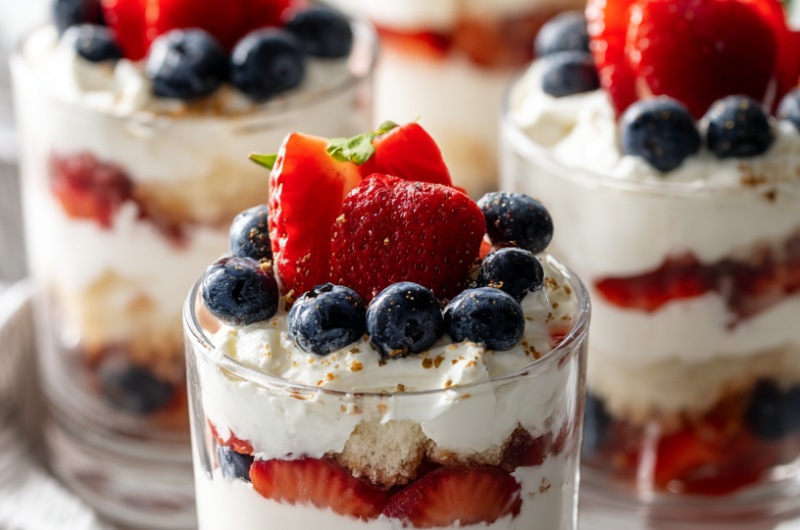
4th of July Trifle Cups are seriously the most gorgeous and delicious way to celebrate Independence Day because these individual no-bake desserts feature beautiful red, white, and blue layers of fresh berries, fluffy vanilla cream, and soft pound cake in clear cups that show off every patriotic stripe. The combination of sweet strawberries, juicy blueberries, rich cream cheese whipped cream, and tender cake creates layers of amazing flavor and texture that taste like summer in a cup. What makes these 4th of July Trifle Cups so perfect is how they’re super easy to assemble ahead of time, require no baking, and look incredibly impressive when you serve them at your Fourth of July party.
What Are 4th of July Trifle Cups?
4th of July Trifle Cups are individual no-bake layered desserts served in clear cups or glasses featuring red strawberries, white vanilla cream cheese filling, and blue blueberries layered with cubed pound cake or ladyfingers. Unlike traditional trifles served in large bowls, these personal portions make serving easy and show off the gorgeous patriotic colors. The cream layer combines cream cheese with whipped cream for stability and richness that won’t deflate. Think of them as elegant parfaits with the perfect balance of fresh fruit, creamy filling, and soft cake that create a refreshing summer dessert perfect for celebrating America’s birthday.
Ingredient Breakdown
Let me walk you through everything you need for these stunning 4th of July Trifle Cups. The ingredients are simple and create beautiful results.
For the Vanilla Cream Layer:
- Cream cheese (1 block or 8 ounces, softened): Must be room temperature for smooth texture in your 4th of July Trifle Cups. Creates stable rich base.
- Powdered sugar (1 cup): Sweetens cream without graininess. Dissolves smoothly into cream cheese.
- Vanilla extract (1 teaspoon): Pure vanilla is best for classic sweet flavor in filling.
- Cold heavy whipping cream (1 and 1/2 cups): Must be very cold for whipping to stiff peaks for your 4th of July Trifle Cups.
For the Layering:
- Fresh strawberries (12 ounces, hulled and sliced): Creates beautiful red layer. Must be ripe and sweet for your 4th of July Trifle Cups.
- Fresh blueberries (6 ounces): Provides gorgeous blue color. Rinse and dry thoroughly before using.
- Pound cake or ladyfingers (8 ounces, cubed): Pound cake is richer, ladyfingers are lighter for your 4th of July Trifle Cups. Choose based on preference.
- Strawberry jam or berry compote (optional): Adds extra fruity layer and flavor between cake and cream.
For Topping and Garnish:
- Extra fresh berries: For beautiful presentation on top of each cup.
- Fresh mint leaves (optional): Adds pop of green color and fresh aroma to your 4th of July Trifle Cups.
Step-by-Step Instructions
Creating these beautiful desserts is easier than you think. Let me guide you through making perfect 4th of July Trifle Cups every time.
Make the Vanilla Cream Layer
In a large mixing bowl, beat the softened cream cheese with the powdered sugar using an electric mixer on medium speed for your 4th of July Trifle Cups. Mix until the mixture is completely smooth with no lumps remaining in the cream cheese.
Add the vanilla extract to the cream cheese mixture and beat until fully incorporated. Scrape down the sides of the bowl to make sure everything is evenly combined.
Gradually pour in the cold heavy whipping cream while beating on medium-high speed for your 4th of July Trifle Cups. Start slowly and increase speed as the cream begins to thicken and increase in volume.
Continue beating until stiff peaks form when you lift the beaters. The finished cream should be light, fluffy, and stable enough to hold its shape when layered. This takes about 3 to 4 minutes of beating.
Prepare the Fresh Fruit
Rinse the strawberries and blueberries under cold running water for your 4th of July Trifle Cups. Pat them completely dry with paper towels because excess water will make the dessert watery.
Hull the strawberries by removing the green tops and white cores. Slice the strawberries into halves or quarters depending on their size. Smaller pieces layer better in the cups.
Set aside the prepared strawberries and whole blueberries in separate bowls for your 4th of July Trifle Cups. Keep them ready for easy assembly of the layers.
Assemble the Trifle Cups
Cut the pound cake or ladyfingers into small cubes about half an inch in size for your 4th of July Trifle Cups. Uniform pieces create even layers and better presentation in the clear cups.
Place a layer of cake cubes at the bottom of each clear plastic or glass cup. Press them down gently to create a solid base layer for building the trifle.
Spoon a generous layer of the prepared vanilla cream mixture over the cake cubes in each cup for your 4th of July Trifle Cups. Spread it evenly to the edges so every bite has cream.
Add a layer of sliced strawberries over the cream layer, arranging them so they’re visible through the sides of the clear cups. Follow with a layer of blueberries for that patriotic blue stripe.
Repeat the layers in the same order for your 4th of July Trifle Cups. Add more cake cubes, then cream, then strawberries, then blueberries until the cups are nearly full. You should get at least 2 complete layer cycles in each cup.
If using strawberry jam or berry compote, spread a thin layer between the cake and cream for extra fruity flavor. This is optional but adds wonderful moisture and taste.
Finish each cup with a final generous spoonful of vanilla cream on top for your 4th of July Trifle Cups. Smooth it slightly or leave it peaked for visual interest.
Garnish the top of each trifle cup with whole fresh strawberries and blueberries arranged attractively. Add a small sprig of fresh mint if using for that pop of green color.
Chill Before Serving
Cover the assembled 4th of July Trifle Cups loosely with plastic wrap. Make sure the wrap doesn’t touch the cream topping to avoid messing up the presentation.
Refrigerate the trifle cups for at least 1 hour before serving to allow the layers to set properly. The chilling time lets the cake soften slightly from the cream and the flavors blend together beautifully.
For best results, make your 4th of July Trifle Cups up to 1 day ahead and store them chilled until party time. Add the fresh berry garnish and mint just before serving for freshest appearance.
How to Serve
These 4th of July Trifle Cups are perfect for Independence Day parties, Memorial Day celebrations, summer barbecues, picnics, or any patriotic gathering where you want gorgeous individual desserts. Serve them cold directly from the refrigerator for best flavor and texture. The clear cups make them easy to grab and enjoy while mingling at parties. Provide small spoons so guests can dig through all the delicious layers. These trifle cups also work wonderfully for potlucks because they’re self-contained and travel well. Pair with iced tea, lemonade, or champagne for adults. Store covered in refrigerator for up to 2 days. The individual portions eliminate the need for cutting and plating, making cleanup incredibly easy.
Expert Tips
- Use room temperature cream cheese: Cold cream cheese creates lumps in your 4th of July Trifle Cups. Let it sit out 30 minutes before mixing.
- Beat to stiff peaks: Soft peaks will deflate and make layers runny. Beat cream until it holds firm peaks.
- Dry berries thoroughly: Excess water makes dessert watery and dilutes cream for your 4th of July Trifle Cups. Pat completely dry with paper towels.
- Use clear cups: Plastic or glass cups showcase beautiful layers. Mason jars work great too for rustic presentation.
- Cut uniform cake cubes: Even pieces create neat layers. About half inch cubes are perfect size for cups.
- Press berries to sides: Arrange strawberries and blueberries against cup sides for your 4th of July Trifle Cups. Makes colors visible from outside.
- Don’t overfill cups: Leave space at top for garnish and to prevent overflow when covering.
- Make ahead friendly: Assemble 1 day before for your 4th of July Trifle Cups. Add fresh garnish just before serving.
- Chill minimum 1 hour: Gives layers time to set and flavors to meld. Overnight is even better.
- Try different cakes: Angel food cake, sponge cake, or even brownies work instead of pound cake.
Common Questions
Can I make these trifle cups ahead of time?
Yes! 4th of July Trifle Cups are perfect for making ahead and actually taste better when made the day before because the flavors have time to meld together beautifully. Assemble completely, cover with plastic wrap, and refrigerate up to 24 hours before serving. Add the fresh berry garnish and mint sprigs just before serving for the freshest appearance and best presentation.
Can I use frozen berries instead of fresh?
Fresh berries work best for 4th of July Trifle Cups because frozen berries release too much liquid when thawed, which makes the dessert watery and can cause the layers to become soggy. If you must use frozen, thaw them completely, drain very well, and pat thoroughly dry with paper towels before using. The texture and appearance won’t be quite as nice as fresh.
What can I substitute for pound cake?
Ladyfingers create a lighter, more delicate texture for your 4th of July Trifle Cups. Angel food cake works beautifully for a fluffy option. Sponge cake, vanilla wafers, or even graham crackers can substitute. For chocolate lovers, brownie cubes add rich flavor. Choose based on your preference and what complements the fresh berry flavors best.
How do I prevent the cream from deflating?
The cream cheese base stabilizes the whipped cream in your 4th of July Trifle Cups, preventing deflation. Make sure to beat the heavy cream to stiff peaks, not just soft peaks. Use very cold cream straight from the refrigerator. Don’t overmix after the cream is whipped or you’ll break down the air bubbles. Chill the assembled cups promptly to help the cream stay firm and stable.
For more amazing Fourth of July dessert recipes and patriotic celebration ideas, check out my pinterest page where you’ll find expert tips and creative inspiration.
4th of July Trifle Cups
Course: DessertCuisine: AmericanDifficulty: Easy8
servings25
minutes378
kcalIngredients
- For the Vanilla Cream Layer:
Cream cheese (1 block or 8 ounces, softened)
Powdered sugar (1 cup)
Vanilla extract (1 teaspoon)
Cold heavy whipping cream (1 and 1/2 cups)
- For the Layering:
Fresh strawberries (12 ounces, hulled and sliced)
Fresh blueberries (6 ounces)
Pound cake or ladyfingers (8 ounces, cubed)
Strawberry jam or berry compote (optional)
- For Topping:
Extra fresh berries for garnish
Fresh mint leaves (optional)
Directions
- Make the Vanilla Cream Layer
- In large mixing bowl, beat softened cream cheese with powdered sugar using electric mixer on medium speed until completely smooth with no lumps.
- Add vanilla extract and beat until fully incorporated.
- Scrape down sides of bowl.
- Gradually pour in cold heavy whipping cream while beating on medium-high speed.
- Start slowly and increase speed as cream thickens.
- Continue beating until stiff peaks form when you lift beaters, about 3-4 minutes.
- Finished cream should be light, fluffy, and stable.
- Prepare the Fresh Fruit
- Rinse strawberries and blueberries under cold water.
- Pat completely dry with paper towels. Excess water makes dessert watery.
- Hull strawberries by removing green tops and white cores.
- Slice strawberries into halves or quarters depending on size.
- Smaller pieces layer better in cups.
- Set aside prepared strawberries and whole blueberries in separate bowls.
- Assemble the Trifle Cups
- Cut pound cake or ladyfingers into small cubes about 1/2 inch in size.
- Uniform pieces create even layers.
- Place layer of cake cubes at bottom of each clear plastic or glass cup.
- Press down gently to create solid base.
- Spoon generous layer of vanilla cream mixture over cake cubes.
- Spread evenly to edges.
- Add layer of sliced strawberries over cream, arranging them visible through cup sides.
- Follow with layer of blueberries for blue stripe.
- Repeat layers in same order: cake, cream, strawberries, blueberries.
- Continue until cups are nearly full. Should get at least 2 complete layer cycles.
- If using strawberry jam or berry compote, spread thin layer between cake and cream for extra flavor.
- Finish each cup with final generous spoonful of vanilla cream on top.
- Smooth slightly or leave peaked.
- Garnish top with whole fresh strawberries and blueberries arranged attractively.
- Add small sprig of fresh mint if using.
- Chill Before Serving
- Cover assembled cups loosely with plastic wrap.
- Don’t let wrap touch cream topping.
- Refrigerate for at least 1 hour before serving.
- Allows layers to set and flavors to blend.
- Can make up to 1 day ahead and store chilled.
- Add fresh berry garnish and mint just before serving.
Notes
- Use room temperature cream cheese to avoid lumps.
Beat cream to stiff peaks, not soft peaks. Soft peaks deflate.
Dry berries thoroughly with paper towels.
Use clear cups to showcase layers. Mason jars work great too.
Cut uniform cake cubes about 1/2 inch for neat layers.
Press berries against cup sides to make colors visible.
Don’t overfill cups. Leave space for garnish.
Make ahead 1 day before. Add garnish before serving.
Chill minimum 1 hour. Overnight is better.
Can substitute angel food cake, sponge cake, or brownies for pound cake.
Fresh berries work best. Frozen release too much liquid.
Ladyfingers create lighter texture than pound cake.
Store covered in refrigerator up to 2 days.