Oreo No-Bake Cheesecake Cups are honestly one of those desserts I keep coming back to when I need something quick, impressive, and absolutely dreamy without turning on the oven. The first time I made these, I was running low on time before a dinner party and needed something that felt special but took almost zero effort. Let me tell you, these little cups saved the night and had everyone asking for the recipe.
What Are Oreo No-Bake Cheesecake Cups?
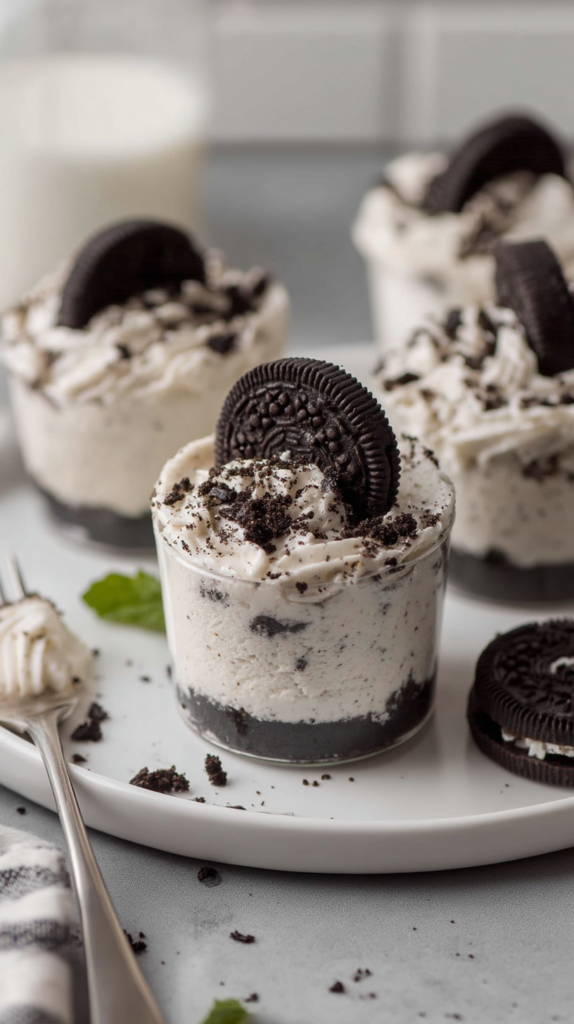
Oreo No-Bake Cheesecake Cups are individual, single-serving desserts made with a creamy cheesecake filling layered over crushed Oreo cookies. Think of them as mini no-bake cheesecakes served in cute little dishes instead of a whole pie. They are light, rich, and packed with that classic cookies-and-cream flavor everyone loves. Because there is no baking involved, they come together in minutes and just need a little time to chill in the fridge. Simple and so satisfying.
What You Will Need for Oreo No-Bake Cheesecake Cups
One of the best things about this recipe is how short the ingredient list is. You probably already have most of these in your kitchen right now. Here is everything you need to make six adorable cheesecake cups.
- 1 block (8 oz) cream cheese, softened – This is the base of your creamy filling. Make sure it is fully softened at room temperature so it blends nice and smooth without lumps. You can swap for a light or reduced-fat version if you prefer.
- 1 container (8 oz) Cool Whip or whipped topping – This is what makes the filling light and fluffy. If you want to skip Cool Whip, you can whip up about 1 cup of heavy cream with a little powdered sugar until stiff peaks form.
- 2/3 cup powdered sugar – Adds the perfect sweetness without being too heavy. Sift it before mixing to avoid any lumps in your filling.
- 1 tsp vanilla extract – Just a little splash of vanilla rounds out the flavor beautifully. Pure vanilla is always my go-to, but imitation works fine too.
- 24 to 26 Oreo cookies, plus more as desired – These are your crust AND your mix-in. You can use classic Oreos, double stuffed, or even golden Oreos for a fun twist. The more Oreos, honestly, the better.
That is truly it. Five ingredients and you are on your way to the most delicious no-bake cookies and cream dessert cups you have ever tasted. I always grab a couple of extra Oreos for topping too because why not?
Step-by-Step Instructions for Oreo No-Bake Cheesecake Cups
This recipe is so beginner-friendly. Even if you have never made a cheesecake in your life, you will nail this one on the first try. Follow these steps and you will have the most gorgeous little dessert cups ready to serve.
Step 1: Crush the Oreos
Place your Oreos into a zip-lock plastic bag and seal it tight. Then grab a rolling pin or a sturdy wooden spoon and crush them until you get a mix of fine crumbs and slightly bigger chunks. I love having a little texture in there because it gives every bite that satisfying crunch. Do not over-crush them into dust. You want some personality in those crumbs.
Step 2: Build the Base
Spoon about 1.5 to 2 tablespoons of the crushed Oreos into the bottom of each of your six small dessert dishes. Make sure your dishes are at least 3/4 cup to 1 cup in size so there is enough room for the creamy filling on top. Press the crumbs down lightly and then set them aside while you make the filling.
Step 3: Make the Cheesecake Filling
Using a hand mixer or a standing mixer, beat together the softened cream cheese and powdered sugar until the mixture is smooth and creamy. This usually takes about two minutes on medium speed. Add the vanilla extract and beat it in for another thirty seconds. Next, gently fold in the Cool Whip using a spatula. You want to keep it light and airy, so do not stir too aggressively. Finally, fold in the remaining crushed Oreos and mix until just combined.
Step 4: Fill the Cups
Divide the cheesecake filling evenly across all six dishes. Gently press the filling down onto the crushed Oreo base so everything sticks together nicely. Smooth out the tops with the back of a spoon or a small offset spatula if you have one.
Step 5: Chill and Serve
Place the cups in the refrigerator and let them chill for at least one hour. This gives the filling time to set and firm up into that perfect cheesecake texture. When you are ready to serve, top each cup with a generous swirl of whipped cream and more crushed Oreos. Then sit back and accept all the compliments coming your way.
Serving Ideas for Your No-Bake Cheesecake Cups
These cups are already stunning on their own, but you can take them up a notch with a few simple touches. I love setting up a little dessert toppings bar when I serve these at gatherings. Guests can add their own extras and it becomes a super fun experience. Here are a few ideas to try.
- Drizzle with chocolate sauce or hot fudge for extra richness
- Add fresh strawberries or blueberries for a fruity contrast
- Top with a whole Oreo cookie for a cute and Instagram-worthy presentation
- Dust with a little cocoa powder for a fancy touch
- Layer with a spoonful of strawberry or raspberry jam before adding the filling
Tips for the Perfect Oreo No-Bake Cheesecake Cups
- Soften your cream cheese fully: Cold cream cheese will leave lumps in your filling no matter how long you mix it. Pull it out of the fridge at least 30 minutes before you start.
- Do not over-mix after adding Cool Whip: Folding gently keeps the filling light and fluffy. Over-mixing deflates all that airiness and you end up with a dense, heavy texture.
- Chill for longer if possible: One hour is the minimum, but if you can let them chill for two to three hours or even overnight, the flavor and texture get even better.
- Use a piping bag for the filling: If you want to be a little fancy, scoop the filling into a piping bag and pipe it into the cups for a cleaner and more professional look.
- Save some Oreo crumbs for topping: Do not use all the crushed Oreos in the filling. Set aside a good handful for garnishing right before you serve.
- Make them ahead: These are perfect for meal prepping dessert. You can make them the night before and they stay fresh in the fridge for up to three days covered with plastic wrap.
Your Questions Answered
Can I make Oreo No-Bake Cheesecake Cups ahead of time?
Yes, absolutely! These are actually even better when made ahead. Prepare everything, fill the cups, cover them with plastic wrap, and refrigerate. They stay delicious for up to three days in the fridge. Just add the whipped cream and extra Oreo crumbs right before serving so they stay fresh and crunchy.
Can I use a different type of cookie for the base?
Totally! While Oreos give you that classic cookies and cream flavor, you can switch things up with chocolate wafer cookies, graham crackers, or even golden Oreos for a vanilla twist. The recipe is very flexible so feel free to play around with the base.
What if I do not have Cool Whip?
No problem at all. You can substitute Cool Whip with homemade whipped cream. Just beat about one cup of heavy whipping cream with two tablespoons of powdered sugar until stiff peaks form. Use it in the same way as the Cool Whip and you will get a similarly light and creamy filling.
Can I freeze these no-bake cheesecake cups?
Yes, you can! They actually turn into a frozen cheesecake-style treat when frozen. Wrap each cup tightly with plastic wrap before freezing. They will keep for up to one month. Thaw them in the fridge for a couple of hours before serving. Keep in mind that the Oreo base may soften a bit more after freezing and thawing, but they will still taste amazing.
Why These Cheesecake Cups Will Become Your Go-To Dessert
These Oreo No-Bake Cheesecake Cups check every single box. They are quick to make, need no oven time, and taste like something you ordered from a fancy bakery. The creamy, velvety filling paired with the chocolatey crunch of the Oreo base is just a match made in dessert heaven. They are also perfectly portioned so there is no awkward slicing involved. Everyone gets their own adorable little cup and feels totally special. Once you make these once, I promise you will be coming back to this recipe again and again.
If you want more fun no-bake dessert ideas like this one, come check out my Pinterest page where I share all my favorite recipes and sweet treat inspiration: Visit my Pinterest page here. You will definitely find something new to love over there.
Print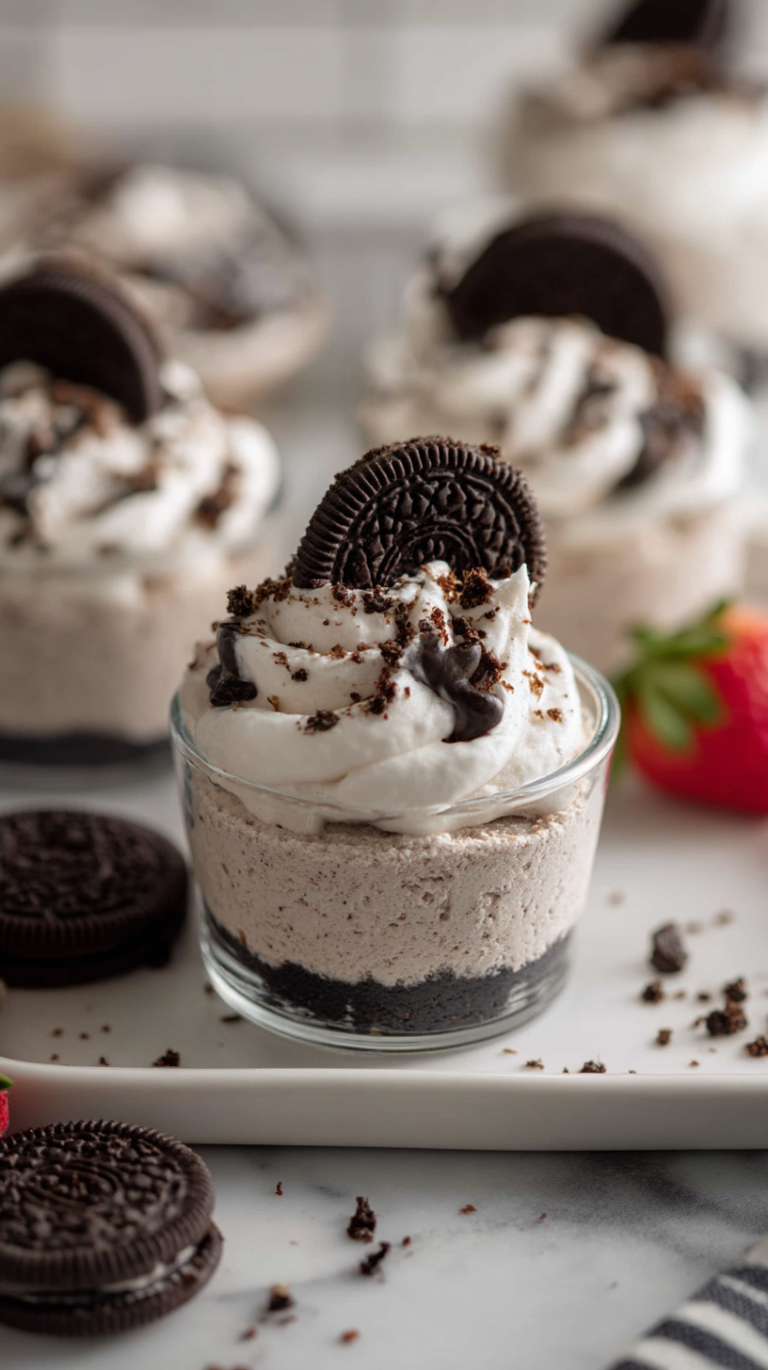
Oreo No-Bake Cheesecake Cups
These no-bake Oreo cheesecake cups are quick, creamy, and perfect for any occasion. Made with a crushed Oreo crust and a smooth vanilla cream cheese filling, they require no baking and magically solidify in the fridge. Ideal for gatherings, they deliver a rich cookies-and-cream experience in just minutes.
- Total Time: 15
- Yield: 6 cups 1x
Ingredients
1 block (8 oz) cream cheese, softened
1 container (8 oz) Cool Whip or 1 cup heavy cream plus 1 tbsp powdered sugar
2/3 cup powdered sugar
1 tsp vanilla extract
24 to 26 Oreo cookies, plus extra for topping
Instructions
Crush 24 Oreo cookies into fine crumbs using a food processor or bag and hammer
Divide ¾ of the crumbs into six foil cupcake liners or small cups
Press the crumbs evenly into the bottom of each liner to form a crust
In a bowl, blend softened cream cheese until smooth
Fold in Cool Whip or whipped cream
Stir in remaining ¼ of the crushed Oreos (minus 1-2 for optional topping)
Spoon the filling into prepared liners to be halfway full
Chill the cups for at least 2 hours before serving
Garnish with extra whole Oreos or optional cocoa powder
Notes
For vegan option, use plant-based cream cheese and non-dairy whipped topping
Chilling duration can be extended for longer set
Cover and store in fridge for up to 3 days
Serve chilled with optional fresh berries or sprinkles for added flair
- Prep Time: 15
- Category: Desserts
- Method: No-Bake
- Cuisine: American
- Diet: Vegetarian
Nutrition
- Serving Size: 1 cup
- Calories: 210
- Sugar: 18g
- Sodium: 150mg
- Fat: 12g
- Saturated Fat: 7g
- Carbohydrates: 28g
- Fiber: 1g
- Protein: 4g
- Cholesterol: 45mg