Chocolate Mousse Brownies are hands down one of the most decadent and impressive desserts I’ve ever created, and trust me when I say they’re worth every single minute of effort. The first time I made these layered beauties with their fudgy brownie base and silky chocolate mousse topping, Joe actually said it was the best thing I’d ever baked. Coming from someone who usually prefers savory food, that’s saying something. The combination of dense, chewy brownie with light, airy mousse creates this incredible texture experience that keeps you coming back for more.
What Are Chocolate Mousse Brownies?
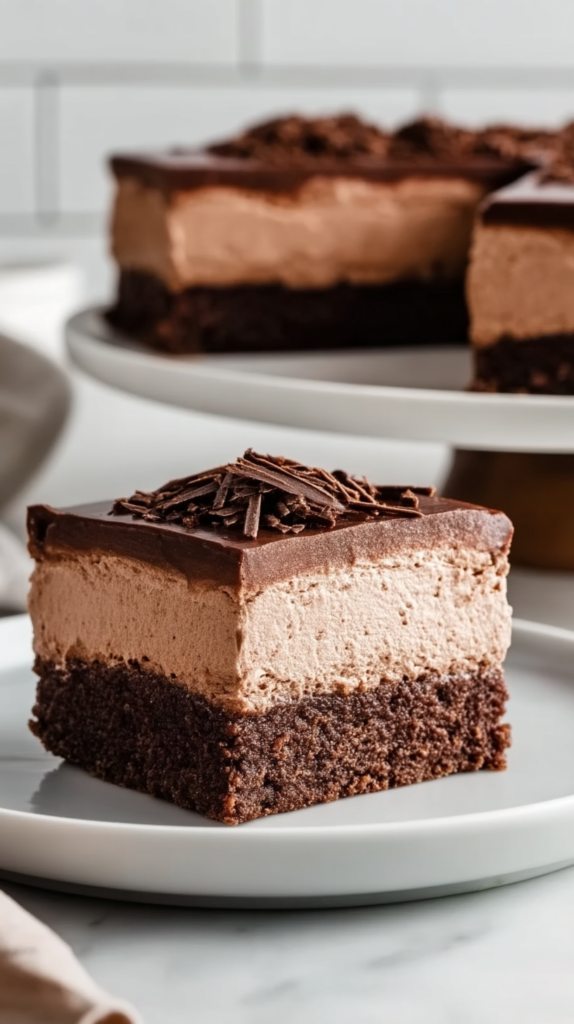
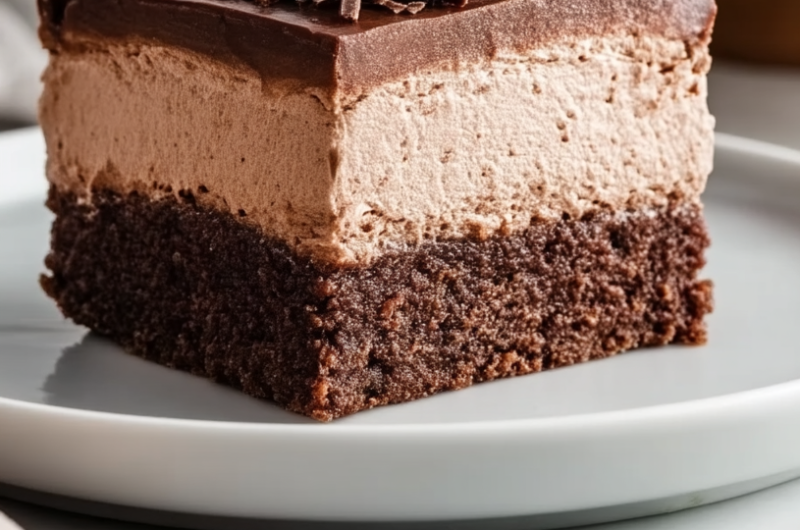
Chocolate Mousse Brownies are a layered dessert that combines the best of both worlds by starting with a rich, fudgy brownie base and topping it with layers of smooth, creamy chocolate mousse. What you see in the image are gorgeous squares with distinct layers that show off the contrast between the dense brownie and the fluffy mousse. They’re typically topped with chocolate shavings or cocoa powder for that final touch of elegance. Think of them as brownies that got dressed up for a fancy party, because they’re sophisticated enough for special occasions but still have that comforting brownie appeal.
Everything You’ll Need
Let’s go through all the ingredients for these amazing Chocolate Mousse Brownies. I’ve organized everything by component so you can see exactly what goes into each layer.
For the Brownie Base:
- Butter (¾ cup): Use unsalted butter so you can control the salt level. This creates that rich, fudgy texture we want.
- Semi-sweet chocolate chips (1 cup): Melted with the butter for maximum chocolate flavor. You could use dark chocolate for more intensity.
- Granulated sugar (1 cup): Sweetens the brownies and helps create that shiny, crackly top.
- Eggs (3 large): Room temperature eggs blend better. They give structure to the brownies without making them cakey.
- Vanilla extract (1 teaspoon): Always use pure vanilla because it really makes a difference.
- All-purpose flour (¾ cup): Just enough to give structure without making the brownies dry.
- Cocoa powder (¼ cup): Adds extra chocolate depth and that dark color.
- Salt (¼ teaspoon): Essential for balancing sweetness and making the chocolate pop.
For the Chocolate Mousse Layers:
- Semi-sweet chocolate (8 oz, chopped): This creates the base for your mousse layers. Quality matters because it’s the main flavor.
- Heavy whipping cream (2 cups, divided): You’ll use part to melt with chocolate and the rest gets whipped for that airy texture.
- Powdered sugar (¼ cup): Sweetens the whipped cream and helps stabilize it.
- Vanilla extract (1 teaspoon): Rounds out the chocolate flavor beautifully.
- Gelatin (1 teaspoon, optional): Helps the mousse hold its shape for cleaner slices. You can skip this for a softer texture.
- Cocoa powder for lighter layer (2 tablespoons): Creates that beautiful two-tone effect you see in the photo.
For Topping:
- Chocolate shavings: Use a vegetable peeler on a chocolate bar to create beautiful curls.
- Cocoa powder for dusting (optional): Adds a professional finishing touch.
Building Your Chocolate Mousse Brownies
Alright, let’s make these stunning layered treats. Don’t be intimidated by the multiple steps because each one is actually quite simple. The key is just giving yourself enough time for everything to set properly.
Prepare Your Pan
Preheat your oven to 350°F. Line a 9×13 inch baking pan with parchment paper, leaving some overhang on the sides. This overhang is your secret weapon for lifting the brownies out later for clean cuts. Spray the parchment lightly with cooking spray.
Make the Brownie Base
Melt the butter and chocolate chips together in a microwave-safe bowl in 30-second intervals, stirring between each, until completely smooth. Let it cool for about 5 minutes so it doesn’t cook the eggs when you add them.
Whisk in the sugar until well combined, then add the eggs one at a time, mixing well after each addition. Stir in the vanilla. In a separate bowl, whisk together the flour, cocoa powder, and salt. Fold the dry ingredients into the chocolate mixture just until no streaks of flour remain.
Pour the batter into your prepared pan and spread it evenly. Bake for 25-30 minutes until a toothpick inserted in the center comes out with just a few moist crumbs. You want fudgy Chocolate Mousse Brownies, not cakey ones. Let them cool completely in the pan.
Create the First Mousse Layer
Melt 4 oz of the chocolate with ¼ cup of heavy cream in a heatproof bowl set over simmering water, stirring until smooth. Remove from heat and let it cool to room temperature. This is important because if it’s too hot, it’ll deflate your whipped cream.
In a separate bowl, whip 1 cup of heavy cream with 2 tablespoons of powdered sugar and ½ teaspoon vanilla until stiff peaks form. Take about a third of the whipped cream and fold it into the cooled chocolate mixture to lighten it. Then gently fold in the remaining whipped cream until no white streaks remain.
Spread this first mousse layer evenly over the cooled brownie base. Refrigerate for at least 1 hour until set before adding the next layer.
Add the Lighter Mousse Layer
Repeat the same process with the remaining 4 oz of chocolate and ¼ cup of cream. This time, when you fold in the whipped cream, also add 2 tablespoons of cocoa powder for that beautiful lighter brown color you see in the photo.
Spread this lighter mousse over the set first layer. The two-tone effect makes your Chocolate Mousse Brownies look absolutely bakery-quality. Refrigerate for another 2-3 hours, or preferably overnight, until completely set and firm.
Top and Slice
Once your mousse layers are completely set, use the parchment paper overhang to lift the whole thing out of the pan. Top with chocolate shavings for that gorgeous finish. Use a sharp knife dipped in hot water and wiped clean between each cut for those perfect, Instagram-worthy slices with distinct layers.
Serving These Beauties
These Chocolate Mousse Brownies are rich and indulgent, so smaller portions are perfect. I love serving them chilled straight from the fridge because the mousse has the best texture when cold. They’re elegant enough for dinner parties, special occasions, or holidays. A dollop of whipped cream on the side is lovely but honestly optional because they’re already so decadent. Pair them with coffee or a glass of cold milk for the ultimate chocolate experience. For a dessert spread, serve alongside other chocolate treats like my Cookie Dough Brownie Cake for variety.
Pro Tips for Perfect Results
- Cool everything completely: The brownie must be completely cool before adding mousse, and each mousse layer must set before adding the next. Patience here prevents layers from mixing.
- Don’t overbake the brownies: Pull them when there are still moist crumbs on the toothpick. They continue cooking as they cool, and overbaked brownies are dry instead of fudgy.
- Fold gently but thoroughly: When incorporating whipped cream into chocolate, use a folding motion to maintain airiness. Make sure no white streaks remain in your Chocolate Mousse Brownies.
- Use quality chocolate: Since chocolate is the star, don’t skimp on quality. The better your chocolate, the better your final result.
- Chill overnight for best results: While you can serve after a few hours, overnight chilling gives you the cleanest cuts and best texture.
- Clean cuts every time: Hot water on your knife between cuts is the secret to those professional-looking slices. Wipe the knife clean too.
- Make ahead friendly: These actually taste better the next day after flavors meld. Make them up to 2 days ahead and store covered in the fridge.
- Stabilize if needed: If making in warm weather, that optional gelatin really helps the mousse hold its shape better.
Your Questions Answered
Can I make these without eggs in the mousse?
Yes! This particular version of Chocolate Mousse Brownies uses a no-egg mousse made with whipped cream, which is actually more stable and beginner-friendly than traditional French mousse. The eggs are only in the brownie base, which gets baked, so there are no food safety concerns.
Why are my mousse layers not setting?
The most common reason is adding the chocolate mixture when it’s still too warm, which deflates the whipped cream. Make sure the melted chocolate cools to room temperature before folding it in. Also, make sure you’re whipping the cream to stiff peaks. If problems persist, add that optional gelatin for extra stability.
Can I freeze Chocolate Mousse Brownies?
You can freeze the brownie base on its own, but I don’t recommend freezing the assembled dessert because the mousse texture changes when thawed, becoming slightly grainy instead of smooth. For best results, freeze just the brownie layer and make the mousse fresh when ready to serve.
How do I get two different colored mousse layers?
The trick is adding cocoa powder to one layer but not the other. The layer with added cocoa powder will be lighter brown, while the one without stays darker. You can also use milk chocolate for one layer and dark chocolate for the other to create different shades in your Chocolate Mousse Brownies.
Why These Are Amazing
Chocolate Mousse Brownies are the ultimate chocolate lover’s dessert because you get multiple textures and depths of chocolate flavor in every bite. The dense, fudgy brownie contrasts beautifully with the light, airy mousse layers. They look incredibly impressive and bakery-quality but are actually achievable at home with a little patience. The make-ahead nature makes them perfect for entertaining because you can prepare them the day before and just slice when ready to serve. Whether you’re hosting a dinner party, celebrating a special occasion, or just want to treat yourself, these deliver every single time.
For more layered chocolate dessert ideas and baking inspiration, check out my Pinterest page where I share all my favorite treats.
Chocolate Mousse Brownies
Course: DessertCuisine: American, FrenchDifficulty: Intermediate48
servings30
minutes40
minutes330
kcalIngredients
- For the Brownie Base:
Butter (¾ cup)
Semi-sweet chocolate chips (1 cup)
Granulated sugar (1 cup)
Eggs (3 large)
Vanilla extract (1 teaspoon)
All-purpose flour (¾ cup)
Cocoa powder (¼ cup)
Salt (¼ teaspoon)
- For the Chocolate Mousse Layers:
Semi-sweet chocolate (8 oz, chopped)
Heavy whipping cream (2 cups, divided)
Powdered sugar (¼ cup)
Vanilla extract (1 teaspoon)
Gelatin (1 teaspoon, optional)
Cocoa powder for lighter layer (2 tablespoons)
Directions
- Prepare Your Pan
- Preheat your oven to 350°F. Line a 9×13 inch baking pan with parchment paper, leaving some overhang on the sides. This overhang is your secret weapon for lifting the brownies out later for clean cuts. Spray the parchment lightly with cooking spray.
- Make the Brownie Base
- Melt the butter and chocolate chips together in a microwave-safe bowl in 30-second intervals, stirring between each, until completely smooth. Let it cool for about 5 minutes so it doesn’t cook the eggs when you add them.
- Whisk in the sugar until well combined, then add the eggs one at a time, mixing well after each addition. Stir in the vanilla. In a separate bowl, whisk together the flour, cocoa powder, and salt. Fold the dry ingredients into the chocolate mixture just until no streaks of flour remain.
- Pour the batter into your prepared pan and spread it evenly. Bake for 25-30 minutes until a toothpick inserted in the center comes out with just a few moist crumbs. You want fudgy Chocolate Mousse Brownies, not cakey ones. Let them cool completely in the pan.
- Create the First Mousse Layer
- Melt 4 oz of the chocolate with ¼ cup of heavy cream in a heatproof bowl set over simmering water, stirring until smooth. Remove from heat and let it cool to room temperature. This is important because if it’s too hot, it’ll deflate your whipped cream.
- In a separate bowl, whip 1 cup of heavy cream with 2 tablespoons of powdered sugar and ½ teaspoon vanilla until stiff peaks form. Take about a third of the whipped cream and fold it into the cooled chocolate mixture to lighten it. Then gently fold in the remaining whipped cream until no white streaks remain.
- Spread this first mousse layer evenly over the cooled brownie base. Refrigerate for at least 1 hour until set before adding the next layer.
- Add the Lighter Mousse Layer
- Repeat the same process with the remaining 4 oz of chocolate and ¼ cup of cream. This time, when you fold in the whipped cream, also add 2 tablespoons of cocoa powder for that beautiful lighter brown color you see in the photo.
- Spread this lighter mousse over the set first layer. The two-tone effect makes your Chocolate Mousse Brownies look absolutely bakery-quality. Refrigerate for another 2-3 hours, or preferably overnight, until completely set and firm.
- Top and Slice
- Once your mousse layers are completely set, use the parchment paper overhang to lift the whole thing out of the pan. Top with chocolate shavings for that gorgeous finish. Use a sharp knife dipped in hot water and wiped clean between each cut for those perfect, Instagram-worthy slices with distinct layers.