
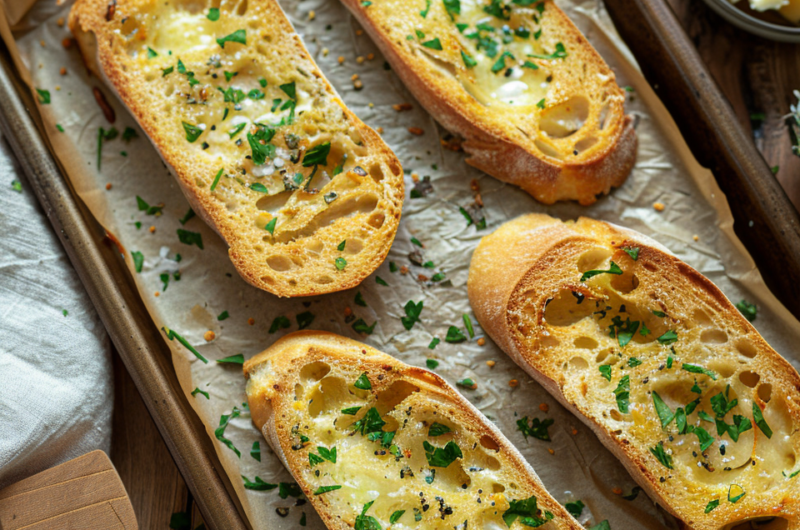
Garlic Bread is one of those things I could honestly eat every single day and never get tired of. There’s something magical about warm, buttery bread with roasted garlic and herbs that just makes everything better. My partner Joe isn’t a huge fan because he says it’s too garlicky for him, but I absolutely love it. The first time I made homemade garlic bread instead of buying the frozen kind, I literally couldn’t believe the difference. It’s crispy on the outside, soft and pillowy on the inside, and packed with so much garlicky flavor that everyone always asks for seconds. Plus, it’s ridiculously easy to make and ready in under 15 minutes.
What Makes Garlic Bread So Special?
So what exactly is garlic bread? It’s basically sliced bread that’s been slathered with a mixture of butter, fresh garlic, and herbs, then baked or toasted until golden and crispy. The butter melts into the bread while the garlic gets all fragrant and delicious. You can make it with Italian bread, French baguette, or even sourdough. Some people add cheese for extra indulgence, while others keep it classic with just butter and garlic. Either way, it’s the perfect side dish for pasta, soups, salads, or honestly just eating straight out of the oven.
Simple Ingredients You’ll Need
Let’s talk about what goes into making the best homemade Garlic Bread. The ingredient list is super short, which is part of why I love this recipe so much. Quality matters here though, especially with the butter and garlic.
For Classic Garlic Bread:
- Italian bread or French baguette (1 large loaf): Fresh bread works best, but day-old bread is actually perfect because it soaks up the butter mixture without getting soggy. You could also use sourdough or ciabatta.
- Butter (½ cup, softened): Use real butter, not margarine. Salted or unsalted both work, but I prefer salted for extra flavor. Let it soften at room temperature so it’s easy to spread.
- Garlic cloves (4-6, minced): Fresh garlic is absolutely essential here. The jarred stuff just doesn’t have the same punch. Adjust the amount based on how much you love garlic.
- Fresh parsley (3 tablespoons, chopped): This adds color and a fresh, herby flavor. You can use dried parsley in a pinch, but fresh is so much better.
- Salt (½ teaspoon): Just a pinch to bring out all the flavors. Skip this if you’re using salted butter.
- Black pepper (¼ teaspoon, optional): Adds a subtle kick that I really like.
For Cheesy Garlic Bread (Optional Add-ons):
- Mozzarella cheese (1 cup, shredded): Melts beautifully and gets all gooey and stretchy. Low-moisture mozzarella works best so it doesn’t make the bread soggy.
- Parmesan cheese (½ cup, grated): Adds a nutty, salty flavor and helps the top get nice and golden. Always use freshly grated for the best taste.
- Italian seasoning (1 teaspoon, optional): A blend of dried herbs like oregano, basil, and thyme for extra Italian flavor.
Easy Steps to Make It
Alright, let’s make some incredible homemade Garlic Bread. This process is so simple that even if you’ve never baked anything before, you’ll nail this on your first try. I promise.
Preheat and Prep
First things first, preheat your oven to 400°F. While that’s heating up, line a large baking sheet with aluminum foil or parchment paper. This makes cleanup super easy and prevents the butter from making a mess on your pan.
Slice Your Bread
Cut your bread loaf in half lengthwise so you have two long halves. If you’re using a baguette, you can also slice it into individual pieces, but I prefer the halves because they’re easier to spread and the insides stay soft while the edges get crispy.
Make the Garlic Butter
In a medium bowl, mix together the softened butter, minced garlic, chopped parsley, salt, and black pepper. Stir everything together until it’s well combined and the garlic is evenly distributed throughout the butter. The mixture should be smooth and spreadable. If your butter is too hard, pop it in the microwave for just 5-10 seconds.
Spread the Magic
Place your bread halves cut-side up on the prepared baking sheet. Spread the garlic butter mixture generously over the cut sides of the bread. Don’t be shy here because this is where all the flavor comes from. Make sure to get it all the way to the edges so every bite is delicious.
If you’re making cheesy garlic bread, sprinkle the mozzarella and Parmesan cheese evenly over the buttered bread at this point. You can also add a sprinkle of Italian seasoning on top for extra flavor.
Bake Until Golden
Bake your Garlic Bread in the preheated oven for 10-12 minutes until the edges are golden brown and crispy. If you added cheese, bake until it’s melted and bubbly. For extra crispy tops, turn on the broiler for the last 1-2 minutes, but watch it closely because it can burn quickly.
Slice and Serve
Remove the bread from the oven and let it cool for just a minute or two. Then slice it into individual pieces. I like to cut mine into thick slices, about 1-2 inches wide. Serve immediately while it’s still warm and the butter is melted into every crevice.
Perfect Pairings
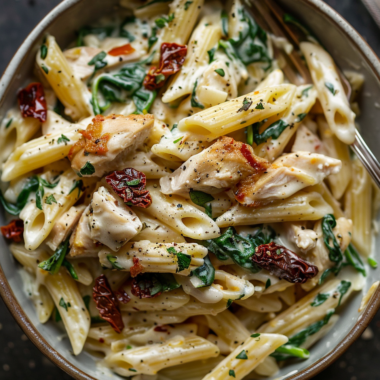
Homemade Garlic Bread is the ultimate side dish for so many meals. It’s absolutely perfect alongside any pasta dish, especially my Creamy Tuscan Chicken Pasta, Marry Me Pasta, or Boursin Pasta. The buttery, garlicky bread is ideal for soaking up all those creamy sauces. It also pairs beautifully with soups, salads, or even as an appetizer at parties. Honestly, I’ve been known to eat it as a snack all by itself because it’s just that good.
Tips for the Best Garlic Bread
- Use fresh garlic always: I cannot stress this enough. Fresh minced garlic has so much more flavor than the pre-minced stuff in jars. It’s worth the extra 30 seconds to mince it yourself.
- Soften your butter properly: The butter should be soft enough to spread easily but not melted. Leave it at room temperature for about 30 minutes before starting. If you’re in a hurry, microwave it for 5-10 seconds.
- Don’t skimp on the garlic butter: More is better when it comes to the garlic butter mixture. Make sure every inch of bread is covered for maximum flavor in every bite.
- Toast it perfectly: Watch your bread closely in the last few minutes of baking. You want golden brown edges, not burnt ones. Every oven is different, so adjust timing as needed.
- Make it ahead: You can prepare the garlic butter mixture and spread it on the bread up to a day ahead. Wrap it tightly in foil and refrigerate, then bake when ready to serve.
- Freeze for later: Garlic Bread freezes beautifully. Prepare it completely, wrap tightly in foil, and freeze for up to 3 months. Bake from frozen, adding a few extra minutes to the baking time.
- Try different breads: While Italian bread is classic, sourdough adds a tangy flavor, ciabatta has great texture, and even thick-sliced sandwich bread works in a pinch.
- Add extra toppings: Fresh herbs like basil or oregano, red pepper flakes for heat, or even a drizzle of olive oil after baking all make great additions.
Common Garlic Bread Questions
Can I make Garlic Bread in an air fryer?
Can I make GaAbsolutely! Air fryer garlic bread is amazing and gets super crispy. Preheat your air fryer to 350°F, place the buttered bread slices in a single layer (you may need to work in batches), and cook for 5-7 minutes until golden and crispy. Keep an eye on it because air fryers can vary in temperature and it might cook faster than you expect.rlic Bread in an air fryer?
How do I store leftover Garlic Bread?
Store leftover garlic bread in an airtight container or wrapped tightly in aluminum foil at room temperature for up to 2 days, or in the fridge for up to 5 days. To reheat, wrap it in foil and warm in a 350°F oven for about 10 minutes, or toast it in a toaster oven until heated through. The microwave makes it soggy, so avoid that if possible.
What’s the difference between garlic bread and Texas toast?
Great question! Texas toast is made with thick-sliced white bread and is usually softer and more buttery. Garlic Bread is typically made with Italian or French bread and has a crispier texture with more emphasis on the garlic flavor. Both are delicious, just slightly different styles. For more bread inspiration and techniques, King Arthur Baking has an excellent bread recipe collection.
Can I use garlic powder instead of fresh garlic?
You can, but the flavor won’t be quite as bold and fresh. If you must use garlic powder, use about 1-2 teaspoons mixed into the butter. Fresh garlic gives you that punchy, aromatic flavor that really makes homemade Garlic Bread special, so I’d recommend taking the extra minute to mince fresh cloves whenever possible.
Why This Recipe Is a Game Changer
Honestly, once you make Garlic Bread from scratch, you’ll never go back to the frozen stuff. The difference is night and day. This homemade version is buttery, garlicky, and has the perfect balance of crispy edges and soft middle. It takes literally 15 minutes from start to finish, uses simple ingredients you probably already have, and makes everything taste better. Whether you’re serving it with pasta, soup, or just want a delicious snack, this garlic bread delivers every single time. Plus, your whole house will smell absolutely amazing while it bakes.
My Garlic Bread Journey
My first attempt at making Garlic Bread was definitely a learning curve. I forgot to soften the butter, so it was impossible to spread evenly, and some parts of the bread were drowning in garlic while others had barely any. But even that messy first try tasted way better than frozen garlic bread. Now I make this at least once a week because everyone requests it.
Garlic Bread
Course: Bread, MainCuisine: MediterraneanDifficulty: Easy6-8
servings8
hours50
minutes10
minutes180
kcalIngredients
- For Classic Garlic Bread:
Italian bread or French baguette (1 large loaf): Fresh bread works best, but day-old bread is actually perfect because it soaks up the butter mixture without getting soggy. You could also use sourdough or ciabatta.
Butter (½ cup, softened): Use real butter, not margarine. Salted or unsalted both work, but I prefer salted for extra flavor. Let it soften at room temperature so it’s easy to spread.
Garlic cloves (4-6, minced): Fresh garlic is absolutely essential here. The jarred stuff just doesn’t have the same punch. Adjust the amount based on how much you love garlic.
Fresh parsley (3 tablespoons, chopped): This adds color and a fresh, herby flavor. You can use dried parsley in a pinch, but fresh is so much better.
Salt (½ teaspoon): Just a pinch to bring out all the flavors. Skip this if you’re using salted butter.
Black pepper (¼ teaspoon, optional): Adds a subtle kick that I really like.
- For Cheesy Garlic Bread (Optional Add-ons):
Mozzarella cheese (1 cup, shredded): Melts beautifully and gets all gooey and stretchy. Low-moisture mozzarella works best so it doesn’t make the bread soggy.
Parmesan cheese (½ cup, grated): Adds a nutty, salty flavor and helps the top get nice and golden. Always use freshly grated for the best taste.
Italian seasoning (1 teaspoon, optional): A blend of dried herbs like oregano, basil, and thyme for extra Italian flavor.
Directions
- Preheat and Prep
- First things first, preheat your oven to 400°F. While that’s heating up, line a large baking sheet with aluminum foil or parchment paper. This makes cleanup super easy and prevents the butter from making a mess on your pan.
- Slice Your Bread
- Cut your bread loaf in half lengthwise so you have two long halves. If you’re using a baguette, you can also slice it into individual pieces, but I prefer the halves because they’re easier to spread and the insides stay soft while the edges get crispy.
- Make the Garlic Butter
- In a medium bowl, mix together the softened butter, minced garlic, chopped parsley, salt, and black pepper. Stir everything together until it’s well combined and the garlic is evenly distributed throughout the butter. The mixture should be smooth and spreadable. If your butter is too hard, pop it in the microwave for just 5-10 seconds.
- Spread the Magic
- Place your bread halves cut-side up on the prepared baking sheet. Spread the garlic butter mixture generously over the cut sides of the bread. Don’t be shy here because this is where all the flavor comes from. Make sure to get it all the way to the edges so every bite is delicious.
- If you’re making cheesy garlic bread, sprinkle the mozzarella and Parmesan cheese evenly over the buttered bread at this point. You can also add a sprinkle of Italian seasoning on top for extra flavor.
- Bake Until Golden
- Bake your Garlic Bread in the preheated oven for 10-12 minutes until the edges are golden brown and crispy. If you added cheese, bake until it’s melted and bubbly. For extra crispy tops, turn on the broiler for the last 1-2 minutes, but watch it closely because it can burn quickly.
- Slice and Serve
- Remove the bread from the oven and let it cool for just a minute or two. Then slice it into individual pieces. I like to cut mine into thick slices, about 1-2 inches wide. Serve immediately while it’s still warm and the butter is melted into every crevice.