Oreo Earthquake Cake is absolutely the most decadent and over-the-top chocolate dessert I’ve ever created, and I love how it combines layers of whole Oreos, chocolate cake, cream cheese swirl, and chocolate ganache all in one outrageous pan. The combination of crunchy cookie base, moist chocolate cake, tangy cream cheese ribbons, and rich ganache topping creates the ultimate Oreo lover’s dream dessert. What makes this earthquake cake so special is how the cream cheese swirl creates those signature cracks and fissures on top that look like earthquake damage, hence the name.
What Is Oreo Earthquake Cake?
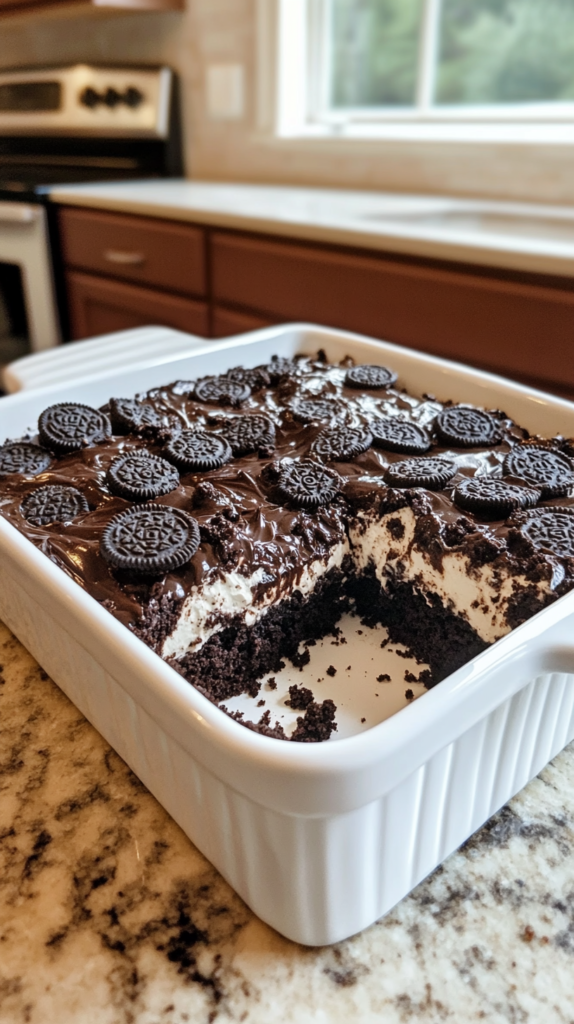
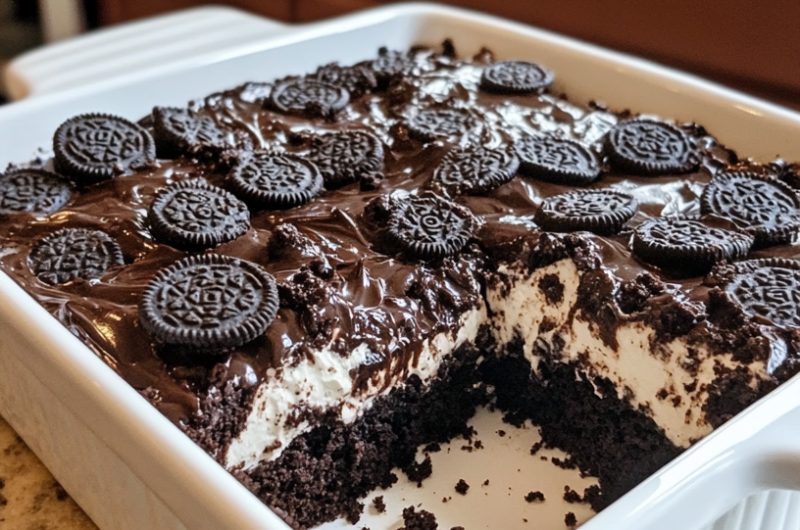
Oreo Earthquake Cake is a layered sheet cake dessert featuring a whole Oreo cookie base, chocolate cake layer, cream cheese swirl that cracks during baking, and chocolate ganache topping studded with more Oreos. What makes this cake special is the cream cheese mixture that gets dolloped on top before baking and creates those characteristic earthquake cracks as it bakes and settles. The multiple Oreo layers add crunch and cookies-and-cream flavor throughout. Think of it as the ultimate potluck showstopper that combines everything people love about Oreos and chocolate cake in one impressive dessert.
Ingredients You’ll Need
Let’s break down all the ingredients for this delicious Oreo Earthquake Cake. I’ve organized everything by layer.
For the Chocolate Cake Base:
- Chocolate cake mix (1 box, 432g or 15.25 oz): Prepared according to package directions for your Oreo Earthquake Cake.
- Whole Oreo cookies (24 cookies): For the base layer. Regular Oreos work best.
For the Cream Cheese Swirl:
- Cream cheese (226g or 8 oz, softened to room temperature): Must be soft for smooth mixing.
- Unsalted butter (113g or 1/2 cup, melted): Adds richness to swirl for your Oreo Earthquake Cake.
- Confectioners sugar (312g or 2 1/2 cups): Sweetens and thickens the cream cheese layer.
- Vanilla extract (1 teaspoon): Flavor enhancer.
- Kosher salt (1/4 teaspoon): Balances sweetness.
For the Chocolate Ganache Topping:
- Semi-sweet chocolate (200g or 7 oz, finely chopped): Quality chocolate makes better ganache for your Oreo Earthquake Cake.
- Heavy cream (180ml or 3/4 cup): Creates silky ganache.
For Decoration:
- Whole Oreo cookies (14 to 16 cookies): For placing on top of ganache.
Creating Your Earthquake Cake
Alright, let’s make this amazing cake. Each layer builds on the last for ultimate flavor.
Assembly
Preheat oven to 175°C or 350°F. Spray a 23x33cm or 9×13 inch baking dish generously with nonstick cooking spray for your Oreo Earthquake Cake.
Prepare the chocolate cake mix batter according to the package directions and set aside. Arrange 24 whole Oreo cookies in a single even layer covering the entire bottom of the prepared dish.
Pour and spread the chocolate cake batter evenly over the Oreo base layer. Make sure all cookies are covered.
Cream Cheese Swirl
In a large bowl, combine the softened cream cheese, melted butter, confectioners sugar, vanilla extract, and salt for your Oreo Earthquake Cake. Beat until completely smooth with no lumps.
Drop very large generous spoonfuls of the cream cheese mixture all over the top of the cake batter, using the entire mixture. Don’t worry about being neat, this creates the earthquake effect.
Use a knife or skewer to gently drag through the dollops in slow deliberate passes to create a visible marble swirl. Do not overswirl or you’ll blend it completely into the batter.
Baking
Bake for 55 to 60 minutes until the center is set and a toothpick inserted comes out mostly clean for your Oreo Earthquake Cake. The cream cheese swirl will crack and create earthquake-like fissures.
Remove from the oven and allow to cool for 20 minutes before adding ganache.
Chocolate Ganache Topping
Heat the heavy cream until just simmering and pour over the chopped chocolate. Let sit 2 minutes then stir until completely smooth and glossy for your Oreo Earthquake Cake.
Allow to cool for 10 minutes until slightly thickened but still pourable. Pour the ganache evenly over the entire top surface of the cooled cake, spreading it smoothly to the edges.
While the ganache is still warm and glossy, place whole Oreo cookies flat across the entire top surface, spacing them evenly in rows. Allow the ganache to set for 30 minutes before slicing and serving.
Serving This Showstopper
This Oreo Earthquake Cake is best served at room temperature or slightly chilled, cut into squares that reveal the layers of Oreos, chocolate cake, cream cheese swirl, and ganache topping. I love serving it at potlucks, birthday parties, or any gathering where you need a dessert that feeds a crowd and looks absolutely stunning. The combination of all the chocolate and Oreo layers creates incredible richness. For a complete chocolate dessert spread, serve it alongside other treats like my Triple Chocolate Layer Cake to give guests variety. Store covered at room temperature for 2 days or refrigerate for up to 5 days.
Pro Tips for Success
- Generously spray pan: Prevents sticking for your Oreo Earthquake Cake. Use nonstick spray liberally.
- Cover pan bottom completely with Oreos: No gaps. Pack them tightly for solid cookie base.
- Room temperature cream cheese essential: Cold cream cheese won’t mix smooth. Let soften 1 hour.
- Don’t overmix cream cheese: Beat just until smooth. Overmixing adds too much air.
- Large generous dollops: Big spoonfuls create better earthquake cracks than small ones.
- Don’t overswirl: Light swirling creates marble effect for your Oreo Earthquake Cake. Too much blends it.
- Check doneness at 55 minutes: Ovens vary. Center should be set but not overbaked.
- Cool before ganache: Hot cake melts ganache too thin. 20 minutes cooling essential.
- Quality chocolate for ganache: Better chocolate makes smoother silkier topping.
- Place Oreos while ganache warm: They stick better to warm ganache for your Oreo Earthquake Cake.
Common Questions Answered
Can I use homemade chocolate cake?
Yes! Use your favorite chocolate cake recipe that makes enough for a 9×13 inch pan for your Oreo Earthquake Cake. The cake mix is just convenient but homemade works great too.
Why is it called earthquake cake?
The cream cheese swirl cracks and creates fissures as it bakes, looking like earthquake damage on the surface. The shifting and settling of layers also mimics earthquake movement, hence the name.
Can I make this ahead?
Yes! Bake the cake completely with ganache and Oreos up to 2 days ahead for your Oreo Earthquake Cake. Store covered at room temperature or refrigerate. The flavors actually improve after a day as everything melds together.
Do the bottom Oreos get soggy?
They soften slightly from the cake batter moisture but stay intact and add amazing cookies and cream flavor. They won’t be crunchy like fresh Oreos but that’s part of the appeal.
Why This Recipe Works
Oreo Earthquake Cake is the ultimate crowd-pleasing dessert because it combines multiple beloved elements into one outrageous pan that serves a crowd. The whole Oreo base adds cookies and cream flavor throughout. The chocolate cake stays moist and rich. The cream cheese swirl creates visual drama with those earthquake cracks while adding tangy contrast to all the chocolate. The ganache topping with more Oreos makes it look bakery-professional. Whether you’re feeding a party, bringing dessert to a potluck, or just need to impress serious Oreo lovers, this cake delivers incredible chocolate and cookie flavor with stunning presentation every single time.
For more earthquake cake variations and chocolate dessert ideas, check out King Arthur Baking for expert techniques and inspiration.
Oreo Earthquake Cake
Course: Dessert, Snacks, SidesCuisine: AmericanDifficulty: Easy12
servings20
minutes1
hour420
kcalIngredients
- For the Chocolate Cake Base:
Chocolate cake mix (1 box, 432g or 15.25 oz, prepared according to package directions)
Whole Oreo cookies (24 cookies, for base layer)
- For the Cream Cheese Swirl:
Cream cheese (226g or 8 oz, softened to room temperature)
Unsalted butter (113g or 1/2 cup, melted)
Confectioners sugar (312g or 2 1/2 cups)
Vanilla extract (1 teaspoon)
Kosher salt (1/4 teaspoon)
- For the Chocolate Ganache Topping:
Semi-sweet chocolate (200g or 7 oz, finely chopped)
Heavy cream (180ml or 3/4 cup)
- For Decoration:
Whole Oreo cookies (14-16 cookies, for placing on top)
Directions
- Assembly
- Preheat oven to 175°C (350°F). Spray 23x33cm (9×13-inch) baking dish generously with nonstick cooking spray.
- Prepare chocolate cake mix batter according to package directions and set aside.
- Arrange 24 whole Oreo cookies in single even layer covering entire bottom of prepared dish.
- Pour and spread chocolate cake batter evenly over Oreo base layer. Make sure all cookies covered.
- Cream Cheese Swirl
- In large bowl, combine softened cream cheese, melted butter, confectioners sugar, vanilla extract, and salt. Beat until completely smooth with no lumps.
- Drop very large generous spoonfuls of cream cheese mixture all over top of cake batter, using entire mixture.
- Use knife or skewer to gently drag through dollops in slow deliberate passes to create visible marble swirl. Do NOT overswirl.
- Baking
- Bake 55-60 minutes until center is set and toothpick inserted comes out mostly clean. Cream cheese swirl will crack and create earthquake-like fissures.
- Remove from oven and allow to cool 20 minutes before adding ganache.
- Chocolate Ganache Topping
- Heat heavy cream until just simmering and pour over chopped chocolate. Let sit 2 minutes then stir until completely smooth and glossy.
- Allow to cool 10 minutes until slightly thickened but still pourable.
- Pour ganache evenly over entire top surface of cooled cake, spreading smoothly to edges.
- While ganache still warm and glossy, place whole Oreo cookies flat across entire top surface, spacing evenly in rows.
- Allow ganache to set 30 minutes before slicing and serving.
- Store covered at room temperature 2 days or refrigerate up to 5 days.