Red White and Blue Cake is absolutely my favorite patriotic dessert to make for summer celebrations because it features three gorgeous colored vanilla cake layers stacked with fluffy buttercream frosting that creates the most stunning surprise when you slice into it. The combination of moist vanilla cake dyed in patriotic colors, rich vanilla buttercream, and festive decorations creates a showstopping centerpiece that’s perfect for Memorial Day barbecues and 4th of July parties. What makes this cake so special is how the beautiful red white, and blue layers look incredibly impressive but are actually easy to create using simple gel food coloring and basic vanilla cake recipe.
What Is Red White and Blue Cake?
Red White and Blue Cake is a stunning three-layer vanilla cake where each layer is dyed a different patriotic color and stacked with vanilla buttercream frosting to create beautiful red white and blue stripes when sliced. Unlike regular cakes that might just have patriotic decorations on top, this cake has the colors baked right into the layers themselves. The vanilla cake is divided into three portions before baking, dyed with gel food coloring, and then assembled into a gorgeous layer cake decorated with swirled tricolor frosting and sprinkles. Think of it as the ultimate Fourth of July dessert that combines stunning visual impact with delicious moist vanilla cake and creamy buttercream that everyone will love.
Ingredient Breakdown
Let me walk you through everything you need for this amazing Red White and Blue Cake. The ingredients are simple but create spectacular results.
For the Cake:
- Granulated sugar (2 cups or 380g): Sweetens the cake perfectly for your Red White and Blue Cake.
- Vegetable oil (1/2 cup or 118ml): Keeps cake moist and tender. Can substitute canola oil.
- Large eggs (3): Room temperature works best. Adds structure and richness.
- Pure vanilla extract (1 tablespoon or 15ml): Essential vanilla flavor throughout.
- Sour cream (1/2 cup or 118ml): Creates incredibly moist texture in your Red White and Blue Cake.
- All-purpose flour (2 and 1/2 cups or 350g): Provides structure for cake layers.
- Baking powder (3 teaspoons or 11.2g): Creates rise and fluffy texture.
- Salt (1 teaspoon or 5g): Balances sweetness and brings out flavors.
- Milk (1 and 1/4 cups or 296ml): Nonfat, whole, or 2% all work for your Red White and Blue Cake.
- Gel food coloring: Super red and royal blue. Highly concentrated for vibrant colors without thinning batter.
For the Frosting:
- Unsalted butter (2 and 1/2 cups or 576g, cold): Must be cold not softened. Creates fluffy stable frosting.
- Powdered sugar (8 cups or 1041g): Sweetens and thickens buttercream for your Red White and Blue Cake.
- Pure vanilla extract (1 tablespoon or 15ml): Adds delicious vanilla flavor to frosting.
- Heavy whipping cream (2 to 3 tablespoons or 30 to 44ml): Thins frosting to perfect consistency. Can substitute milk.
- Pinch of salt: Balances sweetness in buttercream.
- Patriotic sprinkles: Redwhite, and blue sprinkles for decoration on your Red White and Blue Cake.
Step-by-Step Instructions
Creating this stunning patriotic cake is easier than you think. Let me guide you through making this Red White and Blue Cake perfectly.
Prepare and Mix Cake Batter
Preheat your oven to 350 degrees Fahrenheit. Prepare three 8-inch round baking pans by lining the bottoms with parchment paper and greasing the sides well for your Red White and Blue Cake. You can also use bake even strips if you have them.
In a large mixing bowl, combine the granulated sugar, vegetable oil, eggs, and vanilla extract. Beat on medium speed until the eggs and oil are well incorporated, about 2 minutes. Scrape down the bowl as needed to make sure everything mixes evenly.
Mix in the sour cream and beat until well combined throughout the batter for your Red White and Blue Cake. The mixture should look smooth and creamy at this point.
Combine the dry ingredients including all-purpose flour, baking powder, and salt in a separate bowl and whisk together. Alternate adding half the dry ingredients and half the milk at a time to the wet mixture, mixing on low speed until well combined. Repeat until all ingredients are added. Use a spatula to scrape down the sides and ensure everything is well mixed.
Color the Cake Layers
Divide the cake batter into three equal portions, about 1 and 2/3 cups per bowl for your Red White and Blue Cake. Leave one bowl completely undyed for the white cake layer.
Add a couple drops of super red gel food coloring to one bowl of batter at a time to better control the color intensity. Stir thoroughly until the color is completely mixed through with no streaks remaining. Add more gel coloring as needed to achieve the vibrant red you want.
Repeat the coloring process with royal blue gel food coloring in the third bowl for your Red White and Blue Cake. Make sure the blue is evenly distributed and vibrant throughout the batter.
Bake the Layers
Add each colored batter to the prepared pans, spreading evenly. Bake at 350 degrees Fahrenheit for approximately 20 to 23 minutes for your Red White and Blue Cake. Rotate your pans in the oven halfway through baking after about 10 minutes for even cooking.
Test the cake for doneness by inserting a toothpick into the center of each layer. If the toothpick comes out clean, your cakes are done. Remove from the oven and allow to cool completely before assembling.
Make the Buttercream
Cut the cold butter into pieces. Using the paddle attachment on your stand mixer, whip the butter for 5 to 7 minutes, scraping down the bowl occasionally for your Red White and Blue Cake. Beat until the butter looks light in color and super fluffy.
Alternate adding 2 cups of powdered sugar at a time with the liquid ingredients including vanilla extract and heavy cream. Make sure the powdered sugar is well combined after each addition, then whip for 1 to 2 minutes before adding more. Repeat until all ingredients are added.
Once all the powdered sugar has been added, increase speed to medium-high and beat for another 3 to 5 minutes to whip additional air into the frosting for your Red White and Blue Cake. The frosting should be light, fluffy, and spreadable.
Assemble and Decorate
Use a cake leveler or serrated knife to cut the domes off the top of each cake layer so they’re flat and even for your Red White and Blue Cake. Place a dollop of frosting on your cake board and place the blue layer on top of that as the bottom.
Place about 2 cups of frosting in a large piping bag fitted with a large open round tip, or simply cut off the end. Pipe a layer of frosting on top of the blue cake, starting at the outside edge and working your way into the middle. Spread evenly with an offset spatula.
Place the white layer next on top of the frosting for your Red White and Blue Cake. Repeat the frosting process with the second layer, then place the red layer on top as the final tier.
Use your piping bag to fill in any gaps between your layers and create a crumb coat. Using an offset spatula or icing smoother, wipe away the excess frosting, leaving just enough to coat the outside of the cake. Don’t mix crumb coating frosting back into your icing if it has cake debris.
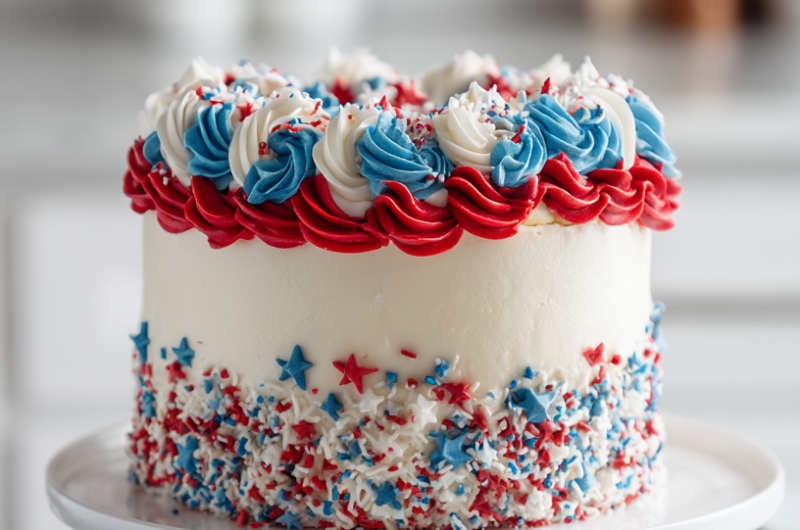
Separate out 1 and 1/4 cups of frosting for the decorative border and divide it into thirds for your Red White and Blue Cake. Leave one portion undyed white, and dye one red and one blue using the gel colors until desired color is reached.
Lay out plastic wrap and spread or pipe a thick row of each frosting color side by side onto the clear wrap. Fold the plastic wrap up and tightly roll, twist one end, and cut the tip off. Drop the plastic wrap into a piping bag fitted with a closed star tip.
Use the remaining white frosting to frost the top and sides of the cake using your offset spatula for your Red White and Blue Cake. Once the sides are covered, use an icing smoother to remove any excess frosting and create smooth sides.
Before the frosting has set, use your hand to press the patriotic sprinkles into the cake along the bottom edge. Pipe the decorative border on top of the cake with the tricolor frosting and add more sprinkles in the center if desired.
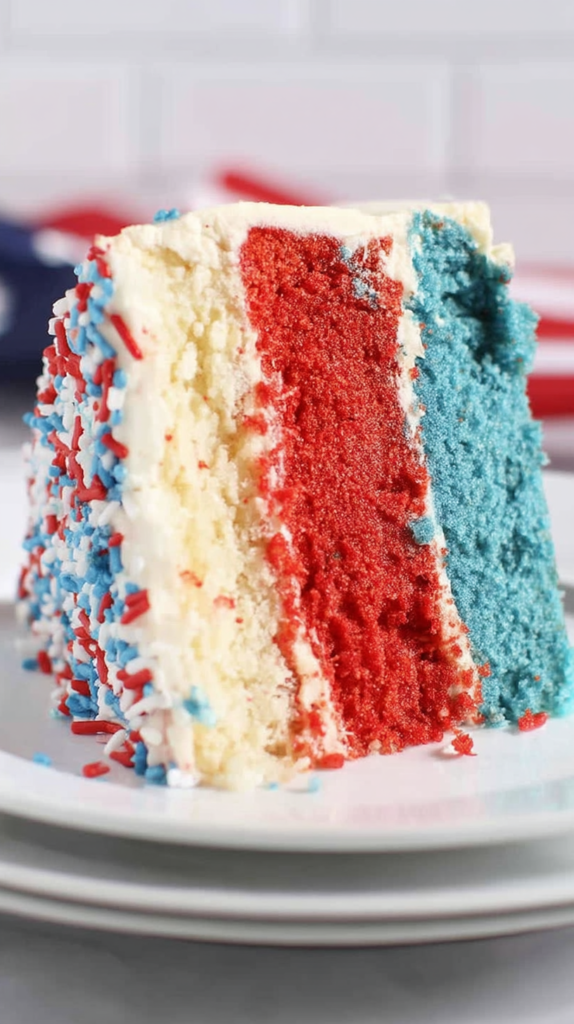
How to Serve
This Red White and Blue Cake is perfect for patriotic celebrations and creates the most stunning presentation when sliced to reveal the colorful layers inside. Serve at Memorial Day barbecues, Fourth of July parties, or any summer gathering where you want to impress guests with a showstopping dessert. The cake is best served at room temperature, so remove from refrigerator at least 30 minutes before serving if you’ve stored it cold. Cut into generous slices to show off those beautiful red white, and blue layers. Pair with vanilla ice cream, fresh berries, or whipped cream for extra indulgence. Store in airtight cake carrier at room temperature for up to 2 days. Refrigerate if your environment is hot or humid, but bring back to room temp before serving for best flavor and texture.
Expert Tips
- Use gel food coloring: Liquid food coloring won’t give vibrant colors for your Red White and Blue Cake. Gel colors are concentrated and don’t thin batter.
- Room temperature ingredients: Eggs and milk at room temp create smoother batter. Set out 30 minutes before baking.
- Don’t overmix the batter: Mix just until combined after adding flour. Overmixing creates tough cake instead of tender.
- Level the cake layers: Cutting off domes creates stable stacking and professional appearance for your Red White and Blue Cake.
- Use cold butter for frosting: Cold butter whips up fluffier than softened. Let mixer do the work to soften it.
- Beat frosting thoroughly: Whip at each stage after adding powdered sugar. Creates light fluffy texture.
- Crumb coat is essential: Thin first layer of frosting seals in crumbs for your Red White and Blue Cake. Makes final coat smooth.
- Tricolor frosting trick: Laying colors side by side on plastic wrap creates beautiful swirled effect when piped.
- Rotate pans while baking: Turning pans halfway through creates even baking and prevents lopsided layers.
- Cool completely before assembling: Warm cake layers will melt frosting and slide. Be patient for your Red White and Blue Cake.
Common Questions
Can I make this cake ahead of time?
Yes! Bake the cake layers up to 2 days ahead, wrap tightly in plastic wrap, and store at room temperature for your Red White and Blue Cake. You can also freeze unfrosted layers for up to 3 months. Assemble and frost the day before serving and refrigerate, then bring to room temperature before serving.
Do I have to refrigerate this cake?
Not unless you live in a very hot or humid environment for your Red White and Blue Cake. The buttercream is butter-based so it will melt in heat. Store in airtight cake carrier at room temperature for up to 2 days. If you must refrigerate, bring to room temp 30 minutes before serving for best taste and texture.
Can I use different size pans?
This recipe is designed for three 8-inch round pans for your Red White and Blue Cake. You can use 9-inch pans but layers will be thinner and may need less baking time, around 18 to 20 minutes. Check with toothpick for doneness. Don’t use smaller than 8-inch or batter will overflow.
Why is my frosting too thick or too thin?
If frosting is too thick for your Red White and Blue Cake, add more heavy cream 1 tablespoon at a time and beat until smooth. If too thin, add more powdered sugar 1/4 cup at a time. Temperature also affects consistency, so let frosting sit at room temp a few minutes if it’s been refrigerated before adjusting.
Why This Is Perfect
Red White and Blue Cake is absolutely the perfect patriotic dessert for summer celebrations because it combines stunning visual impact with delicious moist vanilla cake and creamy buttercream that everyone loves. The colorful layers create an incredible surprise when you slice the cake that makes guests gasp with delight. Despite looking incredibly impressive and professional, the cake uses simple ingredients and straightforward techniques that even beginner bakers can master. Whether you’re celebrating Memorial Day, Fourth of July, or any patriotic occasion, this showstopping layer cake delivers wow factor and amazing flavor that makes it the star of every gathering.
For more amazing cake decorating tips and patriotic dessert inspiration, check out my pinterest page where you’ll find techniques and creative ideas.
Red White and Blue Cake
Course: DessertCuisine: AmericanDifficulty: Medium10-12
servings1
hour30
minutes20
minutes990
kcalIngredients
- For the Cake:
Granulated sugar (2 cups or 380g)
Vegetable oil (1/2 cup or 118ml)
Large eggs (3, room temperature)
Pure vanilla extract (1 tablespoon or 15ml)
Sour cream (1/2 cup or 118ml)
All-purpose flour (2 and 1/2 cups or 350g)
Baking powder (3 teaspoons or 11.2g)
Salt (1 teaspoon or 5g)
Milk (1 and 1/4 cups or 296ml, nonfat or 2%)
Gel food coloring (super red and royal blue)
- For the Frosting:
Unsalted butter (2 and 1/2 cups or 576g, cold)
Powdered sugar (8 cups or 1041g)
Pure vanilla extract (1 tablespoon or 15ml)
Heavy whipping cream (2 to 3 tablespoons or 30 to 44ml)
Pinch of salt
Patriotic sprinkles (red, white, and blue)
Directions
- Prepare and Mix Cake Batter
- Preheat oven to 350°F.
- Prepare three 8-inch round baking pans by lining bottoms with parchment paper and greasing sides well.
- In large mixing bowl, combine granulated sugar, vegetable oil, eggs, and vanilla extract.
- Beat on medium speed until eggs and oil are well incorporated, about 2 minutes. Scrape down bowl as needed.
- Mix in sour cream and beat until well combined throughout batter.
- Combine dry ingredients (all-purpose flour, baking powder, and salt) in separate bowl and whisk together.
- Alternate adding half the dry ingredients and half the milk at a time to wet mixture, mixing on low speed until well combined.
- Repeat until all ingredients are added. Use spatula to scrape down sides and ensure well mixed.
- Color the Cake Layers
- Divide cake batter into three equal portions, about 1 and 2/3 cups per bowl.
- Leave one bowl completely undyed for white cake layer.
- Add couple drops of super red gel food coloring to one bowl at a time to control color intensity.
- Stir thoroughly until color is completely mixed through with no streaks. Add more gel as needed for vibrant red.
- Repeat coloring process with royal blue gel food coloring in third bowl.
- Make sure blue is evenly distributed and vibrant throughout batter.
- Bake the Layers
- Add each colored batter to prepared pans, spreading evenly.
- Bake at 350°F for approximately 20-23 minutes.
- Rotate pans in oven halfway through baking after about 10 minutes for even cooking.
- Test cake for doneness by inserting toothpick into center of each layer. If toothpick comes out clean, cakes are done.
- Remove from oven and allow to cool completely before assembling.
- Make the Buttercream
- Cut cold butter into pieces.
- Using paddle attachment on stand mixer, whip butter for 5-7 minutes, scraping down bowl occasionally.
- Beat until butter looks light in color and super fluffy.
- Alternate adding 2 cups of powdered sugar at a time with liquid ingredients (vanilla extract and heavy cream).
- Make sure powdered sugar is well combined after each addition, then whip 1-2 minutes before adding more.
- Repeat until all ingredients are added.
- Once all powdered sugar added, increase speed to medium-high and beat another 3-5 minutes to whip additional air into frosting.
- Assemble and Decorate
- Use cake leveler or serrated knife to cut domes off top of each cake layer so they’re flat and even.
- Place dollop of frosting on cake board and place blue layer on top as bottom.
- Place about 2 cups of frosting in large piping bag fitted with large open round tip, or simply cut off end.
- Pipe layer of frosting on top of blue cake, starting at outside edge and working into middle. Spread evenly with offset spatula.
- Place white layer next on top of frosting. Repeat frosting process.
- Place red layer on top as final tier.
- Use piping bag to fill any gaps between layers and create crumb coat.
- Using offset spatula or icing smoother, wipe away excess frosting, leaving just enough to coat outside of cake.
- Separate out 1 and 1/4 cups of frosting for decorative border, divide into thirds.
- Leave one portion undyed white, dye one red and one blue using gel colors.
- Lay out plastic wrap and spread or pipe thick row of each frosting color side by side onto clear wrap.
- Fold plastic wrap up and tightly roll, twist one end, cut tip off. Drop plastic wrap into piping bag fitted with closed star tip.
- Use remaining white frosting to frost top and sides of cake using offset spatula.
- Once sides covered, use icing smoother to remove excess frosting.
- Before frosting sets, use hand to press patriotic sprinkles into cake along bottom edge.
- Pipe decorative border on top of cake with tricolor frosting and add more sprinkles in center if desired.
Notes
- Use gel food coloring, not liquid. Gel is concentrated and doesn’t thin batter.
Cold butter for frosting whips fluffier than softened.
Level cake layers for stable stacking and professional look.
Crumb coat seals in crumbs for smooth final coat.
Store in airtight cake carrier at room temp up to 2 days.
Refrigerate only if hot/humid environment. Bring to room temp 30 min before serving.
Can bake layers 2 days ahead or freeze up to 3 months.
Use 8-inch pans. 9-inch will be thinner, adjust bake time to 18-20 minutes.