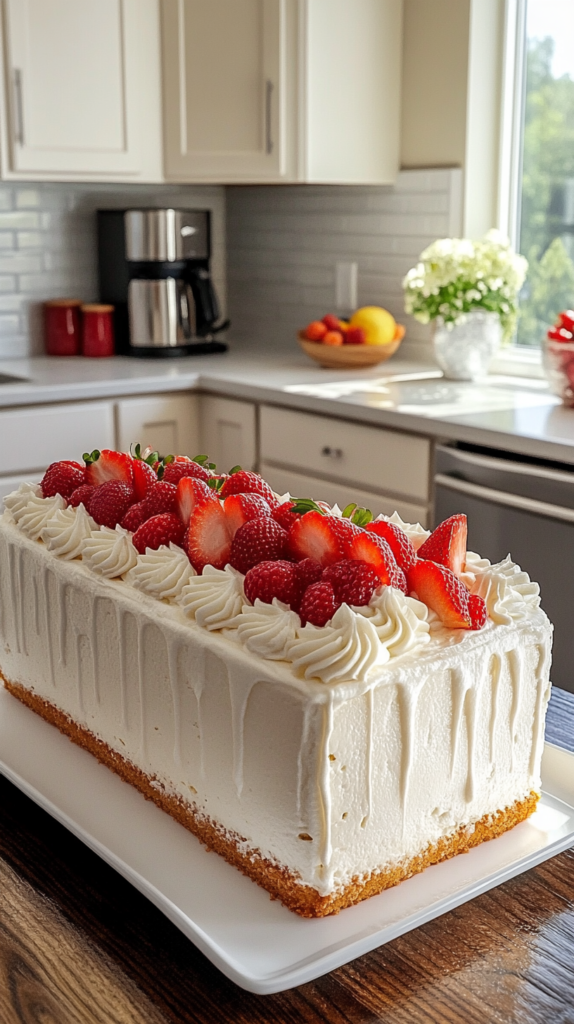
Strawberry Cream Cake Pastry Style is hands down the most elegant and delicious cake I’ve ever made, and it’s become my absolute showstopper recipe when I want something that looks like it came straight from a French patisserie but is actually achievable at home. The first time I made this stunning rectangular cake with its vanilla sponge layers, fluffy whipped cream frosting, and beautiful arrangement of fresh strawberries and raspberries down the center, everyone at the party couldn’t stop taking photos before devouring slice after slice. The combination of light vanilla cake brushed with simple syrup, clouds of stabilized whipped cream, and fresh berries creates this incredibly sophisticated dessert that tastes as amazing as it looks.
Understanding This Pastry-Style Cake
Strawberry Cream Cake Pastry Style is an elegant rectangular layered cake featuring vanilla sponge brushed with simple syrup, filled and frosted with stabilized whipped cream, and decorated with piped cream rosettes topped with fresh strawberries and raspberries arranged down the center. What makes this cake pastry-style is the rectangular shape, the natural textured cream finish with gentle drips, and that classic European bakery presentation with the fruit arranged in a beautiful line. The stabilized whipped cream stays perfectly fluffy for days without weeping. Think of it as a sophisticated French-style fraisier meets American layer cake that’s perfect for special celebrations and elegant gatherings.
What You’ll Need
Let’s break down all the ingredients for this stunning Strawberry Cream Cake Pastry Style. I’ve organized everything by component so you can see exactly what goes into each layer.
For the Vanilla Sponge:
- All-purpose flour (2 cups): Creates tender, fluffy sponge layers.
- Baking powder (2 teaspoons): Provides lift and light texture.
- Fine salt (½ teaspoon): Balances sweetness and makes flavors pop.
- Eggs (4 large, room temperature): Essential for structure and richness.
- Granulated sugar (1½ cups): Sweetens and keeps the cake moist.
- Whole milk (1 cup, warm): Creates tender crumb.
- Vegetable oil (½ cup): Keeps the sponge incredibly moist for days.
- Vanilla extract (2 teaspoons): Classic vanilla flavor throughout your Strawberry Cream Cake Pastry Style.
For the Simple Syrup Soak:
- Granulated sugar (½ cup): Sweetens the syrup.
- Water (½ cup): Creates the soaking liquid.
- Vanilla extract (1 teaspoon): Adds flavor to the syrup.
For the Whipped Cream Frosting and Filling:
- Double cream (900ml, very cold): Creates fluffy, stable whipped cream.
- Powdered sugar (100g, sifted): Sweetens without grittiness.
- Vanilla extract (2 teaspoons): Rounds out the cream flavor.
- Cream stabiliser or cornflour (2 teaspoons or 1 teaspoon): Essential for keeping cream stable and fluffy for days.
For Decoration:
- Fresh strawberries (10-12 large): Halved and some left whole with stems for that natural bakery look.
- Fresh raspberries (150g): Fill gaps and add color to your pastry-style cake.
- Extra whipped cream: For piping rosettes down the center.
Creating Your Pastry-Style Masterpiece
Alright, let’s make this gorgeous bakery-worthy cake. The process takes some time but each step is straightforward.
Bake the Vanilla Sponge
Preheat your oven to 175°C (350°F). Grease and line a large rectangular 9×13 inch pan with parchment paper. Whisk together the flour, baking powder, and salt in a large bowl.
Beat the eggs and sugar together for 4-5 minutes until very pale, thick, and ribbon-like. This aeration is crucial for light sponge. Add the oil and vanilla and mix until combined. Fold in the flour mixture in two additions alternating with the warm milk, mixing gently until just smooth. Don’t overmix or you’ll deflate all that air for your Strawberry Cream Cake Pastry Style.
Pour into the prepared pan and bake for 25-30 minutes until a skewer comes out clean and the top springs back when gently pressed. Cool completely in the pan for 15 minutes then turn out onto a wire rack to cool fully.
Make the Simple Syrup
Combine the sugar and water in a small saucepan over medium heat, stirring until the sugar dissolves completely. Remove from heat, stir in the vanilla extract, and cool completely before using. This syrup keeps the cake incredibly moist.
Prepare the Whipped Cream Frosting
Whip all the very cold double cream, sifted powdered sugar, vanilla, and stabilizer together to firm, stable peaks. This takes about 4-5 minutes. The cream should stand up in firm peaks when you lift the beaters.
Reserve about one third of the whipped cream in a piping bag fitted with a medium star tip for the rosette decoration. Refrigerate both the piping bag and remaining cream until needed for your Strawberry Cream Cake Pastry Style.
Assemble the Layers
Slice the cooled sponge horizontally into two even layers using a long serrated knife. Place the bottom layer on a large white rectangular serving plate. Brush generously with the cooled simple syrup all over the surface.
Spread a generous, thick layer of whipped cream evenly over the entire surface right to every edge. Place the second sponge layer on top and press down very gently. Brush generously with the remaining simple syrup.
Frost and Finish
Spread whipped cream over the entire top surface and all four sides. Don’t stress about perfect smoothness because a natural, slightly textured finish with gentle soft drips down the sides is exactly what you want here. Let the cream fall naturally for that authentic bakery look.
Allow any excess cream to drip softly and naturally down the sides. This relaxed, organic drip effect is the signature of this Strawberry Cream Cake Pastry Style and should not be smoothed away.
Decorate with Berries
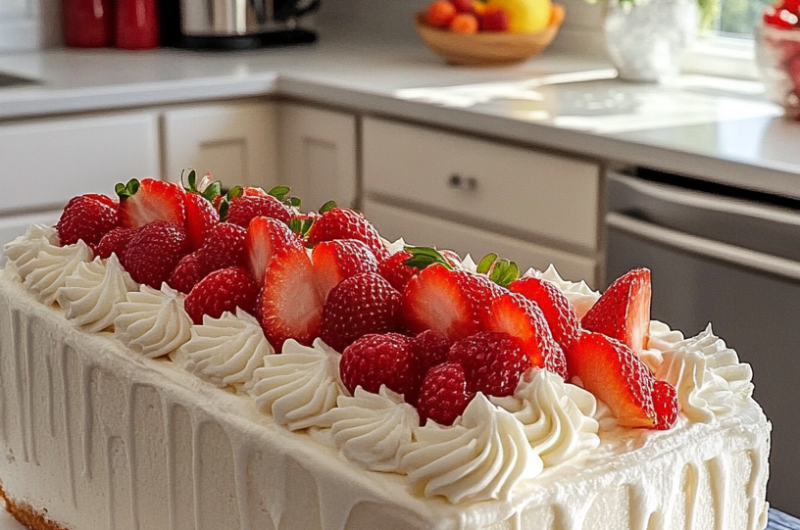
Pipe a row of medium swirl rosettes in a continuous line down the very center of the top from one end to the other. Arrange the halved and whole fresh strawberries generously along the entire rosette line, alternating cut-side-up halves and whole berries with green stems still attached for a natural, abundant look.
Tuck the fresh raspberries in between and around the strawberries to fill every gap with color and create that lush berry display. Refrigerate for at least 1 hour before serving to let everything set.
Serving This Elegant Cake
This Strawberry Cream Cake Pastry Style is best served chilled, cut into generous rectangular slices. The rectangular shape makes serving easy and elegant. I love serving it at spring and summer celebrations, birthday parties, and Mother’s Day brunches because it’s so beautiful and fresh. The combination of vanilla cake, fluffy cream, and fresh berries is universally loved. For a complete berry dessert spread, serve it alongside other strawberry treats like my Easy Strawberry Shortcake Trifle to give guests variety. Use a sharp knife dipped in hot water and wiped dry between cuts for the cleanest slices through the cream layers.
Pro Tips for Success
- Room temperature eggs are essential: They whip to much greater volume and create lighter sponge for your Strawberry Cream Cake Pastry Style.
- Beat eggs and sugar fully: The full 4-5 minutes creates that pale, ribbon-like texture that gives you fluffy cake.
- Use cream stabilizer: Essential for keeping whipped cream firm and beautiful for days without weeping or deflating.
- Brush syrup generously: Don’t be shy with the simple syrup. It keeps the cake incredibly moist and adds subtle sweetness.
- Keep cream natural-looking: The slightly textured finish with soft drips is the signature look. Don’t over-smooth it.
- Arrange fruit just before serving: While the cake keeps for 3 days, the berries look freshest added the day of serving.
- Alternate berry orientation: Mix halved strawberries cut-side-up with whole berries with stems for that natural bakery arrangement.
- Chill before slicing: The full hour of chilling helps everything set for the cleanest, most beautiful slices.
Common Questions Answered
Can I make this in a round pan?
Yes, but the rectangular shape is what makes it pastry-style. If using round pans, bake two 9-inch layers instead. The assembly and decoration remain the same, though you’ll arrange the berries in a circle on top instead of a line for your Strawberry Cream Cake Pastry Style.
How long does this cake keep?
The cake keeps beautifully covered in the refrigerator for up to 3 days thanks to the stabilized whipped cream. The cream stays firm and doesn’t weep. For best appearance, add the fresh berry decoration the day you’re serving, though the assembled frosted cake can wait.
What if I can’t find cream stabilizer?
Use 1 teaspoon of cornflour instead as listed in the recipe. Whisk it with the powdered sugar before adding to the cream. It won’t be quite as stable as commercial stabilizer but it works well. You can also use gelatin (1 teaspoon bloomed in 2 tablespoons water then melted).
Can I use frozen berries?
Fresh berries are essential for decoration because frozen berries release too much liquid when thawed and make the cream weepy. The visual appeal of fresh, vibrant strawberries and raspberries is what makes this Strawberry Cream Cake Pastry Style so stunning. Always use fresh for the topping.
Why This Recipe Works
Strawberry Cream Cake Pastry Style is the ultimate elegant celebration cake because it delivers professional bakery presentation with straightforward home baking techniques. The rectangular shape and natural cream finish give it that authentic European pastry shop look without requiring advanced decorating skills. The stabilized whipped cream stays perfectly fluffy for days, making it ideal for make-ahead entertaining. Whether you’re celebrating a birthday, hosting a spring brunch, or marking a special occasion, this cake looks incredibly impressive while tasting light, fresh, and absolutely delicious.
For more elegant cake recipes and berry desserts, check out my Pinterest page where I share all my favorite bakery-style treats.
Strawberry Cream Cake Pastry Style
Course: DessertCuisine: French-inspired, EuropeanDifficulty: Medium12
servings30
minutes30
minutes380
kcalIngredients
INGREDIENTS:
- For the Vanilla Sponge:
All-purpose flour (2 cups)
Baking powder (2 teaspoons)
Fine salt (½ teaspoon)
Eggs (4 large, room temperature)
Granulated sugar (1½ cups)
Whole milk (1 cup, warm)
Vegetable oil (½ cup)
Vanilla extract (2 teaspoons)
- For the Simple Syrup Soak:
Granulated sugar (½ cup)
Water (½ cup)
Vanilla extract (1 teaspoon)
- For the Whipped Cream Frosting and Filling:
Double cream (900ml, very cold)
Powdered sugar (100g, sifted)
Vanilla extract (2 teaspoons)
Cream stabiliser or cornflour (2 teaspoons or 1 teaspoon)
- For Decoration:
Fresh strawberries (10-12 large, halved and some left whole with stems)
Fresh raspberries (150g)
Extra whipped cream (for piping rosettes)
Directions
- Bake the Vanilla Sponge
- Preheat your oven to 175°C (350°F). Grease and line a large rectangular 9×13 inch pan with parchment paper. Whisk together the flour, baking powder, and salt in a large bowl.
- Beat the eggs and sugar together for 4-5 minutes until very pale, thick, and ribbon-like. This aeration is crucial for light sponge. Add the oil and vanilla and mix until combined. Fold in the flour mixture in two additions alternating with the warm milk, mixing gently until just smooth. Don’t overmix.
- Pour into the prepared pan and bake for 25-30 minutes until a skewer comes out clean and the top springs back when gently pressed. Cool completely in the pan for 15 minutes then turn out onto a wire rack to cool fully.
- Make the Simple Syrup
- Combine the sugar and water in a small saucepan over medium heat, stirring until the sugar dissolves completely. Remove from heat, stir in the vanilla extract, and cool completely before using.
- Prepare the Whipped Cream Frosting
- Whip all the very cold double cream, sifted powdered sugar, vanilla, and stabilizer together to firm, stable peaks. This takes about 4-5 minutes. The cream should stand up in firm peaks when you lift the beaters.
- Reserve about one third of the whipped cream in a piping bag fitted with a medium star tip for the rosette decoration. Refrigerate both the piping bag and remaining cream until needed.
- Assemble the Layers
- Slice the cooled sponge horizontally into two even layers using a long serrated knife. Place the bottom layer on a large white rectangular serving plate. Brush generously with the cooled simple syrup all over the surface.
- Spread a generous, thick layer of whipped cream evenly over the entire surface right to every edge. Place the second sponge layer on top and press down very gently. Brush generously with the remaining simple syrup.
- Frost and Finish
- Spread whipped cream over the entire top surface and all four sides. Don’t stress about perfect smoothness because a natural, slightly textured finish with gentle soft drips down the sides is exactly what you want here. Let the cream fall naturally.
- Allow any excess cream to drip softly and naturally down the sides. This relaxed, organic drip effect is the signature of this cake and should not be smoothed away.
- Decorate with Berries
- Pipe a row of medium swirl rosettes in a continuous line down the very center of the top from one end to the other. Arrange the halved and whole fresh strawberries generously along the entire rosette line, alternating cut-side-up halves and whole berries with green stems still attached for a natural, abundant look.
- Tuck the fresh raspberries in between and around the strawberries to fill every gap with color. Refrigerate for at least 1 hour before serving to let everything set.