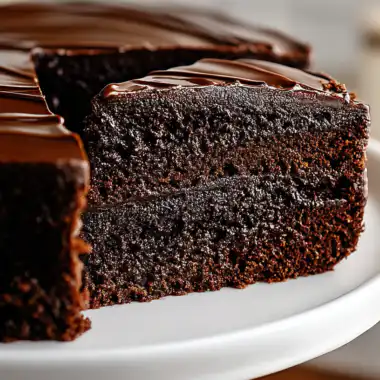
Tuxedo Cake is hands down one of the most elegant and stunning desserts I’ve ever made, and every single time I serve it, people think I ordered it from a fancy bakery. The contrast between the dark chocolate layers and the creamy white vanilla filling is absolutely gorgeous, just like a classic tuxedo. I first encountered this beauty at a wedding years ago and became obsessed with recreating it at home. The combination of moist chocolate cake, silky vanilla mousse, and rich chocolate ganache creates this perfect balance of flavors that’s sophisticated without being overly sweet.
What Is Tuxedo Cake?
Tuxedo Cake gets its name from the striking black and white layers that mimic the classic formal wear. It’s a layered dessert that alternates between rich chocolate cake layers and creamy white vanilla filling, all covered in a glossy chocolate ganache. The name comes from that elegant color contrast, and it’s traditionally served at weddings and special occasions. What makes this cake so special is the texture contrast between the soft, moist chocolate layers and the smooth, mousse-like vanilla filling. It’s basically the perfect marriage of chocolate and vanilla in one impressive dessert.
What You’ll Need
Let’s break down everything that goes into making this show-stopping Tuxedo Cake. I’ve organized the ingredients by component so you can see exactly what you’re working with.
For the Chocolate Cake Layers:
- All-purpose flour (2 cups): Forms the structure of your cake layers. Make sure to measure correctly by spooning it into the cup rather than scooping.
- Granulated sugar (1¾ cups): Sweetens the cake and helps keep it moist. Don’t reduce this or your cake will be dry.
- Dark cocoa powder (¾ cup): Use Dutch-processed cocoa for the deepest, darkest color and richest flavor. This is what gives you that true tuxedo black.
- Baking powder (1½ teaspoons): Helps the cake rise and creates a light, fluffy texture.
- Baking soda (1½ teaspoons): Works with the buttermilk to create lift and tenderness.
- Salt (1 teaspoon): Balances the sweetness and makes the chocolate flavor more intense.
- Eggs (2 large): Room temperature eggs blend better and create a more even crumb.
- Buttermilk (1 cup): The secret to incredibly moist chocolate cake. You can make your own by adding a tablespoon of lemon juice to regular milk.
- Vegetable oil (½ cup): Keeps the cake moist for days. Oil-based cakes stay fresher longer than butter-based ones.
- Vanilla extract (2 teaspoons): Amplifies the chocolate flavor beautifully.
- Hot coffee (1 cup): Don’t worry, this won’t make your cake taste like coffee. It just deepens the chocolate flavor dramatically.
For the White Vanilla Filling:
- Cream cheese (8 oz, softened): Adds tang and richness to the filling. Make sure it’s room temperature or you’ll have lumps.
- Butter (4 tablespoons, softened): Creates a smooth, creamy texture when combined with the cream cheese.
- Powdered sugar (3 cups): Sweetens and thickens the filling. Powdered sugar dissolves better than granulated.
- Heavy cream (½ cup): Lightens the filling and makes it spreadable. You can add more or less to adjust consistency.
- Vanilla extract (2 teaspoons): Pure vanilla is essential here because it’s the star flavor of the white layers.
- White chocolate (4 oz, melted and cooled, optional): Adds extra richness and a beautiful white color to the filling.
For the Chocolate Ganache:
- Semi-sweet chocolate chips (2 cups): Use good quality chocolate because this is what coats the entire cake. The better the chocolate, the better your ganache.
- Heavy cream (1 cup): Creates that pourable, glossy ganache. Full-fat cream is essential for the right consistency.
- Butter (2 tablespoons): Adds extra shine and makes the ganache even smoother.
For Decoration:
- Chocolate shavings or cookie crumbs: For garnishing the top and making it look bakery-perfect.
Step-by-Step Instructions
Alright, let’s make this stunning Tuxedo Cake. Don’t let the multiple components intimidate you because each step is actually quite straightforward. The key is just giving yourself enough time and not rushing the process.
Prep Your Pans
Preheat your oven to 350°F. Grease two 9-inch round cake pans and line the bottoms with parchment paper circles. This ensures your cakes release cleanly without sticking. Lightly flour the sides of the pans after greasing.
Make the Chocolate Cake
In a large bowl, whisk together the flour, sugar, cocoa powder, baking powder, baking soda, and salt until well combined. In another bowl, whisk the eggs, buttermilk, oil, and vanilla until smooth.
Pour the wet ingredients into the dry ingredients and mix on medium speed until just combined. The batter will be thick at this point. Slowly add the hot coffee while mixing on low speed. The batter will become very thin and liquidy, which is exactly what you want. This thin batter bakes up incredibly moist.
Divide the batter evenly between your prepared pans. Bake for 30-35 minutes until a toothpick inserted in the center comes out clean. Let the cakes cool in the pans for 10 minutes, then turn them out onto wire racks to cool completely.
Create the Vanilla Filling
While your cakes cool, make the white filling. Beat the softened cream cheese and butter together until smooth and fluffy, about 2-3 minutes. Add the powdered sugar one cup at a time, mixing well after each addition.
Add the heavy cream and vanilla extract, then beat on high speed until the filling is light and fluffy. If you’re using melted white chocolate, fold it in gently at this point. The filling should be spreadable but hold its shape. If it’s too thick, add a bit more cream. If it’s too thin, add more powdered sugar.
Slice and Layer
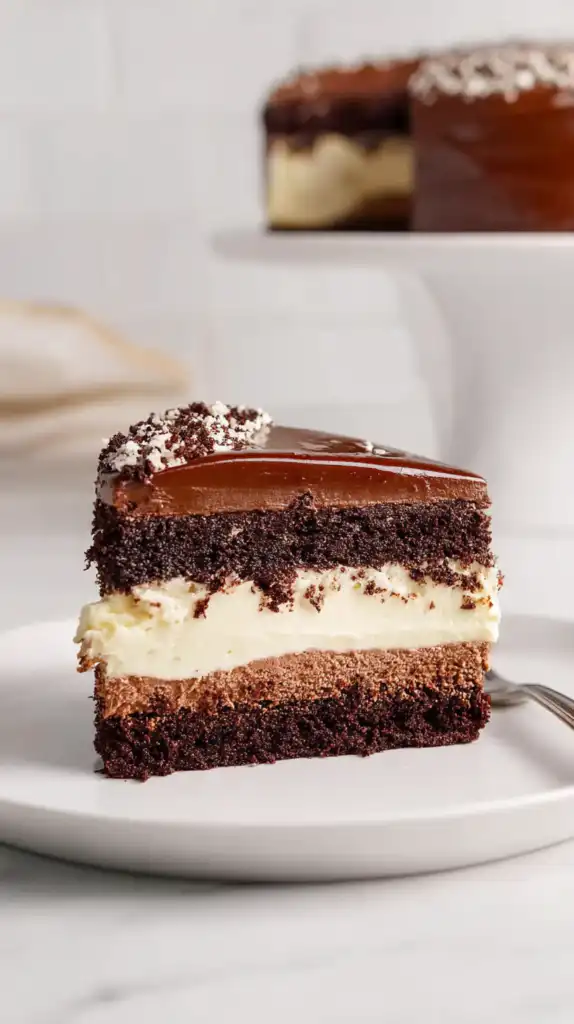
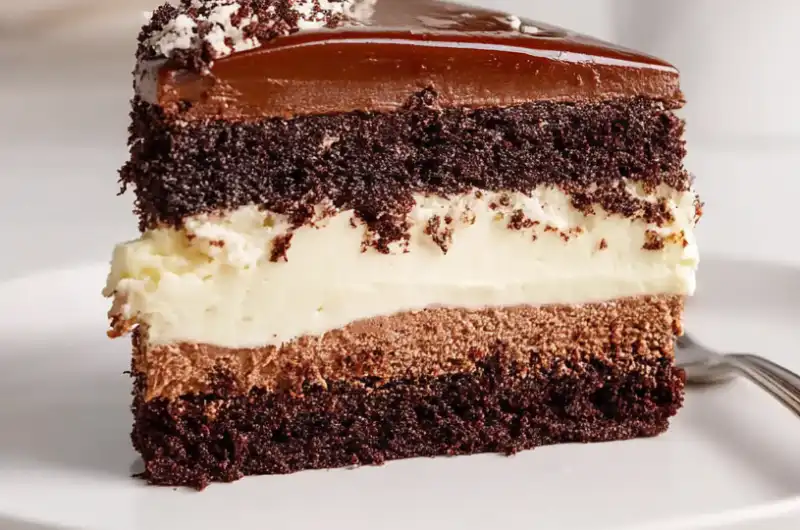
Once your chocolate cakes are completely cool, use a long serrated knife to slice each cake horizontally in half, creating four thin layers total. This is what gives Tuxedo Cake those beautiful alternating stripes.
Place one chocolate layer on your serving plate or cake stand. Spread about a third of the vanilla filling evenly over the top. Add another chocolate layer and repeat with more filling. Continue until you’ve stacked all four chocolate layers with vanilla filling between each one. Don’t put filling on the very top layer because that’s where the ganache goes.
Make the Ganache
Heat the heavy cream in a saucepan until it just starts to simmer. Remove from heat and pour over the chocolate chips in a heatproof bowl. Let it sit for 3 minutes without stirring, allowing the chocolate to melt. Then add the butter and whisk until completely smooth and glossy.
Let the ganache cool for about 10 minutes until it thickens slightly but is still pourable. You want it to be thick enough to coat the cake without running off too quickly.
Frost and Decorate
Pour the ganache over the top of your assembled Tuxedo Cake, letting it drip down the sides naturally. Use an offset spatula to spread it evenly over the top and smooth any gaps on the sides. The drips don’t have to be perfect because that natural dripping look is part of the charm.
While the ganache is still slightly soft, sprinkle chocolate shavings, cookie crumbs, or chocolate chips on top for decoration. Refrigerate the cake for at least an hour to let everything set before slicing.
Perfect Pairings
This Tuxedo Cake is rich and satisfying on its own, but a small dollop of whipped cream on the side is always welcome. Fresh raspberries or strawberries add a beautiful pop of color and a tart contrast that cuts through the sweetness. I love serving this with strong coffee or espresso because the bitterness complements the sweet cake perfectly. For an impressive dessert table, pair it with other elegant options like my Black Velvet Cake with Dark Chocolate Ganache, Chocolate Mousse Dream, or Classic Crème Brûlée.
Pro Tips for Success
- Level your cake layers: Use a cake leveler or serrated knife to trim any domed tops before slicing horizontally. This ensures perfectly even layers in your Tuxedo Cake.
- Chill between steps: After assembling the layers with filling, refrigerate for 30 minutes before adding ganache. This helps everything set and prevents the layers from sliding.
- Room temperature ingredients matter: Cold cream cheese and butter create lumps in your filling. Set them out an hour before you start.
- Don’t skip the coffee: I know it sounds weird, but the coffee doesn’t make the cake taste like coffee at all. It just makes the chocolate flavor incredibly deep and rich.
- Test your ganache consistency: If it’s too thin, let it cool longer. If it’s too thick, warm it gently in the microwave for 10 seconds.
- Make it ahead: This cake actually tastes better the next day after all the flavors have melded together. You can make it up to 2 days ahead.
- Clean slices every time: Use a sharp knife dipped in hot water and wiped clean between each cut. This shows off those beautiful layers perfectly.
- Store properly: Keep Tuxedo Cake covered in the refrigerator for up to 5 days. Let it sit at room temperature for 20 minutes before serving for the best flavor.
Your Tuxedo Cake Questions
Can I make this cake in advance?
Absolutely! In fact, Tuxedo Cake is perfect for making ahead because it needs time to set anyway. You can bake the cake layers up to 2 days in advance and store them wrapped tightly at room temperature. The fully assembled cake keeps beautifully in the fridge for up to 5 days. Just make sure to cover it well so it doesn’t absorb any fridge odors.
Can I freeze Tuxedo Cake?
Yes! You can freeze the unfrosted cake layers wrapped tightly in plastic wrap for up to 3 months. Thaw them overnight in the fridge before assembling. I don’t recommend freezing the fully assembled cake because the cream cheese filling can become slightly watery when thawed, though it’s still edible if you need to do it.
What if I don’t want to slice the layers?
No problem! You can make this as a two-layer cake instead of four. Just use all the vanilla filling between the two whole cake layers and on top before covering with ganache. You won’t get as many stripes, but it’ll still taste amazing and look impressive. The slicing technique just creates more visual drama.
Can I use a different filling?
Definitely! While the classic white vanilla filling is traditional for Tuxedo Cake, you could use vanilla buttercream, white chocolate mousse, or even a stabilized whipped cream. The key is keeping it white or very light colored to maintain that tuxedo contrast with the dark chocolate layers.
Why This Cake Is Special
Tuxedo Cake is one of those desserts that looks incredibly impressive but is actually quite achievable at home. The dramatic black and white layers create this stunning visual that makes people think you’re a professional baker. The flavor combination of rich chocolate cake with creamy vanilla filling is classic and beloved by everyone. It’s sophisticated enough for weddings and formal events but approachable enough for birthday parties and family dinners. Plus, there’s something so satisfying about slicing into it and revealing those perfect alternating layers.
My Tuxedo Cake Story
For more elegant cake ideas and decorating tips, check out my Pinterest page where I share all my favorite baking inspiration.
Tuxedo Cake
Course: DessertCuisine: AmericanDifficulty: Intermediate4
servings45
minutes35
minutes52O
kcalIngredients
- For the Chocolate Cake Layers:
All-purpose flour (2 cups): Forms the structure of your cake layers. Make sure to measure correctly by spooning it into the cup rather than scooping.
Granulated sugar (1¾ cups): Sweetens the cake and helps keep it moist. Don’t reduce this or your cake will be dry.
Dark cocoa powder (¾ cup): Use Dutch-processed cocoa for the deepest, darkest color and richest flavor. This is what gives you that true tuxedo black.
Baking powder (1½ teaspoons): Helps the cake rise and creates a light, fluffy texture.
Baking soda (1½ teaspoons): Works with the buttermilk to create lift and tenderness.
Salt (1 teaspoon): Balances the sweetness and makes the chocolate flavor more intense.
Eggs (2 large): Room temperature eggs blend better and create a more even crumb.
Buttermilk (1 cup): The secret to incredibly moist chocolate cake. You can make your own by adding a tablespoon of lemon juice to regular milk.
Vegetable oil (½ cup): Keeps the cake moist for days. Oil-based cakes stay fresher longer than butter-based ones.
Vanilla extract (2 teaspoons): Amplifies the chocolate flavor beautifully.
Hot coffee (1 cup): Don’t worry, this won’t make your cake taste like coffee. It just deepens the chocolate flavor dramatically.
- For the White Vanilla Filling:
Cream cheese (8 oz, softened): Adds tang and richness to the filling. Make sure it’s room temperature or you’ll have lumps.
Butter (4 tablespoons, softened): Creates a smooth, creamy texture when combined with the cream cheese.
Powdered sugar (3 cups): Sweetens and thickens the filling. Powdered sugar dissolves better than granulated.
Heavy cream (½ cup): Lightens the filling and makes it spreadable. You can add more or less to adjust consistency.
Vanilla extract (2 teaspoons): Pure vanilla is essential here because it’s the star flavor of the white layers.
White chocolate (4 oz, melted and cooled, optional): Adds extra richness and a beautiful white color to the filling.
- For the Chocolate Ganache:
Semi-sweet chocolate chips (2 cups): Use good quality chocolate because this is what coats the entire cake. The better the chocolate, the better your ganache.
Heavy cream (1 cup): Creates that pourable, glossy ganache. Full-fat cream is essential for the right consistency.
Butter (2 tablespoons): Adds extra shine and makes the ganache even smoother.
- For Decoration:
Chocolate shavings or cookie crumbs: For garnishing the top and making it look bakery-perfect.
Directions
- Prep Your Pans
- Preheat your oven to 350°F. Grease two 9-inch round cake pans and line the bottoms with parchment paper circles. This ensures your cakes release cleanly without sticking. Lightly flour the sides of the pans after greasing.
- Make the Chocolate Cake
- In a large bowl, whisk together the flour, sugar, cocoa powder, baking powder, baking soda, and salt until well combined. In another bowl, whisk the eggs, buttermilk, oil, and vanilla until smooth.
- Pour the wet ingredients into the dry ingredients and mix on medium speed until just combined. The batter will be thick at this point. Slowly add the hot coffee while mixing on low speed. The batter will become very thin and liquidy, which is exactly what you want. This thin batter bakes up incredibly moist.
- Divide the batter evenly between your prepared pans. Bake for 30-35 minutes until a toothpick inserted in the center comes out clean. Let the cakes cool in the pans for 10 minutes, then turn them out onto wire racks to cool completely.
- Create the Vanilla Filling
- While your cakes cool, make the white filling. Beat the softened cream cheese and butter together until smooth and fluffy, about 2-3 minutes. Add the powdered sugar one cup at a time, mixing well after each addition.
- Add the heavy cream and vanilla extract, then beat on high speed until the filling is light and fluffy. If you’re using melted white chocolate, fold it in gently at this point. The filling should be spreadable but hold its shape. If it’s too thick, add a bit more cream. If it’s too thin, add more powdered sugar.
- Slice and Layer
- Once your chocolate cakes are completely cool, use a long serrated knife to slice each cake horizontally in half, creating four thin layers total. This is what gives Tuxedo Cake those beautiful alternating stripes.
- Place one chocolate layer on your serving plate or cake stand. Spread about a third of the vanilla filling evenly over the top. Add another chocolate layer and repeat with more filling. Continue until you’ve stacked all four chocolate layers with vanilla filling between each one. Don’t put filling on the very top layer because that’s where the ganache goes.
- Make the Ganache
- Heat the heavy cream in a saucepan until it just starts to simmer. Remove from heat and pour over the chocolate chips in a heatproof bowl. Let it sit for 3 minutes without stirring, allowing the chocolate to melt. Then add the butter and whisk until completely smooth and glossy.
- Let the ganache cool for about 10 minutes until it thickens slightly but is still pourable. You want it to be thick enough to coat the cake without running off too quickly.
- Frost and Decorate
- Pour the ganache over the top of your assembled Tuxedo Cake, letting it drip down the sides naturally. Use an offset spatula to spread it evenly over the top and smooth any gaps on the sides. The drips don’t have to be perfect because that natural dripping look is part of the charm.
- While the ganache is still slightly soft, sprinkle chocolate shavings, cookie crumbs, or chocolate chips on top for decoration. Refrigerate the cake for at least an hour to let everything set before slicing.