Chocolate cake is honestly my love language. I know that sounds dramatic, but the moment I pull a freshly baked, deeply chocolatey layer cake out of the oven, all is right in the world. This recipe is the one I keep going back to every single time, whether it is a birthday, a dinner party, or just a random Tuesday when I need something sweet and comforting. It is rich, it is moist, and it is absolutely covered in the most gorgeous chocolate buttercream frosting. Get ready, because this one is a keeper.
What Exactly Is a Chocolate Cake?
At its core, a chocolate cake is a classic baked dessert made with cocoa powder or melted chocolate to give it that rich, deep flavor we all adore. It comes in so many forms, from simple single-layer snack cakes to towering, frosted showstoppers. This version is a two-layer round cake paired with a creamy, fluffy chocolate buttercream frosting. Think of it as the ultimate homemade chocolate cake, the kind that tastes way better than anything from a box.
What You Will Need for This Chocolate Cake
Before we get into the fun part, let me walk you through all the ingredients. Nothing is complicated here, and most of it is probably already sitting in your pantry. I will also share some easy swaps in case you are missing something.
For the Cake Layers
- 240g (2 cups) all-purpose flour – The base of the cake. Plain flour works perfectly here, giving the cake its tender but sturdy crumb.
- 400g (2 cups) granulated sugar – This adds sweetness and also helps keep the cake super moist after baking.
- 50g (1/2 cup) unsweetened cocoa powder – Use a good quality Dutch-process or natural unsweetened cocoa for the best deep chocolate flavor.
- 1 1/2 tsp baking powder – Helps the cake rise up nice and tall.
- 1 1/2 tsp baking soda – Works together with the baking powder for that perfect lift.
- 1/2 tsp kosher salt – Just a touch of salt balances all that sweetness and brings out the chocolate notes beautifully.
- 240ml (1 cup) whole milk, at room temperature – Full-fat milk gives a richer, more tender crumb. You can swap with oat milk or almond milk if needed.
- 2 large eggs, at room temperature – Room temperature eggs blend into the batter much more smoothly than cold ones, trust me on this.
- 120ml (1/2 cup) vegetable oil – Oil keeps the cake incredibly moist, even days after baking. You can use sunflower oil or a light olive oil as a substitute.
- 1 tbsp pure vanilla extract – A generous splash of vanilla rounds out the chocolate flavor in the most delicious way.
- 240ml (1 cup) boiling water or hot coffee – This is the secret weapon. Hot liquid blooms the cocoa powder and deepens the chocolate flavor significantly. Do not skip it. If you use hot coffee, it just makes the chocolate taste even more intense without any coffee flavor coming through. Use hot water if you prefer.
For the Chocolate Buttercream Frosting
- 338g (1 1/2 cups) unsalted butter, at room temperature – Soft, room temperature butter is absolutely essential for a smooth and fluffy frosting. Take it out of the fridge at least an hour before you start.
- 25g (1/4 cup) unsweetened cocoa powder – This gives the buttercream its rich chocolate color and flavor.
- 1/4 tsp salt – A tiny pinch to cut through the sweetness of all that powdered sugar.
- 1 tsp pure vanilla extract – Adds warmth and depth to the frosting.
- 680g (6 cups) powdered sugar – Sifted is best to avoid any lumps in your frosting.
- 3 to 4 tbsp whole milk – Add this gradually to get your frosting to the perfect spreadable consistency.
Step-by-Step Instructions for the Best Chocolate Cake
Baking the Cake Layers
Step 1: Preheat and Prep Your Pans. Start by preheating your oven to 177 degrees C (350 degrees F). Grease two 23cm (9-inch) round cake pans with butter or baking spray, then line the bottom of each pan with a round of parchment paper. This step makes removing the cakes so much easier and stress-free.
Step 2: Mix the Dry Ingredients. Sift the flour, sugar, cocoa powder, baking soda, baking powder, and salt into a large mixing bowl. Give everything a good whisk to make sure it is all evenly combined. Sifting the cocoa powder is especially important here because it clumps so easily.
Step 3: Add the Wet Ingredients. In a separate bowl, whisk together the milk, eggs, oil, and vanilla extract until well combined. Pour this mixture into the bowl with your dry ingredients and whisk everything together until smooth and there are no dry streaks remaining.
Step 4: Add the Boiling Water. Now pour in your boiling water or hot coffee and whisk until fully incorporated. Fair warning, the batter is going to look very runny at this point. That is completely normal and exactly what you want! Do not panic, it bakes up into a perfectly moist cake.
Step 5: Bake the Cakes. Divide the batter evenly between your two prepared pans and pop them in the oven for about 35 minutes. You will know they are done when a toothpick inserted into the center comes out clean or with just a crumb or two attached.
Step 6: Cool Completely. Let the cakes cool in their pans on a wire rack for 15 minutes. Then carefully invert them onto the rack, peel off the parchment paper, and let them cool completely before you even think about frosting. If you try to frost a warm cake, the buttercream will just slide right off.
Making the Chocolate Buttercream Frosting
Step 1: Beat the Butter. Using a stand mixer or hand mixer, beat the softened butter on medium speed for about 2 minutes until it is soft, pale, and creamy. This step is what makes the frosting light and fluffy rather than dense and heavy.
Step 2: Add Cocoa and Salt. Add the cocoa powder and salt and mix on low speed until they are fully combined. Scrape down the sides of the bowl with a spatula so everything gets mixed in evenly.
Step 3: Add Powdered Sugar and Milk. With the mixer running on low speed, gradually add in the powdered sugar, alternating with small splashes of milk. Keep going until you have used up all the powdered sugar and up to 4 tablespoons of milk total. Adding them slowly prevents a huge puff of sugar flying across your kitchen.
Step 4: Final Beat. Add the vanilla extract and beat the frosting on medium-low speed for about 1 minute until it is light and fluffy. Give the bowl a final scrape down and beat briefly once more. Your chocolate buttercream should be smooth, creamy, and absolutely irresistible at this point.
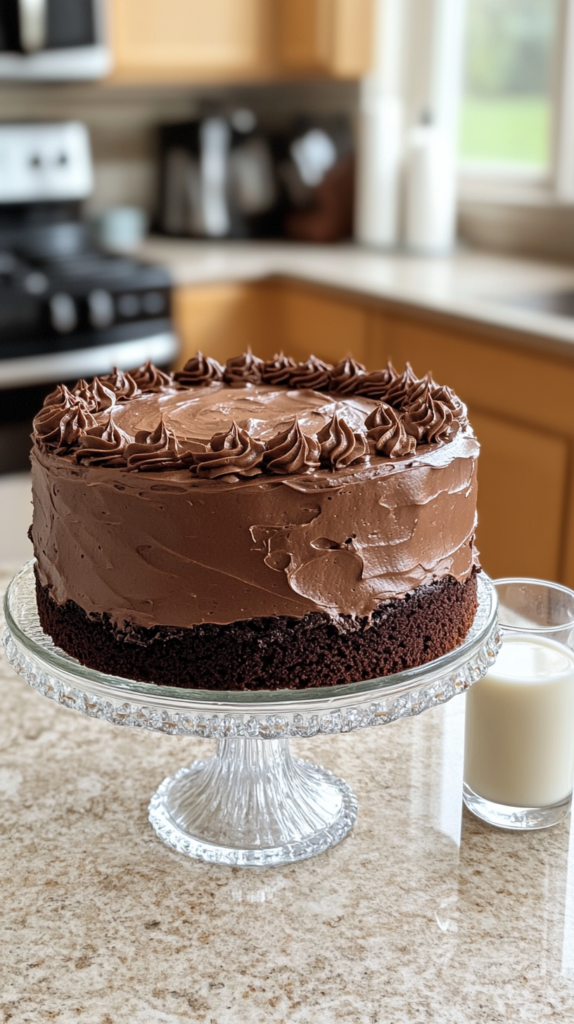
Assembling Your Layer Cake
Step 1: Place the First Layer. Set your first cooled cake layer on a beautiful glass or crystal cake stand. Using a cake stand makes the whole process easier and makes for gorgeous presentation.
Step 2: Add the Frosting Layer. Spread about 1 cup of your chocolate buttercream evenly over the top of the first cake layer, spreading it all the way to the edges.
Step 3: Add the Second Layer. Gently place the second cake layer directly on top of the frosted first layer.
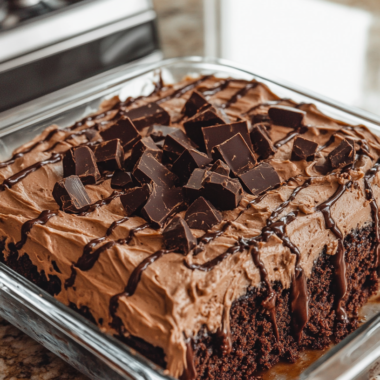
Step 4: Frost the Outside. Spread the remaining chocolate buttercream over the top and sides of the entire cake. Use a spatula to create rustic, swooping swirls for a look that is both casual and stunning. You do not need to be perfect here. Those imperfect swirls honestly make it look even more homemade and delicious.
Serving Ideas for Your Chocolate Cake
This rich chocolate layer cake is honestly amazing just as it is, but there are a few fun ways to serve it up. A scoop of vanilla ice cream on the side is always a winning move. You could also add fresh berries like strawberries or raspberries on top, since the tartness cuts through the sweetness beautifully. A light dusting of flaky sea salt on the frosting right before serving is another little trick I love. For a party, you can slice it and plate each piece with a small drizzle of warm chocolate sauce or a dollop of whipped cream.
Tips for the Perfect Chocolate Cake
- Use room temperature ingredients. Cold eggs and cold milk can cause the batter to look curdled and uneven. Pull everything out of the fridge at least 30 to 60 minutes before you start baking.
- Do not skip the parchment paper. Lining the pans makes getting the cakes out cleanly so much easier. It is worth the extra 2 minutes of prep.
- Measure flour correctly. Spoon the flour into your measuring cup and level it off rather than scooping directly from the bag. Scooping packs in too much flour and can make the cake dense.
- Sift your dry ingredients. Cocoa powder especially loves to clump. Sifting everything together ensures a smooth, lump-free batter every time.
- Bloom your cocoa with hot liquid. Pouring in that boiling water or hot coffee activates the cocoa powder and creates a much deeper, more intense chocolate flavor. It is such a game-changer.
- Cool completely before frosting. I cannot stress this enough. A warm cake will melt your beautiful buttercream into a greasy, sliding mess. Be patient, it is worth the wait.
- For make-ahead convenience. You can bake the cake layers up to 2 days ahead. Wrap them tightly in plastic wrap and store at room temperature. Make the frosting fresh on the day you plan to serve it for the best results.
Your Questions About Chocolate Cake, Answered
Can I make this chocolate cake ahead of time?
Yes, absolutely! The cake layers can be baked up to 2 days in advance. Just wrap them tightly in plastic wrap once they are fully cooled and store them at room temperature. The fully assembled frosted cake can also be made a day ahead and stored in the refrigerator. Just bring it to room temperature for about an hour before serving so the frosting softens up again.
Why is my chocolate cake batter so runny?
Do not worry at all, this is completely intentional! The batter for this recipe is meant to be thin and pourable, especially after you add the boiling water. The high liquid content is what gives the finished cake that incredibly moist, tender crumb. Just trust the process and pour it into your prepared pans without second-guessing yourself.
Can I use coffee instead of water in this chocolate cake recipe?
Yes and I actually prefer it! Hot coffee intensifies the chocolate flavor without making the cake taste like coffee at all. The coffee just acts as a flavor amplifier for the cocoa. If you are avoiding caffeine, hot water works perfectly well too. Either way, using a hot liquid is key for the best flavor.
How should I store leftover chocolate cake?
Store any leftovers in an airtight container or cover the cut surface of the cake with plastic wrap. It keeps well at room temperature for up to 2 days or in the refrigerator for up to 5 days. You can also freeze individual slices wrapped in plastic wrap and then foil for up to 2 months. Just thaw at room temperature before eating.
Why You Are Going to Absolutely Love This Recipe
This is genuinely the best homemade chocolate cake I have ever made, and I have made a lot of them. The crumb is impossibly moist, the flavor is deep and intensely chocolatey, and that silky buttercream frosting is just over the top in the best possible way. It looks impressive but it is really straightforward to make, even if you are a relatively new baker. Once you make this from scratch, you will never want a box mix again. It is the kind of recipe you will print out and keep forever.
Behind the Scenes: How This Recipe Came Together
Okay, I have to tell you about the first time I tested this recipe because it was quite the adventure. My very first batch came out of the oven looking gorgeous, but when I sliced into it, the center was slightly underbaked. Total rookie mistake, I had not given it quite enough time and my oven runs a little cool. So lesson learned, always use a toothpick and do not rush that bake time.
The second test was better, but I had used cold eggs straight from the fridge and the batter looked slightly curdled when I added them. The cake still turned out okay, but the crumb was not as perfectly tender as I wanted. Room temperature ingredients really do make a noticeable difference.
By the third round, I had it all figured out. Hot coffee instead of plain water, properly softened butter, sifted cocoa, and a full cool-down before frosting. The result was exactly what I had been dreaming of. If you want to see more behind-the-scenes recipe testing, baking ideas, and all kinds of sweet inspiration, come find me over on Pinterest. I share all my favorites over there and there is so much good stuff to browse through.
PrintClassic Moist Chocolate Cake
A luxuriously moist two-layer chocolate cake with rich cocoa flavor and a velvety chocolate buttercream frosting. Perfect for any celebration or quiet dessert moment.
- Total Time: 55
- Yield: 12 servings 1x
Ingredients
2 1/4 cups all-purpose flour
2 cups granulated sugar
1/2 cup unsweetened cocoa powder
1 1/2 tsp baking powder
1 1/2 tsp baking soda
1/2 tsp salt
1 cup whole milk (or non-dairy alternative)
2 large eggs
1/2 cup vegetable oil
1 tbsp pure vanilla extract
1/4 cup boiling water
Instructions
Preheat oven to 350°F (176°C). Grease and flour two 9-inch round cake pans
In a large bowl, whisk together flour, sugar, cocoa powder, baking powder, baking soda, and salt
Add milk, eggs, oil, and vanilla. Mix on medium speed until smooth
Stir in boiling water (batter will be thin) and pour evenly into prepared pans
Bake 30-35 minutes until a toothpick inserted into centers comes out clean
Cool in pans 10 minutes, then turn out onto wire racks to cool completely
Notes
Room temperature eggs and milk blend more smoothly. For gluten-free option, use 1:1 flour blend
Freeze fully cooled layers between parchment paper for up to 3 months
Top with chocolate buttercream made from 1 cup softened butter, 3 1/2 cups powdered sugar, 1/2 cup cocoa powder, 1 tsp vanilla, and 4-6 tbsp milk
- Prep Time: 20
- Cook Time: 35
- Category: Desserts
- Method: Baking
- Cuisine: American
- Diet: Vegetarian
Nutrition
- Serving Size: 1 slice (1/12 of cake)
- Calories: 850
- Sugar: 65g
- Sodium: 400mg
- Fat: 35g
- Saturated Fat: 12g
- Carbohydrates: 115g
- Fiber: 4g
- Protein: 10g
- Cholesterol: 110mg