This flag cake recipe has been my go-to Fourth of July dessert for years now, and honestly, it never fails to steal the show at every single summer gathering I bring it to. There is something so magical about pulling out a giant sheet cake decorated like an American flag that just makes everyone smile before they even take a bite. And the best part? It is way easier than it looks, I promise.
What Is a Flag Cake?
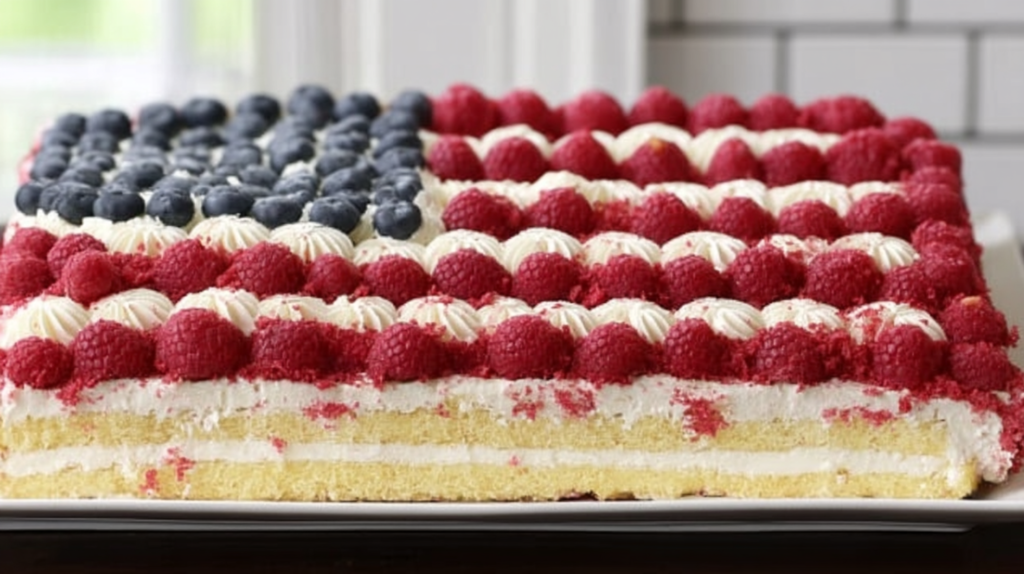
A flag cake is basically a large sheet cake that is decorated on top to look like the American flag using frosting and fresh fruit. Think fluffy white frosting as the base, blueberries in the corner to represent the blue field of stars, and rows of raspberries alternating with piped frosting stripes to mimic the red and white stripes. It is the classic patriotic cake recipe you see at every Fourth of July cookout, Memorial Day party, or Labor Day BBQ.
This version uses a buttery vanilla sheet cake as the base, and it is honestly so good on its own that you might just want to eat it plain. But paired with that tangy cream cheese frosting and all those gorgeous fresh berries? It is truly next level.
What You Will Need for This Flag Cake Recipe
Let me walk you through everything you need before you get started. I love how the ingredient list for this recipe is made up of simple pantry staples, with fresh fruit being the star of the decoration. Here is the full breakdown:
For the Cake:
- 3 cups (375 g) all-purpose flour – the backbone of the cake. I always spoon and level my flour so it does not get packed in and make the cake dense.
- 1/3 cup (42.67 g) cornstarch – this is the secret weapon! It makes the crumb super soft and tender. Do not skip it.
- 1 teaspoon baking soda – gives the cake just the right lift without making it too airy.
- 1 teaspoon kosher salt – balances all the sweetness. Regular table salt works too, just use a little less.
- 1 cup + 2 tablespoons (227 g) unsalted butter, at room temperature – make sure it is truly softened, not melted. Room temp butter creams so much better.
- 3 cups (600 g) granulated sugar – yes, it is a big cake so it needs a good amount of sugar. Trust the process.
- 6 extra-large eggs, at room temperature – room temp eggs incorporate more evenly into the batter. Pop them in warm water for 10 minutes if you forgot to take them out.
- 1 cup (230 ml) sour cream, at room temperature – this adds incredible moisture and a slight tang. You can swap with full-fat plain yogurt in a pinch.
- 1.5 teaspoons vanilla extract – use good quality pure vanilla for the best flavor.
For the Frosting:
- 2 cups (454 g) unsalted butter, at room temperature – again, make sure it is fully softened for a smooth, lump-free frosting.
- 24 ounces (680 g) cream cheese, at room temperature – full-fat block cream cheese only please, not the spreadable kind in a tub. It needs to be room temp or the frosting will be lumpy.
- 4 cups (480 g) powdered sugar – sift it first if you want a super silky frosting.
- 1.5 teaspoons vanilla extract – just a touch to round out the flavor of the cream cheese frosting.
For Decorating:
- 24 ounces (680 g) raspberries – fresh raspberries are key here. They represent the red stripes and look absolutely stunning.
- 16 ounces (454 g) blueberries – fresh blueberries fill in the blue canton (the star field in the corner). They stay firm and look perfect.
Step-by-Step Instructions for the Best Flag Cake Recipe
Okay, let us get into the fun part! This whole process takes a bit of time, but I promise each step is straightforward. Here is exactly how to make this beautiful patriotic sheet cake from scratch.
Step 1: Prep Your Pan and Preheat the Oven
Start by preheating your oven to 350 degrees F. Then grease and flour a 13×18-inch half sheet pan really well. I use butter to grease mine and then dust it with flour, tapping out any excess. You can also use a non-stick baking spray with flour already in it to save a step. Set your pan aside while you make the batter.
Step 2: Mix the Dry Ingredients
In a medium bowl, whisk together the all-purpose flour, cornstarch, baking soda, and salt. Whisking them together first means everything is evenly distributed throughout the batter. Go ahead and set this bowl aside too.
Step 3: Cream the Butter and Sugar
In your stand mixer fitted with a paddle attachment, cream together the softened butter and granulated sugar on medium-high speed for about 3 minutes. You are looking for the mixture to turn pale, light, and fluffy. This step matters so much for the texture of the cake, so do not rush it. Properly creamed butter and sugar gives you that soft, moist crumb everyone loves.
Step 4: Add the Eggs
Reduce the mixer speed to medium. Add the eggs two at a time, beating well after each addition and scraping down the sides of the bowl in between. Adding them gradually keeps the batter from curdling or separating.
Step 5: Add the Wet Ingredients
Reduce the speed to low and add the sour cream and vanilla extract, mixing just until combined. Give the batter a little stir with a rubber spatula at this point to make sure nothing is hiding at the bottom of the bowl.
Step 6: Add the Dry Ingredients
With the mixer still on low, gradually add in your dry ingredient mixture. Mix just until the flour is incorporated, then fold the batter gently with a rubber spatula. Overmixing once the flour is added will make the cake tough, so be gentle here.
Step 7: Bake the Cake
Pour the batter into your prepared pan and spread it into an even layer using an offset spatula. Bake for 20 to 30 minutes, until the top is golden brown and a thin knife or toothpick inserted in the center comes out clean. Every oven is different, so start checking at the 20-minute mark. Once baked, place the pan on a wire rack and let it cool completely before you even think about frosting it.
Step 8: Make the Cream Cheese Frosting
In your stand mixer, beat the softened butter and room temperature cream cheese together on medium-high speed until the mixture is completely smooth, about 3 minutes. Then reduce the speed to medium-low and gradually add the powdered sugar. Once all the sugar is in, add the vanilla and increase the speed back to medium. Beat for about 1 minute until everything is beautifully combined and fluffy.
Step 9: Decorate Your Flag Cake
This is honestly my favorite part of the whole process! Take about three-quarters of the frosting and spread it in an even layer over the top of the cooled cake. Then use a toothpick to lightly draw a square in the upper left-hand corner of the cake. This is where your blueberry canton goes. Fill that square entirely with blueberries, packed in nice and close together.
Next, place two rows of raspberries across the top of the cake just to the right of the blueberry square to create your first red stripe. Put the remaining frosting into a piping bag fitted with a large tip, and pipe two rows of frosting below the raspberries for the white stripe. Continue alternating rows of raspberries and piped frosting all the way to the bottom of the cake.
Finally, pipe little stars onto the blueberries in whatever pattern you like. I usually just do a random scatter and it still looks adorable. Nobody is grading you on accuracy here, honestly.
How to Serve This Patriotic Cake
This flag cake recipe is perfect served right at room temperature, which makes it so easy for outdoor summer parties. Slice it into square portions straight from the pan and serve it on little paper plates. I like to keep the whole flag design intact when I display it, so everyone can ooh and aah before I cut into it.
It pairs beautifully with a scoop of vanilla ice cream on the side if you want to go the extra mile. A cold glass of lemonade or sparkling fruit water alongside this berry-covered cake is honestly summer perfection. This is also a great make-ahead dessert for big gatherings since you can bake the cake the night before and decorate it the morning of your party.
Tips for the Perfect Flag Cake Recipe
- Use room temperature ingredients: This applies to the butter, eggs, sour cream, and cream cheese. Room temp ingredients combine more smoothly and give you a better texture in both the cake and the frosting.
- Do not skip the cornstarch: It is the little trick that makes this cake noticeably softer and more tender than a standard vanilla sheet cake. It is a real game changer.
- Cool the cake completely before frosting: I know it is tempting to rush this, but warm cake will melt your frosting and make it slide everywhere. Give it at least an hour on the wire rack, or pop it in the fridge to speed things up.
- Use a toothpick to plan your design: Lightly sketching the flag layout with a toothpick before placing any fruit helps you visualize the spacing and keeps the proportions looking right.
- Pat your berries dry: Before placing the raspberries and blueberries on the frosting, gently pat them with a paper towel. Wet berries can bleed color onto the white frosting and make it look a little messy.
- Pipe neat stripes: For really clean frosting stripes, use a large round or star tip and pipe slowly and steadily. Do not worry too much though, even imperfect stripes look festive and fun!
- Storage tip: The cake can sit at room temperature if your space is cool and air-conditioned. Otherwise, cover leftovers with plastic wrap and keep them in the refrigerator. It stays good for up to 3 days, but it really is best enjoyed within a day of decorating.
Questions You Might Have About This Flag Cake Recipe
Can I make this flag cake recipe ahead of time?
Yes, absolutely! You can bake the cake a day ahead and store it covered at room temperature or in the fridge. Make the frosting and decorate the cake the morning of your event for the freshest look. Once decorated, it keeps well for up to 3 days refrigerated, but the berries are definitely at their best on day one.
Can I use a different size pan?
This recipe is specifically designed for a 13×18-inch half sheet pan, which is what gives it that wide flag shape. If you use a smaller pan, you will need to increase the baking time and your stripes might not have as much room to look like a proper flag. You can technically use a 9×13-inch pan but the cake will be thicker and will need longer to bake through.
What can I use instead of sour cream?
Full-fat plain Greek yogurt is the best swap for sour cream in this cake. It has a similar tangy flavor and creamy consistency, so the cake will turn out just as moist and delicious. Avoid using low-fat versions as they can make the cake slightly drier.
Can I use frozen berries instead of fresh?
I really recommend sticking with fresh berries for the decoration. Frozen berries release a lot of liquid as they thaw and will bleed color all over your white frosting, which would make the flag design look muddy and messy. Fresh berries look cleaner, hold their shape better, and honestly just taste brighter too.
Why You Will Fall in Love With This Cake
Okay so honestly, what is not to love here? This flag cake recipe gives you a buttery, moist vanilla sheet cake with a tender crumb, piled high with tangy cream cheese frosting that is not too sweet, and finished with gorgeous fresh berries. It feeds a crowd, it is stunning to look at, and it is so much more fun to make than a regular layer cake.
Whether you are hosting a backyard BBQ, a potluck, or just want to impress your family this summer, this is the dessert that will have everyone coming back for seconds. I genuinely look forward to making it every single year.
If you want more fun recipe ideas and baking inspiration, you can check out my Pinterest boards at Pinterest where I save all my favorite holiday desserts, sheet cake ideas, and seasonal recipes. I am always pinning new things over there and I would love for you to come find me!
Print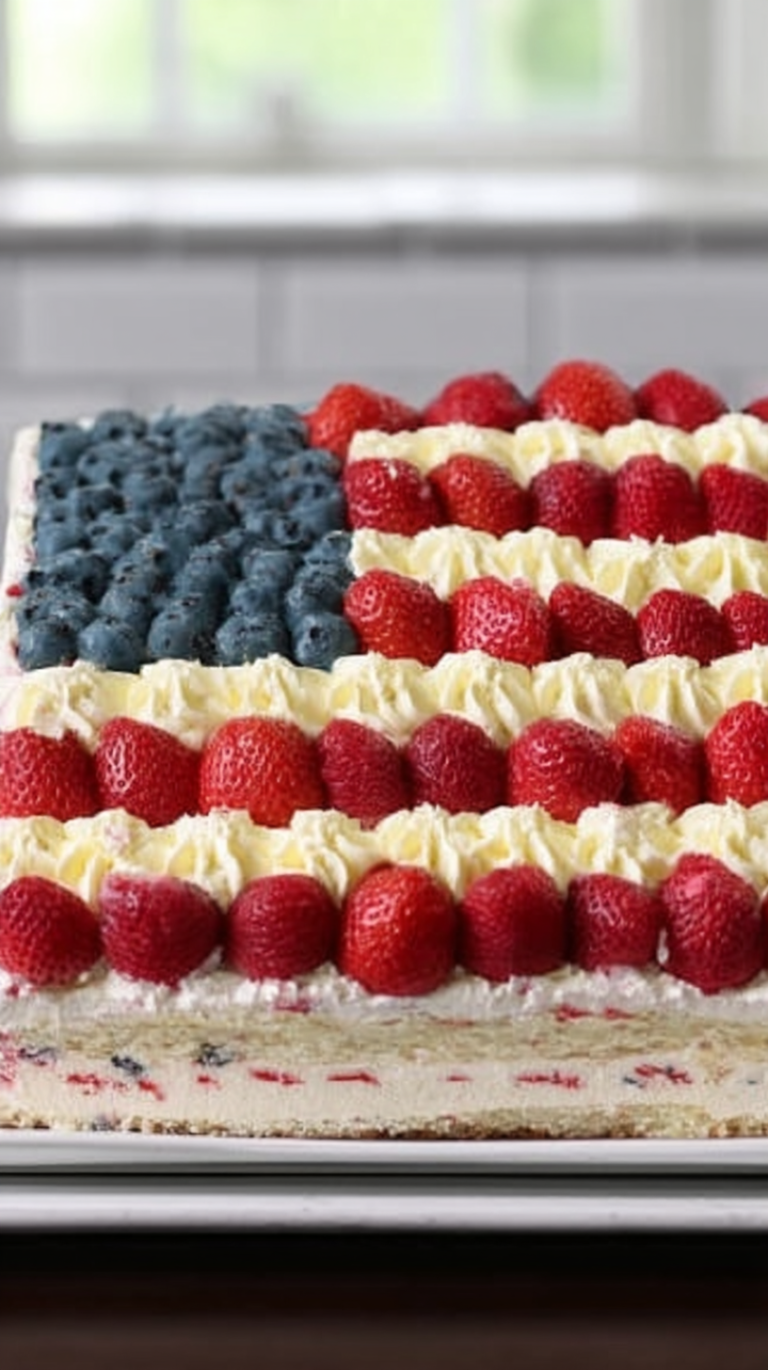
Flag Cake
A festive July 4th sheet cake decorated like the American flag using white frosting, blueberries (for the blue field), and raspberries (for red stripes). Buttery vanilla cake pairs perfectly with tangy cream cheese frosting for a crowd-pleasing, patriotic dessert.
- Total Time: 60
- Yield: 16 servings (1/16 of cake per serving) 1x
Ingredients
3 cups all-purpose flour
1/3 cup cornstarch
1 teaspoon baking soda
1 teaspoon salt
1 cup + 2 tablespoons unsalted butter, room temperature
3 cups granulated sugar
6 large eggs, room temperature
1 cup sour cream, room temperature
2 teaspoons pure vanilla extract
16 ounces cream cheese, room temperature
2 tablespoons unsalted butter, room temperature
4 cups powdered sugar
1 teaspoon vanilla extract
2 cups blueberries, washed
2 cups raspberries, washed
Instructions
Preheat oven to 350°F (175°C) and line a 13×18-inch baking sheet with parchment paper
In a bowl, whisk together flour, cornstarch, baking soda, and salt
In a mixer, beat butter and sugar until light and fluffy
Add eggs, one at a time, then mix in sour cream and vanilla
Alternately add dry ingredients and mix until incorporated
Pour batter into prepared pan and bake 25-30 minutes until golden
Let cake cool completely
For frosting: Beat cream cheese, butter, powdered sugar, and vanilla until smooth
Spread white frosting over cooled cake
Place blueberries in the top left corner in 7 rows for the blue field
Pipe white frosting stripes alternating with raspberry rows using parchment paper templates
Notes
Use parchment paper to create precise flag patterns before adding berries
Substitute frozen blueberries (thawed and drained) if fresh unavailable
Store covered at room temperature up to 24 hours or refrigerate for freshness
- Prep Time: 30
- Cook Time: 30
- Category: Desserts
- Method: Baking
- Cuisine: American
- Diet: Vegetarian
Nutrition
- Serving Size: 1 slice (1/16 of cake)
- Calories: 420
- Sugar: 60g
- Sodium: 500mg
- Fat: 25g
- Saturated Fat: 15g
- Carbohydrates: 58g
- Fiber: 3g
- Protein: 6g
- Cholesterol: 85mg