The Giant Matilda Cake has been living rent-free in my head ever since I first saw that iconic scene, and honestly, I just had to recreate it in my own kitchen. This is the kind of cake that makes people stop talking the moment it hits the table. It is dramatic, deeply chocolatey, and absolutely irresistible. If you love rich, fudgy chocolate layer cakes with a glossy ganache drip and a rustic, slightly messy finish, then you are in exactly the right place. Trust me, this one is worth every single step.
What Is the Giant Matilda Cake?
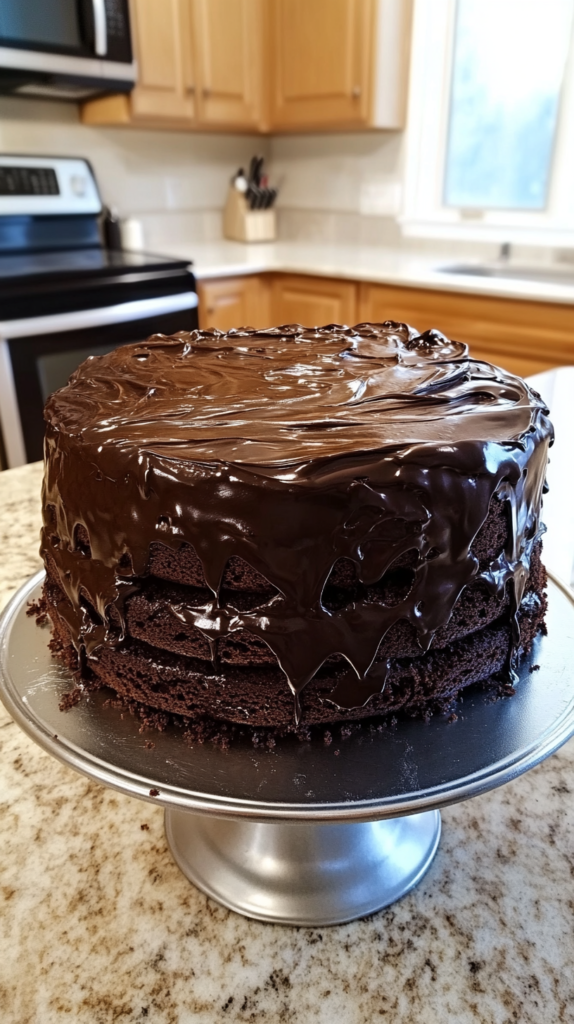
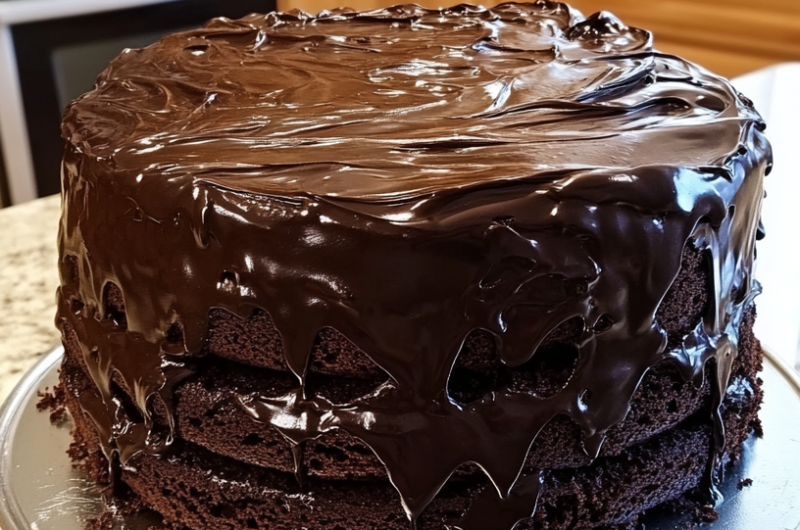
The Giant Matilda Cake is inspired by the legendary chocolate cake scene from the movie Matilda, where a young boy is forced to eat an enormous, glistening chocolate cake in front of the whole school. The real-life version is a towering triple-layer chocolate sponge cake filled with silky chocolate buttercream and finished with a dramatic, drippy chocolate ganache. It is less polished than a wedding cake and more in the spirit of a rustic, over-the-top celebration cake that just screams indulgence.
What You Will Need for the Giant Matilda Cake
Before we jump in, let me walk you through everything you need. The ingredient list might look a little long at first, but most of it is pantry staples. I have also added some easy swaps where I can!
Chocolate Cake
- 340g (1 1/2 cups) unsalted butter – gives the sponge that rich, dense, fudgy texture. You can use salted butter and just reduce the added salt slightly.
- 375ml (1 1/2 cups) hot strong coffee, made from 2 tbsp instant coffee dissolved in boiling water – do not skip this! The coffee deepens the chocolate flavor without making it taste like coffee. If you really cannot use coffee, substitute hot water instead.
- 100g (1 cup) unsweetened cocoa powder, sifted – use a good quality Dutch-processed cocoa for the best dark, rich flavor.
- 200g (1 cup) light brown sugar, packed – adds a subtle caramel depth to the sponge.
- 210g (1 cup) granulated sugar – balances the sweetness and helps with texture.
- 1 tbsp pure vanilla extract – always use pure, not imitation, for the best flavor.
- 1 tsp salt – brings out all the chocolate notes beautifully.
- 6 large eggs, at room temperature – room temperature eggs incorporate much more smoothly into the batter.
- 3 large egg yolks, chilled – these extra yolks add richness and a dense, fudgy crumb.
- 300g (2 cups) all-purpose flour – plain flour works perfectly here. You could swap with a 1:1 gluten-free flour blend if needed.
- 1 tsp baking soda – the leavening agent for a tender, soft crumb.
Chocolate American Buttercream Filling
- 375g (1 1/2 cups + 2 tbsp) unsalted butter, softened – this must be genuinely soft, not melted. Leave it out for at least an hour before starting.
- 375g (3 cups) powdered sugar – also called icing sugar. Sift it to avoid lumps.
- 2 tsp pure vanilla extract – adds warmth to the buttercream.
- 1 tsp whole milk – loosens the buttercream just a touch. You can use any milk or a splash of heavy cream instead.
- 25g (1/4 cup) unsweetened cocoa powder – for that deep chocolate buttercream flavor.
Chocolate Ganache
- 580g (3 cups) dark chocolate, finely chopped – finely chopping the chocolate helps it melt evenly. Use chocolate with at least 50 to 60% cocoa content for the glossiest finish.
- 250ml (1 cup) heavy cream – this is what makes the ganache pourable and luscious.
- 1 tbsp glucose syrup or corn syrup – this gives the ganache that signature shiny, mirror-like finish. Do not skip it if you want that glossy drip!
Step-by-Step Instructions for the Giant Matilda Cake
Making the Chocolate Cake Layers
Step 1: Prep your tins and oven. Preheat your oven to 180 degrees Celsius (350 degrees Fahrenheit). Spray three 20cm (8-inch) round cake tins with oil spray and line the bottoms with baking paper. Having three tins ready to go at once saves so much time.
Step 2: Make the coffee mixture. Dissolve the instant coffee in the boiling water and stir until it is fully combined. This step is quick but so important for that deep chocolatey flavor in the final cake.
Step 3: Melt the butter and combine with coffee. Melt the butter in a large heatproof bowl using your microwave in 30-second intervals until fully melted. Pour in the hot coffee and stir everything together. Set it aside to cool down slightly before adding the other ingredients.
Step 4: Mix the dry ingredients with the wet base. In a large bowl, whisk together both sugars, the sifted cocoa powder, baking soda, and salt. Pour in the butter and coffee mixture and stir until everything is well combined. The batter will smell absolutely incredible at this point.
Step 5: Add eggs and flour. Add the vanilla extract and eggs, then stir until smooth. Add the flour and whisk until no dry streaks remain, but be careful not to overwhip the batter. Overwhipping develops the gluten and can make the cake tough instead of tender.
Step 6: Bake the layers. Divide the batter evenly among your three prepared tins and bake for 20 minutes, or until a toothpick inserted into the center comes out clean. Cool in the tins for 5 minutes, then turn out onto wire racks to cool completely.
Step 7: Chill the cake layers. Once completely cool, wrap each layer tightly in plastic wrap and refrigerate for at least 4 hours, or overnight. Chilling the layers makes them much easier to stack and frost without crumbling. This step genuinely transformed my assembly process!
Making the Chocolate Buttercream Filling
Step 8: Beat the butter. Beat the softened butter in a stand mixer, starting on low speed and gradually increasing to high. Beat for a full 5 minutes until the butter is very fluffy and pale. This step makes all the difference between a flat, dense buttercream and a light, airy one.
Step 9: Add the sugar and cocoa. Scrape down the sides of the bowl. Add the powdered sugar, cocoa powder, and vanilla on low speed until incorporated, then increase to high speed and beat for another 5 to 6 minutes. The buttercream should look pale, light, and fluffy. Add the milk and beat briefly to loosen it slightly.
Making the Chocolate Ganache
Step 10: Make the ganache. Combine the finely chopped dark chocolate, heavy cream, and glucose syrup in a large microwave-safe bowl. Microwave in 30-second intervals, stirring between each one, until completely smooth and glossy. Cover with plastic wrap and let it sit at room temperature until it thickens slightly but is still pourable. This usually takes around 30 to 45 minutes depending on your kitchen temperature.
Assembling the Giant Matilda Cake
Step 11: Stack the layers. Place the first chilled cake layer on a round silver metal cake stand. Spread half of the chocolate buttercream evenly over the top. Place the second cake layer on top and spread the remaining buttercream evenly. Then add the final third layer on top.
Step 12: Add the dramatic ganache finish. Pour the ganache generously over the entire top of the cake. Use a spatula to spread it in loose, rustic swirl strokes across the top. Let the ganache drip naturally and unevenly down the sides of the cake, leaving some of the dark chocolate sponge layers peeking through between the drips. Do not try to cover the sides completely. Those partially exposed layers are the rustic, signature look of this cake and what makes it so visually stunning.
Step 13: Let it set. Leave the assembled cake to set at room temperature for 30 minutes before slicing and serving. The wait is hard but so worth it.
How to Serve Your Giant Matilda Cake
This cake is already a showstopper on its own, so you really do not need much else. Serve generous slices with a big scoop of good vanilla ice cream on the side for a truly indulgent dessert. A small drizzle of warm ganache over each slice never hurts either. For a birthday or celebration, pile some fresh raspberries on top just before serving for a pop of color and a tart contrast to all that richness. And honestly, a cold glass of whole milk alongside a slice is just perfection.
Tips for the Perfect Giant Matilda Cake
- Chill your cake layers before assembling. I cannot stress this enough. A warm or even room-temperature cake layer will slide around and crumble when you try to stack and frost it. Overnight chilling in the fridge is ideal.
- Do not skip the coffee in the cake. Even if you are not a coffee drinker, the hot coffee simply intensifies the chocolate flavor. You will not taste the coffee at all in the final cake.
- Use good quality dark chocolate for the ganache. This is not the place to use budget chocolate chips. A good-quality dark chocolate bar makes the ganache glossier, richer, and far more delicious.
- Beat your buttercream for the full time. Those extra minutes of beating really do transform the texture from heavy and dense to light and cloud-like. Set a timer and do not rush it.
- Let your ganache cool and thicken before pouring. If the ganache is too hot and runny, it will just drip straight off the cake. Aim for a thick but still pourable consistency, similar to warm honey.
- Embrace the rustic look. The partially exposed cake sides are not a mistake, they are the signature look of this giant chocolate cake. Resist the urge to neaten it up too much!
- Use a kitchen scale. This recipe really benefits from weighing ingredients rather than using cups, especially for the flour and chocolate. It makes a real difference in the final texture.
Your Questions About the Giant Matilda Cake, Answered
Can I make the Giant Matilda Cake ahead of time?
Yes, absolutely! In fact, this cake is better when made in stages. You can bake the cake layers up to two days ahead, wrap them in plastic wrap, and keep them in the fridge. The buttercream can also be made a day ahead and stored in an airtight container at room temperature. Assemble and add the ganache on the day you plan to serve it for the freshest result.
Can I use a different size cake tin?
You can use 23cm (9-inch) tins instead, but the layers will be thinner and the bake time will be slightly shorter, so check them around the 15 to 17 minute mark. The overall look of the cake will be a little flatter but it will taste just as amazing. Avoid going smaller than 20cm or the layers will be very thick and may not bake evenly.
My ganache set too hard. Can I fix it?
Yes! Simply microwave the ganache in 10-second intervals, stirring between each one, until it is soft and pourable again. The key is to not overheat it. You are just warming it back up, not melting it completely. The glucose syrup in the recipe also helps keep the ganache more flexible and shiny even after setting.
How should I store leftovers?
Store leftover slices in an airtight container at room temperature for up to two days, or in the fridge for up to five days. If you store it in the fridge, let each slice come back to room temperature before eating for the best texture and flavor. Cold buttercream can taste a little dense and firm, but once it warms up it becomes fluffy and delicious again.
Why You Will Absolutely Love This Cake
This Giant Matilda Cake is the kind of recipe that genuinely makes people gasp when they see it. It is deeply chocolatey, with a fudgy dense sponge, a light and airy buttercream filling, and a glossy, dramatic ganache finish. It is also surprisingly forgiving and the rustic, imperfect look is part of the charm. Whether you are baking it for a birthday, a dinner party, or honestly just because it is a Tuesday and you deserve something spectacular, this is the chocolate layer cake that will become your most-requested recipe.
If you want to follow along with more recipe adventures like this one, you can find me on Pinterest where I share all my latest baking projects, tips, and food inspiration. Come say hi over at my Pinterest page and save this recipe for later. It is one you will want to come back to again and again!
Giant Matilda Cake
Course: DessertsCuisine: AmericanDifficulty: Medium30
servings20
minutes40
minutes294
kcalIngredients
- Chocolate Cake
340g (1 1/2 cups) unsalted butter – gives the sponge that rich, dense, fudgy texture. You can use salted butter and just reduce the added salt slightly.
375ml (1 1/2 cups) hot strong coffee, made from 2 tbsp instant coffee dissolved in boiling water – do not skip this! The coffee deepens the chocolate flavor without making it taste like coffee. If you really cannot use coffee, substitute hot water instead.
100g (1 cup) unsweetened cocoa powder, sifted – use a good quality Dutch-processed cocoa for the best dark, rich flavor.
200g (1 cup) light brown sugar, packed – adds a subtle caramel depth to the sponge.
210g (1 cup) granulated sugar – balances the sweetness and helps with texture.
1 tbsp pure vanilla extract – always use pure, not imitation, for the best flavor.
1 tsp salt – brings out all the chocolate notes beautifully.
6 large eggs, at room temperature – room temperature eggs incorporate much more smoothly into the batter.
3 large egg yolks, chilled – these extra yolks add richness and a dense, fudgy crumb.
300g (2 cups) all-purpose flour – plain flour works perfectly here. You could swap with a 1:1 gluten-free flour blend if needed.
1 tsp baking soda – the leavening agent for a tender, soft crumb.
- Chocolate American Buttercream Filling
375g (1 1/2 cups + 2 tbsp) unsalted butter, softened – this must be genuinely soft, not melted. Leave it out for at least an hour before starting.
375g (3 cups) powdered sugar – also called icing sugar. Sift it to avoid lumps.
2 tsp pure vanilla extract – adds warmth to the buttercream.
1 tsp whole milk – loosens the buttercream just a touch. You can use any milk or a splash of heavy cream instead.
25g (1/4 cup) unsweetened cocoa powder – for that deep chocolate buttercream flavor.
- Chocolate Ganache
580g (3 cups) dark chocolate, finely chopped – finely chopping the chocolate helps it melt evenly. Use chocolate with at least 50 to 60% cocoa content for the glossiest finish.
250ml (1 cup) heavy cream – this is what makes the ganache pourable and luscious.
1 tbsp glucose syrup or corn syrup – this gives the ganache that signature shiny, mirror-like finish. Do not skip it if you want that glossy drip!
Directions
- Making the Chocolate Cake Layers
- Prep your tins and oven. Preheat your oven to 180 degrees Celsius (350 degrees Fahrenheit). Spray three 20cm (8-inch) round cake tins with oil spray and line the bottoms with baking paper. Having three tins ready to go at once saves so much time.
- Make the coffee mixture. Dissolve the instant coffee in the boiling water and stir until it is fully combined. This step is quick but so important for that deep chocolatey flavor in the final cake.
- Melt the butter and combine with coffee. Melt the butter in a large heatproof bowl using your microwave in 30-second intervals until fully melted. Pour in the hot coffee and stir everything together. Set it aside to cool down slightly before adding the other ingredients.
- Mix the dry ingredients with the wet base. In a large bowl, whisk together both sugars, the sifted cocoa powder, baking soda, and salt. Pour in the butter and coffee mixture and stir until everything is well combined. The batter will smell absolutely incredible at this point.
- Add eggs and flour. Add the vanilla extract and eggs, then stir until smooth. Add the flour and whisk until no dry streaks remain, but be careful not to overwhip the batter. Overwhipping develops the gluten and can make the cake tough instead of tender.
- Bake the layers. Divide the batter evenly among your three prepared tins and bake for 20 minutes, or until a toothpick inserted into the center comes out clean. Cool in the tins for 5 minutes, then turn out onto wire racks to cool completely.
- Chill the cake layers. Once completely cool, wrap each layer tightly in plastic wrap and refrigerate for at least 4 hours, or overnight. Chilling the layers makes them much easier to stack and frost without crumbling. This step genuinely transformed my assembly process!
- Making the Chocolate Buttercream Filling
- Beat the butter. Beat the softened butter in a stand mixer, starting on low speed and gradually increasing to high. Beat for a full 5 minutes until the butter is very fluffy and pale. This step makes all the difference between a flat, dense buttercream and a light, airy one.
- Add the sugar and cocoa. Scrape down the sides of the bowl. Add the powdered sugar, cocoa powder, and vanilla on low speed until incorporated, then increase to high speed and beat for another 5 to 6 minutes. The buttercream should look pale, light, and fluffy. Add the milk and beat briefly to loosen it slightly.
- Making the Chocolate Ganache
- Make the ganache. Combine the finely chopped dark chocolate, heavy cream, and glucose syrup in a large microwave-safe bowl. Microwave in 30-second intervals, stirring between each one, until completely smooth and glossy. Cover with plastic wrap and let it sit at room temperature until it thickens slightly but is still pourable. This usually takes around 30 to 45 minutes depending on your kitchen temperature.
- Assembling the Giant Matilda Cake
- Stack the layers. Place the first chilled cake layer on a round silver metal cake stand. Spread half of the chocolate buttercream evenly over the top. Place the second cake layer on top and spread the remaining buttercream evenly. Then add the final third layer on top.
- Add the dramatic ganache finish. Pour the ganache generously over the entire top of the cake. Use a spatula to spread it in loose, rustic swirl strokes across the top. Let the ganache drip naturally and unevenly down the sides of the cake, leaving some of the dark chocolate sponge layers peeking through between the drips. Do not try to cover the sides completely. Those partially exposed layers are the rustic, signature look of this cake and what makes it so visually stunning.
- Let it set. Leave the assembled cake to set at room temperature for 30 minutes before slicing and serving. The wait is hard but so worth it.