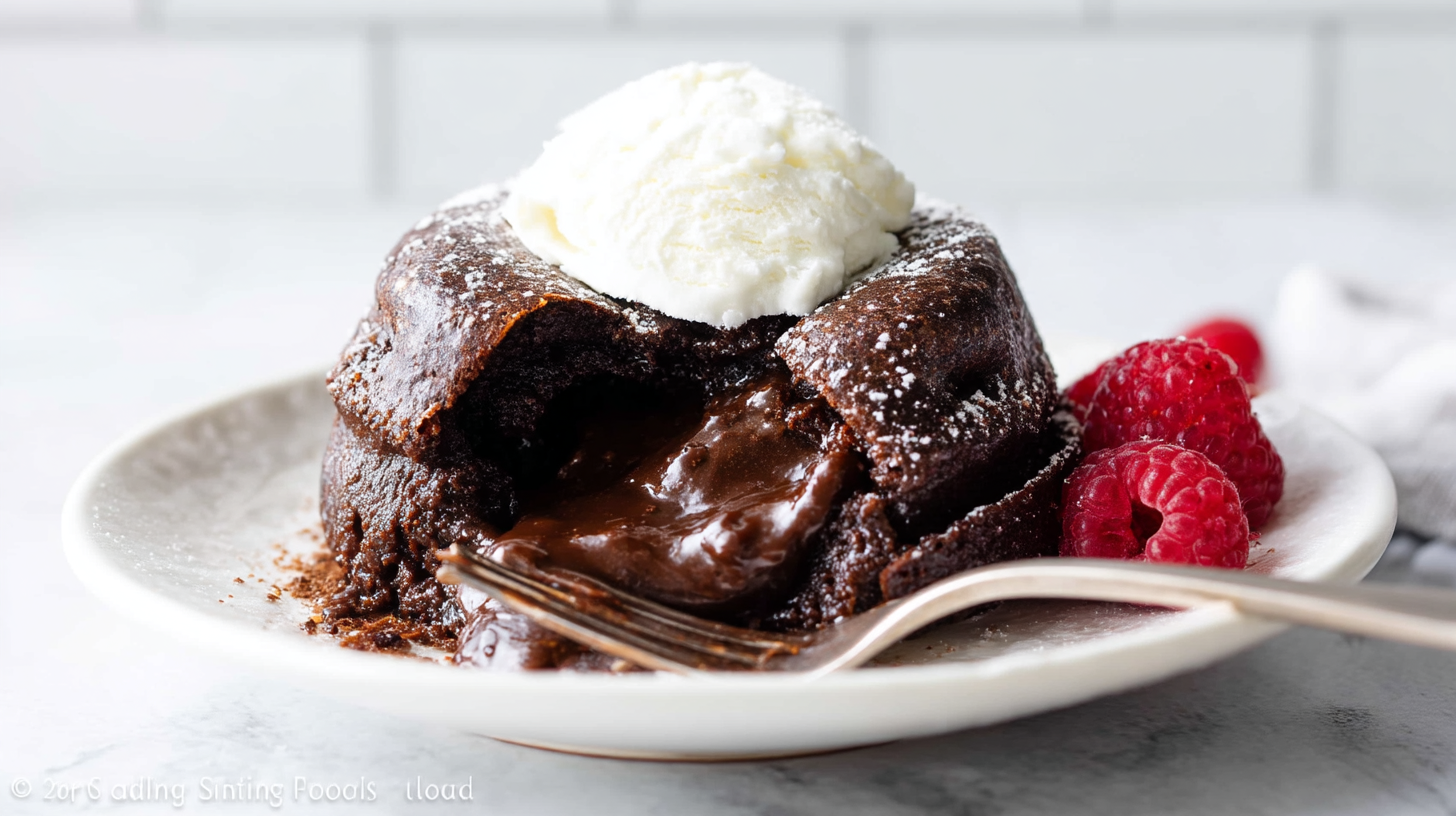
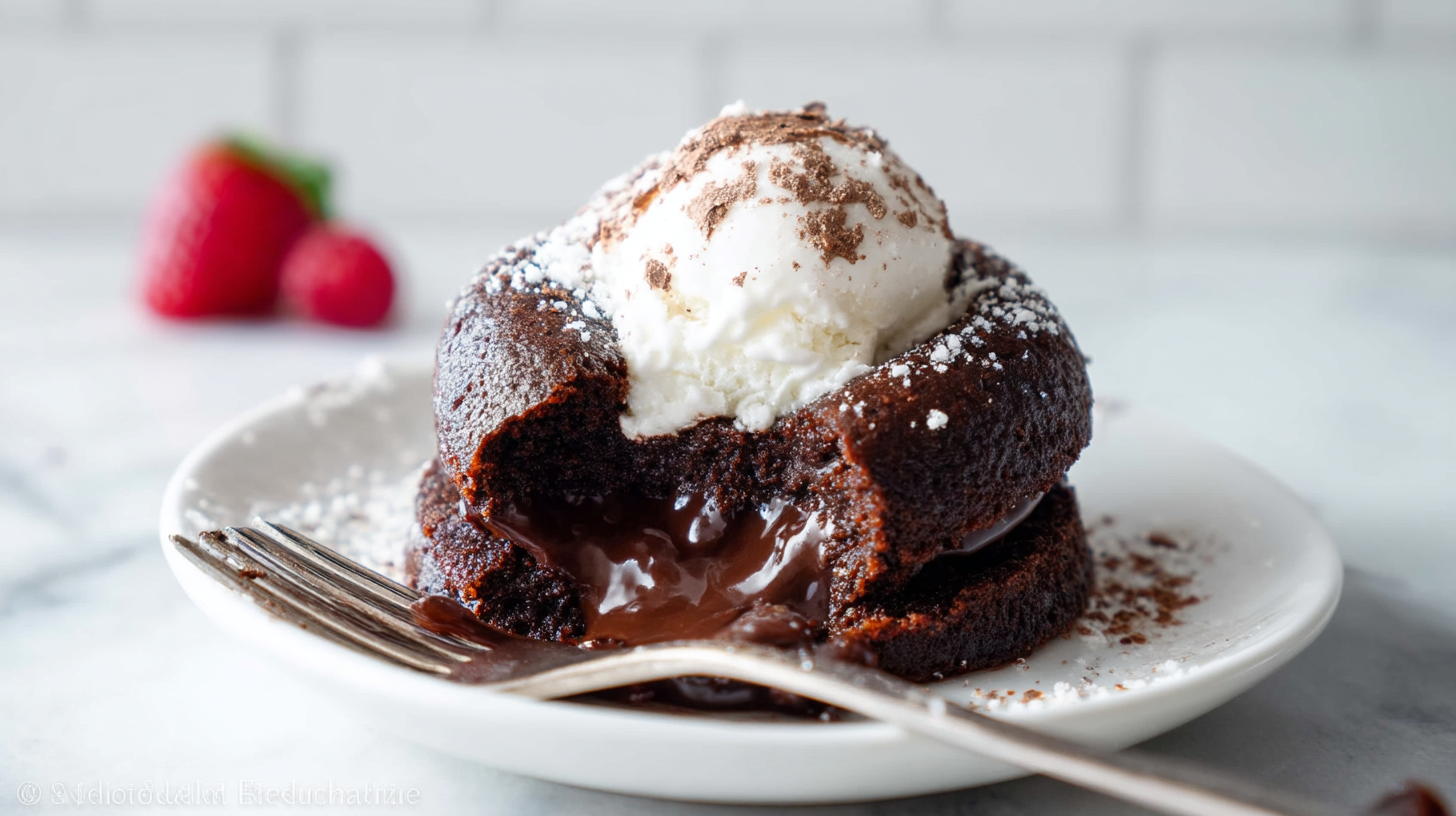
Chocolate lava cake is honestly one of those desserts that makes people think you spent hours in the kitchen when really, you were done in under 30 minutes. I remember the first time I made these for a dinner party and my friends were completely speechless. That warm, gooey molten center just oozing out when you cut into it? Pure magic. If you have been searching for a show-stopping dessert that is secretly super simple, you are in exactly the right place.
What Is Chocolate Lava Cake?
Chocolate lava cake, also called molten chocolate cake, is a small individual-sized dessert with a fully baked outside and a warm, liquid chocolate center. Think of it like a rich chocolate cake that hides a pool of melted chocolate inside. It is sometimes called a fondant au chocolat, and it became super trendy in fancy restaurants but honestly, it is completely doable at home. The secret is all in the baking time. Just a minute or two too long and you lose that dreamy molten lava center.
What You Will Need for Chocolate Lava Cake
The ingredient list for this chocolate lava cake is beautifully short. You probably have most of these things in your kitchen already, which is one of the reasons I absolutely love this recipe. Let me walk you through each one so you know exactly what to grab.
- 6 ounces (170g) high-quality semi-sweet chocolate: This is the star of the show, so do not skimp here. A good quality chocolate bar works way better than chocolate chips because the flavor is richer and the texture melts more smoothly. You can also use dark chocolate if you prefer a deeper, more intense flavor.
- 1/2 cup (8 Tbsp; 113g) unsalted butter: Unsalted is key so you can control the saltiness yourself. If you only have salted butter, just skip the added salt in the recipe.
- 1/4 cup (31g) all-purpose flour, spooned and leveled: Just a small amount is all you need to give the cake its structure. Spooning and leveling your flour prevents over-measuring, which would make the cake too dense.
- 1/2 cup (60g) confectioners’ sugar: Also known as powdered sugar, this dissolves quickly into the batter for a smooth, silky texture. Regular granulated sugar is not a great substitute here because it can make the texture grainy.
- 1/8 teaspoon salt: Just a tiny pinch, but it really wakes up all the chocolate flavor. Trust me on this one.
- 2 large eggs: These help bind everything together and give the cake its tender, fudgy texture.
- 2 large egg yolks: The extra yolks add richness and contribute to that glossy, gooey center. Do not skip these!
- Optional toppings: ice cream, berries, and/or chocolate syrup: Honestly, a scoop of vanilla ice cream on top is basically non-negotiable in my house. The cold ice cream against the warm cake is an experience in itself.
Step-by-Step Instructions for Chocolate Lava Cake
Okay, let us get into it. This is really where the fun begins. I promise the process is much simpler than it looks, and I will walk you through every step so you feel totally confident.
Step 1: Prep Your Ramekins Spray four 6-ounce ramekins with nonstick cooking spray and then dust them with cocoa powder. This step is so important because it is what allows the chocolate lava cake to slide out cleanly when you flip it onto a plate. If you do not have ramekins, you can also use half of a 12-count muffin pan. Just note that if you use a muffin pan, the recipe will yield about 6 smaller cakes instead of 4.
Step 2: Preheat the Oven Get your oven going at 425 degrees Fahrenheit (218 degrees Celsius). A hot oven is really what creates that contrast between the set outer layer and the liquid molten center. So make sure it is fully preheated before the cakes go in.
Step 3: Melt the Chocolate and Butter Coarsely chop your chocolate and place your butter in a medium heat-proof bowl. Add the chopped chocolate on top of the butter. Microwave everything on high in 10-second increments, stirring after each one, until completely smooth. I know it sounds fussy, but those short bursts really prevent the chocolate from seizing or burning. Once it is silky and glossy, set it aside to cool slightly.
Step 4: Mix the Dry and Wet Ingredients In one small bowl, whisk together your flour, confectioners’ sugar, and salt. In another small bowl, whisk the eggs and egg yolks together until they are fully combined. Now pour both of these mixtures into your bowl of melted chocolate. Using a silicone spatula or wooden spoon, slowly stir everything together until you have a smooth batter. If you notice any lumps, gently use your whisk to work them out. The batter will be slightly thick, and that is totally normal.
Step 5: Fill the Ramekins Spoon the chocolate batter evenly into your prepared ramekins or muffin cups. Try to divide it as equally as you can so all the cakes bake at the same rate.
Step 6: Bake Place the ramekins onto a baking sheet and bake for 12 to 14 minutes. You are looking for the sides to appear solid and firm while the tops still look soft and slightly underdone. That is exactly what you want! If you are using a muffin pan, the cakes will only need about 8 to 10 minutes since they are smaller.
Step 7: Flip and Release Let the cakes cool for just one minute after they come out of the oven. Then cover each ramekin with an inverted plate and carefully flip them over. Use an oven mitt because those ramekins will be seriously hot! The cakes should release easily. If you used a muffin pan, use a spoon to gently release each cake and place them upside down on your plates.
Step 8: Add Toppings and Serve Immediately Add your favorite toppings right away and serve immediately. This chocolate lava cake is best the moment it comes out, while that center is still warm and flowing.
How to Serve Your Chocolate Lava Cake
The best part about serving chocolate lava cake is that it already looks stunning on its own. But a few little extras can make it feel really special. A generous scoop of vanilla ice cream is my absolute go-to because that creamy, cold contrast against the warm, fudgy cake is everything. Fresh raspberries or strawberries add a gorgeous pop of color and a nice tartness that cuts through the richness. A drizzle of chocolate syrup or a dusting of powdered sugar also goes a long way. Serve these on pretty individual plates for a restaurant-quality presentation right at home.
Tips for the Perfect Chocolate Lava Cake
- Use good quality chocolate: Since chocolate is really the main ingredient here, the quality matters a lot. A high-quality semi-sweet chocolate bar gives you a much deeper, more complex flavor than regular chocolate chips.
- Do not overbake: This is the number one mistake people make. If the tops look fully set, you have gone too far and you will lose that iconic molten lava center. Pull them out when the edges are firm but the center still looks jiggly and soft.
- Prep ahead: You can make the batter and fill the ramekins up to a day ahead of time. Just cover them and refrigerate. When you are ready, pull them out 15 to 20 minutes before baking to take the chill off, then bake as directed. This is a lifesaver when entertaining.
- Do not skip the cocoa dusting: It might seem like a small detail, but dusting the ramekins with cocoa powder after spraying them ensures those cakes slide out perfectly every single time.
- Room temperature eggs work best: Cold eggs can make the melted chocolate seize up a little. If you have time, let your eggs sit out for about 15 minutes before you start.
- Use a baking sheet: Always place your ramekins on a baking sheet before they go into the oven. It makes it so much easier and safer to move them in and out.
Your Chocolate Lava Cake Questions, Answered
Can I make chocolate lava cake ahead of time?
Yes, absolutely! This is actually one of the best things about this recipe. You can prepare the batter, fill the ramekins, cover them tightly with plastic wrap, and refrigerate for up to 24 hours. When you are ready to bake, let them sit at room temperature for about 15 to 20 minutes first. Then bake as usual. The baking time might need an extra minute or two since they are coming from the fridge.
What if I do not have ramekins?
No ramekins? No problem! A standard muffin pan works just as well. Spray and dust 6 of the cups with cocoa powder, fill them up, and bake for only 8 to 10 minutes since the cups are smaller. The cakes will be a little smaller in size but just as delicious. To remove them, just use a spoon to scoop them out gently and flip each one onto a plate.
Why did my lava cake not have a molten center?
It was overbaked, and that is completely okay because it happens to everyone at least once. The timing can vary slightly depending on your oven. Next time, try pulling them out a minute earlier. The sides should look firm and set, but the top should still look glossy and soft. When in doubt, err on the side of underbaking rather than overbaking. Even without the full lava effect, it still tastes like a rich, fudgy chocolate brownie cake!
Can I use dark chocolate instead of semi-sweet?
Definitely! Dark chocolate works beautifully in this chocolate lava cake recipe and gives you an even more intense, bittersweet flavor. If you are someone who loves a really deep, rich chocolate experience, go for it. Just make sure you are still using a high-quality bar rather than chips for the best texture and melt.
Why You Are Going to Absolutely Love This Recipe
This chocolate lava cake is the kind of dessert that feels indulgent and impressive but is genuinely so easy to pull off. You only need seven simple ingredients. It takes less than 30 minutes from start to finish. You can make it ahead of time. And every single bite is pure chocolate bliss. Whether you are making it for a special occasion, a date night, or just because you are craving something seriously chocolatey on a Tuesday night, this recipe will never let you down. It is a keeper, full stop.
If you want to see more behind-the-scenes moments, recipe tests, and cozy dessert inspiration, come hang out with me over on my Pinterest page. I pin everything from quick weeknight dinners to fancy desserts that are secretly beginner-friendly. You will love it over there!
Print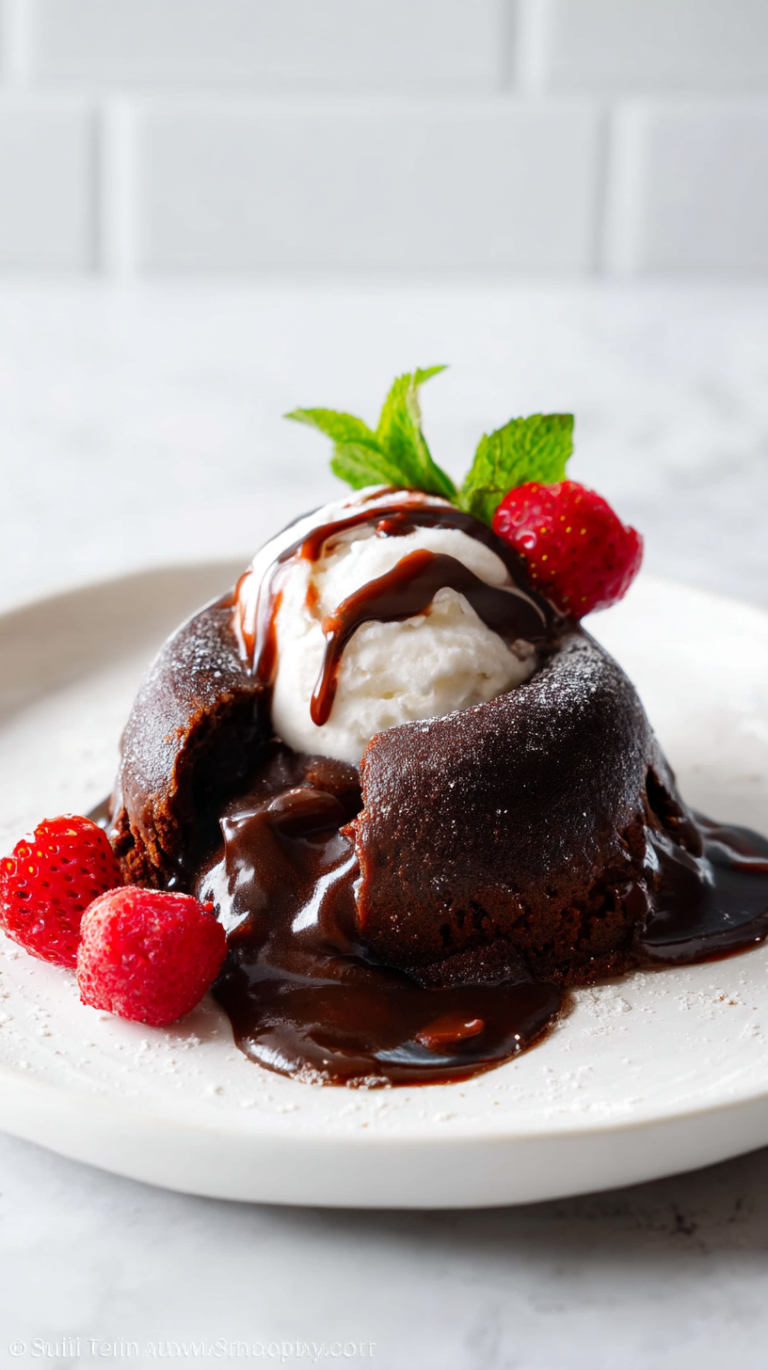
Chocolate Lava Cake
A rich, individual-sized dessert with a molten chocolate center and a tender baked exterior. Perfect for showcasing your baking skills in under 30 minutes, this indulgent treat features high-quality chocolate and butter for a smooth, glossy texture. Serve warm with a scoop of vanilla ice cream for a stellar finish.
- Total Time: 30
- Yield: 4 (122g each) desserts 1x
Ingredients
6 ounces (170g) high-quality semi-sweet chocolate
1/2 cup (8 Tbsp; 113g) unsalted butter
1/4 cup (31g) all-purpose flour, spooned and leveled
1/2 cup (60g) confectioners’ sugar
1/8 teaspoon salt
2 large eggs
2 large egg yolks
Instructions
Preheat oven to 425°F (220°C)
Lightly grease 4 ramekins and dust with cocoa powder
In a microwave-safe bowl, melt chocolate and butter in 30-second intervals, stirring until smooth
Add confectioners’ sugar and salt to the melted mixture, stirring to combine
Whisk in eggs and egg yolks until fully emulsified
Lastly, gently fold in flour until incorporated
Divide evenly into prepared ramekins
Bake for 12-15 minutes, until edges are set and centers are slightly undercooked
Let rest 1-2 minutes before inverting onto plates
Notes
Use a bain-marie water bath for more even cooking if needed
For a showy presentation, top with optional chocolate shavings and a roasted coffee bean
Serves best immediately after baking
Variation: Add a scoop of vanilla bean ice cream before serving for a warm-cold contrast
- Prep Time: 15
- Cook Time: 15
- Category: Desserts
- Method: Baking
- Cuisine: American
- Diet: Vegetarian
Nutrition
- Serving Size: 1 (122g) cake
- Calories: 420
- Sugar: 30g
- Sodium: 300mg
- Fat: 35g
- Saturated Fat: 25g
- Carbohydrates: 40g
- Fiber: 2g
- Protein: 6g
- Cholesterol: 60mg