Chocolate Icebox Cake is hands down the most genius dessert I’ve ever made because this stunning layered no-bake cake requires absolutely zero oven time yet tastes incredibly rich and decadent like you spent hours in the kitchen. The combination of chocolate wafer cookies and fluffy whipped cream creates layers that magically soften into cake-like texture as it chills, transforming simple ingredients into an elegant dessert.
What Is Chocolate Icebox Cake?
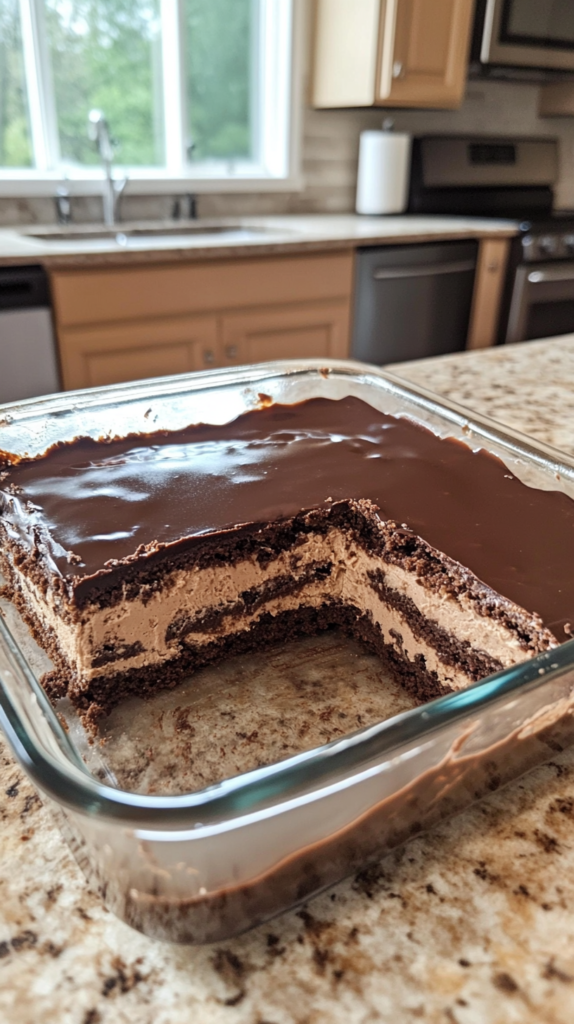
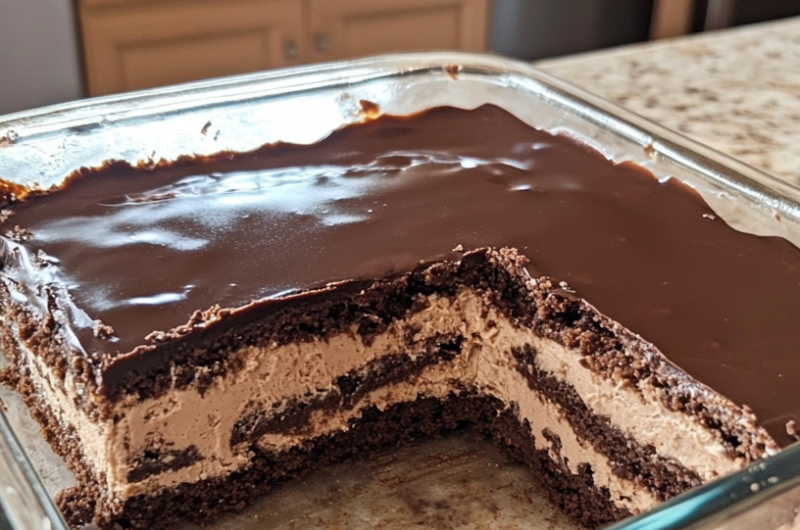
Chocolate Icebox Cake is a classic no-bake layered dessert made by alternating chocolate wafer cookies with sweetened whipped cream and chilling overnight until the cookies soften into tender cake-like layers. Originally created in the 1920s when Nabisco Famous Chocolate Wafers became popular, this retro dessert transforms crunchy cookies into soft cake through the moisture from the cream. The cookies absorb liquid as they chill, creating distinct layers that slice beautifully. Think of it as the easiest cake you’ll ever make with no baking, no mixing cake batter, and minimal effort required for maximum impressive results perfect for hot summer days.
What You’ll Need
Let me walk you through everything you need for this amazing Chocolate Icebox Cake. The ingredient list is incredibly short and simple.
For the Chocolate Icebox Cake:
- Chocolate wafer cookies (1 box or about 45 cookies): Nabisco Famous Chocolate Wafers work best for your Chocolate Icebox Cake. Oreo thins can substitute.
- Heavy whipping cream (3 cups, cold): Must be very cold for whipping to stiff peaks. Creates fluffy layers in your Chocolate Icebox Cake.
- Powdered sugar (1/3 cup): Sweetens and stabilizes whipped cream perfectly. Confectioners’ sugar works same.
- Vanilla extract (2 teaspoons): Pure vanilla adds depth to cream layers for your Chocolate Icebox Cake. Enhances overall flavor.
- Cocoa powder for dusting (optional): Sprinkle on top for finished presentation and extra chocolate flavor.
Optional Add-ins and Toppings:
- Chocolate ganache: Drizzle over top of your Chocolate Icebox Cake for elegant finish and extra richness.
- Chocolate shavings: Garnish with curls or shavings for beautiful presentation on finished cake.
- Fresh berries: Strawberries or raspberries add color and brightness to your Chocolate Icebox Cake.
- Mini chocolate chips: Sprinkle between layers for extra chocolate throughout the dessert.
Step-by-Step Instructions
Creating this incredible dessert is easier than you think. Let me guide you through making perfect Chocolate Icebox Cake every time.
Whip the Cream
Pour the cold heavy whipping cream into a large chilled mixing bowl for your Chocolate Icebox Cake. Using cold bowl and cold cream helps achieve better whipping results faster.
Add the powdered sugar and vanilla extract to the cream. Start beating with an electric mixer on medium speed until the mixture begins to thicken noticeably.
Increase speed to medium-high and continue beating until stiff peaks form for your Chocolate Icebox Cake. This takes about 3 to 5 minutes total. Stiff peaks mean the cream stands up straight when you lift the beaters.
Don’t overbeat the cream or it will become grainy and buttery. Stop as soon as you reach stiff peaks for perfect texture in your dessert.
Assemble the Layers
Spread a thin layer of whipped cream on the bottom of a 9 by 13 inch baking dish for your Chocolate Icebox Cake. This helps the first layer of cookies stick and prevents sliding.
Arrange a single layer of chocolate wafer cookies over the cream, covering the entire bottom of the pan. Place cookies close together but they don’t need to touch perfectly.
Spread about one-third of the remaining whipped cream evenly over the cookie layer for your Chocolate Icebox Cake. Use an offset spatula or the back of a spoon to spread smoothly to the edges.
Add another layer of chocolate wafer cookies over the cream, arranging them in a single layer covering all the cream beneath. Try to stagger cookies from the first layer for stability.
Spread another third of the whipped cream over this second cookie layer for your Chocolate Icebox Cake. Smooth it evenly just like the first cream layer.
Add a final layer of chocolate wafer cookies, using all remaining cookies to create a complete top layer. This should be your third and final cookie layer.
Spread the remaining whipped cream over the top cookie layer for your Chocolate Icebox Cake. Make sure to cover all cookies completely and smooth the top nicely for beautiful presentation.
Chill Overnight
Cover the assembled Chocolate Icebox Cake tightly with plastic wrap. Make sure the wrap doesn’t touch the whipped cream surface or it will stick and mess up the topping.
Refrigerate for at least 8 hours or preferably overnight before serving your Chocolate Icebox Cake. This chilling time is essential for cookies to soften into cake-like texture.
The longer it chills, the better the texture becomes. The cookies absorb moisture from the cream and transform into tender cake layers that slice beautifully.
Before serving, dust the top with cocoa powder or add chocolate shavings if desired for your Chocolate Icebox Cake. Slice with a sharp knife, wiping clean between cuts for neat presentation.
How to Serve
This Chocolate Icebox Cake is perfect for summer parties, potlucks, birthday celebrations, dinner parties, or any time you want an impressive dessert without turning on the oven. Serve chilled directly from the refrigerator for best texture and flavor. The cake slices beautifully to show off the gorgeous layers of chocolate and cream. Garnish individual slices with fresh berries, chocolate shavings, or a drizzle of chocolate sauce. Pairs wonderfully with coffee or cold milk. Store covered in refrigerator for up to 3 days, though it’s best within the first 2 days. The make-ahead nature makes this ideal for entertaining since you can prepare it the day before your event.
Expert Tips
- Use very cold cream: Cold cream whips better and faster for your Chocolate Icebox Cake. Chill bowl and beaters too for best results.
- Don’t overbeat cream: Stop at stiff peaks or cream becomes grainy. Watch closely near the end of whipping.
- Cover cookies completely: Every cookie must be covered with cream or those spots stay crunchy in your Chocolate Icebox Cake.
- Chill minimum 8 hours: Overnight is best for proper softening. Cookies need time to absorb moisture from cream.
- Use Nabisco Famous Chocolate Wafers: These are the original and work best. Thin crispy texture is perfect for your Chocolate Icebox Cake.
- Try Oreo thins as substitute: If can’t find chocolate wafers, Oreo thins work well. Remove filling first or leave it in.
- Wipe knife between cuts: Clean blade makes neat slices that show off layers beautifully.
- Make it the day before: Perfect make-ahead dessert for your Chocolate Icebox Cake. Actually improves with time in fridge.
- Add cocoa to cream: Mix tablespoon of cocoa into whipped cream for chocolate cream layers instead of plain.
- Try coffee variation: Add tablespoon instant espresso to cream for mocha version of your Chocolate Icebox Cake.
Common Questions
How long does Chocolate Icebox Cake need to chill?
Chocolate Icebox Cake needs to chill for at least 8 hours but overnight is ideal for best texture. The cookies need this time to absorb moisture from the whipped cream and soften into tender cake-like layers. If you chill for less time, the cookies will still be too crunchy. The longer it sits up to 24 hours, the better the texture becomes.
Can I use Cool Whip instead of whipped cream?
Yes, you can substitute Cool Whip or other frozen whipped topping for homemade whipped cream in your Chocolate Icebox Cake. Use about 3 containers of 8-ounce Cool Whip, thawed. The texture will be slightly different and not quite as rich, but it still works well and saves time if you prefer convenience over fresh whipped cream.
What if I can’t find chocolate wafer cookies?
If Nabisco Famous Chocolate Wafers aren’t available, use Oreo Thins for your Chocolate Icebox Cake. You can leave the cream filling in or scrape it out depending on preference. Graham crackers also work but create different flavor. Some people use thin chocolate cookies or even chocolate graham crackers as substitutes with good results.
Can I freeze Chocolate Icebox Cake?
Yes! Chocolate Icebox Cake freezes beautifully for up to 2 months. Cover tightly with plastic wrap and then aluminum foil before freezing. Thaw in refrigerator for several hours or overnight before serving. The texture remains perfect after freezing. Some people actually prefer eating it partially frozen for a more ice cream cake-like experience.
Why This Is Perfect
Chocolate Icebox Cake is absolutely the perfect dessert because it requires zero baking, uses only a few simple ingredients, looks incredibly elegant when sliced, and tastes rich and decadent like you spent hours making it. The no-bake nature makes it ideal for hot summer days when you don’t want to heat up the kitchen. The make-ahead aspect means you can prepare it the day before and just slice and serve when guests arrive. Whether you’re entertaining, need a potluck dessert, or just want something easy and impressive, this Chocolate Icebox Cake delivers stunning presentation and delicious flavor with minimal effort that makes it a total winner every time.
More Recipes You’ll Love
If you enjoyed this Chocolate Icebox Cake, you’ll absolutely love these other no-bake and easy dessert recipes from our collection. Try our Banana Split Dump Cake for an easy fruity dessert. For more chocolate options, check out our Chocolate Wacky Cake that’s super easy and egg-free, or try Chocolate Mug Cake when you need chocolate fast.
For more amazing no-bake dessert recipes and vintage classic treats, check out King Arthur Baking where you’ll find expert tips and creative inspiration.
Chocolate Icebox Cake
Course: DessertCuisine: AmericanDifficulty: Easy12
servings20
minutes40
minutes280
kcalIngredients
- For the Chocolate Icebox Cake:
Chocolate wafer cookies (1 box or about 45 cookies, Nabisco Famous Chocolate Wafers)
Heavy whipping cream (3 cups, cold)
Powdered sugar (1/3 cup)
Vanilla extract (2 teaspoons)
Cocoa powder for dusting (optional)
- Optional Add-ins and Toppings:
Chocolate ganache (for drizzling)
Chocolate shavings (for garnish)
Fresh berries (strawberries or raspberries)
Mini chocolate chips (for sprinkling between layers)
Directions
- Whip the Cream
- Pour cold heavy whipping cream into large chilled mixing bowl.
- Using cold bowl and cream helps achieve better whipping.
- Add powdered sugar and vanilla extract to cream.
- Start beating with electric mixer on medium speed until mixture begins to thicken.
- Increase speed to medium-high and continue beating until stiff peaks form.
- Takes about 3-5 minutes total.
- Stiff peaks mean cream stands up straight when you lift beaters.
- Don’t overbeat or cream becomes grainy and buttery.
- Stop as soon as you reach stiff peaks.
- Assemble the Layers
- Spread thin layer of whipped cream on bottom of 9×13 inch baking dish.
- Helps first layer stick and prevents sliding.
- Arrange single layer of chocolate wafer cookies over cream.
- Cover entire bottom of pan. Place close together.
- Spread about one-third of remaining whipped cream evenly over cookie layer.
- Use offset spatula or back of spoon to spread smoothly to edges.
- Add another layer of chocolate wafer cookies over cream.
- Arrange in single layer covering all cream.
- Try to stagger cookies from first layer for stability.
- Spread another third of whipped cream over second cookie layer.
- Smooth evenly like first cream layer.
- Add final layer of chocolate wafer cookies.
- Use all remaining cookies for complete top layer.
- This is your third and final cookie layer.
- Spread remaining whipped cream over top cookie layer.
- Cover all cookies completely and smooth top nicely.
- Chill Overnight
- Cover assembled cake tightly with plastic wrap.
- Don’t let wrap touch whipped cream surface.
- Refrigerate for at least 8 hours or preferably overnight.
- Chilling time essential for cookies to soften into cake texture.
- Longer it chills, better texture becomes.
- Cookies absorb moisture from cream and transform into tender layers.
- Before serving, dust top with cocoa powder or add chocolate shavings if desired.
- Slice with sharp knife, wiping clean between cuts.
Notes
- Use very cold cream. Chill bowl and beaters too for best results.
Don’t overbeat cream. Stop at stiff peaks or becomes grainy.
Cover every cookie completely with cream or spots stay crunchy.
Chill minimum 8 hours. Overnight is best for proper softening.
Use Nabisco Famous Chocolate Wafers. Original works best.
Can substitute Oreo Thins. Remove filling first or leave in.
Wipe knife clean between cuts for neat slices.
Perfect make-ahead dessert. Actually improves with time.
Can add tablespoon cocoa to whipped cream for chocolate layers.
Try tablespoon instant espresso for mocha version.
Can use 3 containers (8oz each) Cool Whip instead of fresh cream.
Graham crackers work but create different flavor.
Store covered in refrigerator up to 3 days.
Best within first 2 days.
Freezes beautifully up to 2 months wrapped tightly.
Thaw in refrigerator overnight before serving.
Some prefer eating partially frozen for ice cream cake texture.