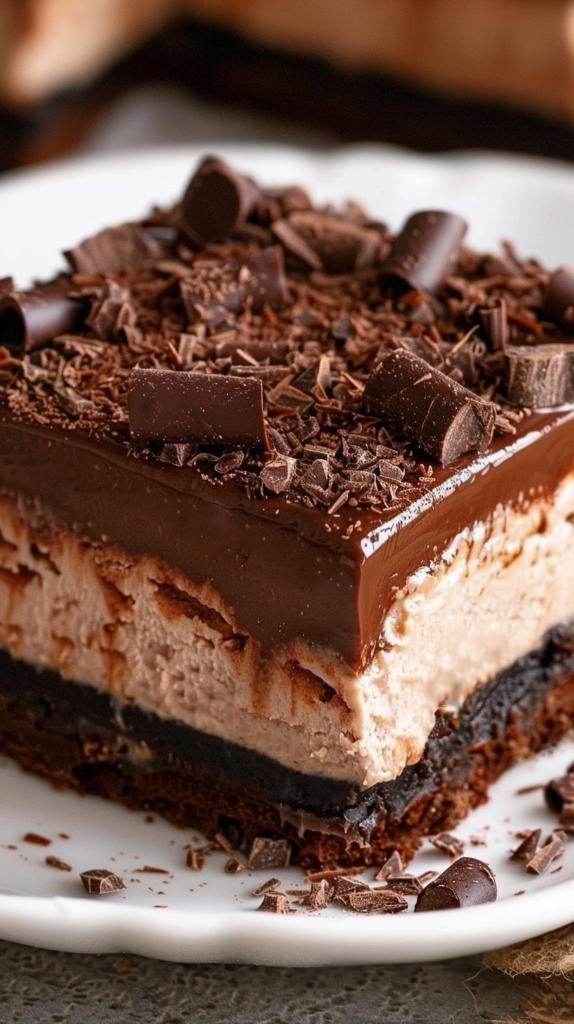
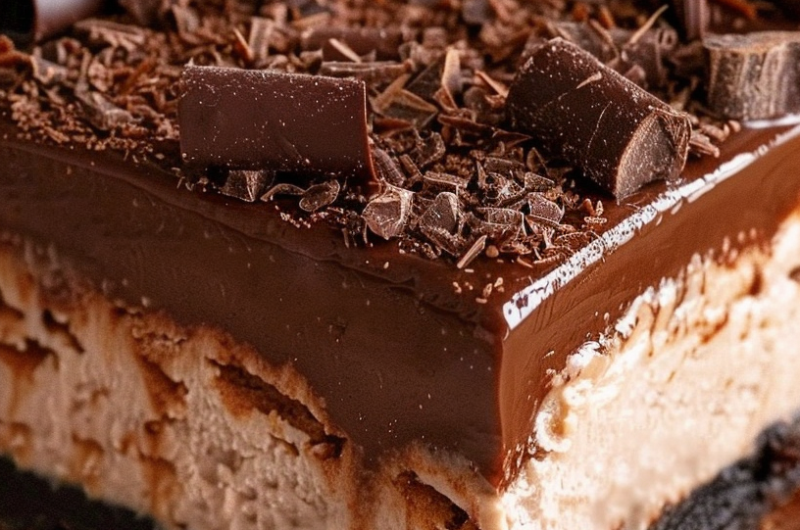
Chocolate Cheesecake Bars with Chocolate Ganache are hands down my favorite dessert to bring to parties because they look absolutely stunning and taste even better than they look. I remember the first time I made these beauties and sliced into those gorgeous layers. The combination of the crunchy chocolate crust, creamy chocolate cheesecake filling, and that silky smooth ganache on top is pure heaven. Plus, everyone gets their own perfect portion, which honestly makes serving dessert so much easier.
What Are Chocolate Cheesecake Bars?
These bars are basically everything you love about chocolate cheesecake but in a much easier, more portable form. You start with a rich chocolate cookie crust, add a layer of velvety chocolate cream cheese filling, then top it all off with glossy chocolate ganache and chocolate shavings. The best part is that you don’t need a springform pan or a water bath like traditional cheesecake. Instead, you bake everything in a regular baking pan, let it chill, and cut it into perfect little squares.
Ingredients You’ll Need
Let’s break down everything that goes into these incredible Chocolate Cheesecake Bars with Chocolate Ganache. I’ve organized it by layer so you can see exactly what you’re working with.
For the Crust:
- Oreo cookies (18 cookies, one standard package): Crushed into fine crumbs. Keep the filling in because it adds flavor and helps bind everything together. You could use chocolate graham crackers if you prefer, but Oreos give the best flavor.
- Butter (4 tablespoons, melted): This binds the cookie crumbs together into a sturdy crust. Make sure it’s fully melted but not too hot.
For the Cheesecake Filling:
- Bittersweet chocolate chips (6 oz, high quality): Use good chocolate here because it makes a huge difference. Ghirardelli or Baker’s chocolate work beautifully.
- Cream cheese (12 oz total, 1½ packages of 8 oz each, softened): Room temperature is absolutely crucial. Cold cream cheese will give you lumps no matter how long you mix it.
- Granulated sugar (½ cup): Sweetens the filling and creates that smooth, creamy texture we’re after.
- Light brown sugar (⅛ cup, packed): Adds a subtle caramel note and extra moisture to the cheesecake.
- Unsweetened cocoa powder (1 tablespoon): Deepens the chocolate flavor without adding extra sweetness. Dutch-processed or natural both work fine.
- Eggs (2 large): These give the cheesecake its structure. Room temperature eggs blend much better than cold ones.
- Heavy cream (½ cup): Makes the filling extra rich and creamy. Don’t substitute with milk or it won’t set properly.
- Vanilla extract (1 teaspoon): Always use pure vanilla if possible. It really does make a difference in the final flavor.
For the Chocolate Ganache:
- Semi-sweet chocolate chips (6 oz): Use good quality chocolate like Ghirardelli or Baker’s chocolate. The better your chocolate, the better your ganache will taste.
- Heavy whipping cream (½ cup): This creates that silky, pourable ganache. Full-fat is essential here, so don’t try to use half-and-half.
For Topping:
- Chocolate shavings: These make your bars look bakery-quality. Use a vegetable peeler on a chocolate bar to create beautiful curls.
- Whipped cream (optional): For serving alongside the bars.
How to Make These Bars
Alright, let’s get these Chocolate Cheesecake Bars with Chocolate Ganache made. Don’t stress about the multiple steps because each one is super simple, and the result is absolutely worth it.
Prepare Your Pan and Oven
First, preheat your oven to 350°F. Line a 9×13 inch baking pan with heavy-duty aluminum foil or parchment paper, leaving some overhang on the sides. This overhang is your secret weapon for lifting the bars out later. Lightly coat with nonstick spray and set aside.
Make the Crust
Place the Oreo cookies in a food processor and pulse until fine crumbs form. Add the melted butter and pulse again until the mixture is evenly moistened and looks like wet sand.
Press the crumb mixture firmly into the bottom of the prepared pan using the back of a spoon or a flat surface. Bring the crumbs about ½ to 1 inch up the sides of the pan. The firmer you press, the better your crust will hold together when you cut the bars.
Bake for 10 minutes, then remove from the oven and allow the crust to cool on a wire rack. Lower the oven temperature to 325°F while you prepare the filling.
Prepare the Chocolate
Place the bittersweet chocolate chips in a microwave-safe bowl. Heat in 30-second intervals, stirring between each, until fully melted and smooth. Set aside to cool slightly while you work on the cream cheese mixture.
Mix the Cheesecake Filling
In the bowl of a stand mixer fitted with the paddle attachment (or using a hand mixer), beat the cream cheese on medium speed for 2 to 3 minutes, until smooth and free of lumps. Make sure there are absolutely no lumps because they won’t disappear once you add the other ingredients.
Add the granulated sugar, brown sugar, and cocoa powder, mixing just until combined. Then beat in the eggs and heavy cream, again mixing only until incorporated. Don’t overmix after adding the eggs because that can create too much air and cause cracks.
Gently fold in the melted chocolate and vanilla extract until the batter is smooth and uniform. The batter should be thick but pourable, with a beautiful rich chocolate color.
Bake the Bars
Pour the cheesecake mixture over the cooled crust and spread evenly. Bake for 30 minutes, or until the center has a slight jiggle, similar to Jell-O, not liquid. The edges should be set, but that little jiggle in the middle is perfect.
Remove the pan from the oven. Carefully loosen the foil, then immediately run the tip of a hot butter knife around the edges to help prevent cracking. This little trick really does make a difference.
Allow the cheesecake to cool completely in the pan, then refrigerate for at least 6 hours or overnight to fully set. I know waiting is hard, but this step is crucial for getting the perfect texture.
Make the Ganache
Pour the heavy cream into a microwave-safe bowl or measuring cup and heat for about 1 minute, until just boiling. You’ll see it start to bubble around the edges.
Pour the hot cream over the chocolate chips and let sit for 3 to 5 minutes, allowing the chocolate to melt. Don’t stir it yet because this waiting time is important. Then whisk until the ganache is smooth and glossy.
Finish and Serve
Spread the ganache evenly over the chilled cheesecake bars using an offset spatula. Work relatively quickly because ganache starts to set as it cools. Return to the refrigerator until ready to serve.
When you’re ready to serve your Chocolate Cheesecake Bars with Chocolate Ganache, use the foil overhang to lift the whole thing out of the pan. Cut into squares with a sharp knife, wiping it clean between cuts. Finish with whipped cream and chocolate shavings if desired.
Best Ways to Serve
These chocolate cheesecake bars are rich, so you don’t need huge portions. I usually cut them into 16-20 squares depending on the occasion. They’re perfect on their own, but a dollop of whipped cream on the side never hurt anyone. For a fancy presentation, drizzle some caramel or raspberry sauce on the plate before setting down the bar. Fresh berries also make a beautiful garnish and add a nice tart contrast to all that chocolate. If you’re serving these at a party alongside other desserts, my Black Velvet Cake with Dark Chocolate Ganache makes an impressive pairing for a chocolate lover’s dream table.
Expert Tips for Perfect Bars
- Room temperature ingredients are essential: I can’t stress this enough. Cold cream cheese creates lumps, and cold eggs don’t incorporate as smoothly. Set everything out at least an hour before you start.
- Don’t skip the parchment paper or foil: Those overhang flaps are lifesavers when it comes time to remove the bars from the pan. Without them, you’ll be scooping out mangled squares instead of beautiful bars.
- Press the crust firmly: A loose crust will crumble when you cut the bars. Really pack it down and bring it slightly up the sides for extra stability.
- Watch for the jiggle: Cheesecake should still jiggle slightly in the center when you take it out. It continues cooking as it cools, and if you bake it until completely firm, it’ll be overdone.
- Use the hot knife trick: Running a hot butter knife around the edges right after baking really does help prevent cracks. It’s a small step that makes a big difference.
- Clean cuts every time: Dip your knife in hot water and wipe it dry between each cut. This gives you those professional-looking clean edges.
- Make ahead friendly: These Chocolate Cheesecake Bars with Chocolate Ganache actually taste better the next day because the flavors have time to meld together. Make them up to 2 days ahead.
- Freeze for later: Wrap individual bars in plastic wrap and freeze for up to 2 months. They thaw perfectly in the fridge overnight.
Your Questions Answered
Can I use milk chocolate instead of bittersweet?
You could, but the bars will be much sweeter. Bittersweet chocolate balances the sweetness of the cream cheese filling perfectly. If you do use milk chocolate, consider reducing the sugar slightly to compensate. Semi-sweet chocolate would be a good middle ground if you find bittersweet too intense.
Why did my cheesecake crack?
Cracks usually happen from overmixing, overbaking, or cooling too quickly. When you mix the batter, especially after adding eggs, mix just until combined. Overbaking is another culprit, so remember that slight jiggle in the center is what you want. The hot knife trick around the edges right after baking also helps prevent cracks. If you do get cracks, don’t worry because the ganache covers everything beautifully anyway.
How long do these bars keep?
Stored in an airtight container in the fridge, these chocolate cheesecake bars stay fresh for up to 5 days. The ganache might lose a bit of its shine after a few days, but the taste remains amazing. You can also freeze them for up to 2 months. Just thaw in the refrigerator overnight before serving. For more delicious dessert recipes and baking tips, check out King Arthur Baking’s recipe collection.
Can I make these in a smaller pan?
Absolutely! You can use an 8×8 or 9×9 inch pan for thicker bars. Just increase the baking time by about 10 minutes and watch for that jiggle test. The crust and ganache measurements stay the same, so you might have a little extra, which is never a bad problem to have.
What Makes These Irresistible
What’s not to love about Chocolate Cheesecake Bars with Chocolate Ganache? You get three distinct layers of chocolate goodness in every bite. The crust is crunchy and rich, the cheesecake filling is creamy and smooth with that perfect tang, and the ganache adds this luxurious silky finish. They’re easier to make than traditional cheesecake, easier to serve, and somehow even more impressive looking.
Chocolate Cheesecake Bars with Chocolate Ganache
Cuisine: DessertDifficulty: Easy12
Bars15
minutes25
minutes300
kcalIngredients
- For the Crust:
Oreo cookies (18 cookies, one standard package): Crushed into fine crumbs. Keep the filling in because it adds flavor and helps bind everything together. You could use chocolate graham crackers if you prefer, but Oreos give the best flavor.
Butter (4 tablespoons, melted): This binds the cookie crumbs together into a sturdy crust. Make sure it’s fully melted but not too hot.
- For the Cheesecake Filling:
Bittersweet chocolate chips (6 oz, high quality): Use good chocolate here because it makes a huge difference. Ghirardelli or Baker’s chocolate work beautifully.
Cream cheese (12 oz total, 1½ packages of 8 oz each, softened): Room temperature is absolutely crucial. Cold cream cheese will give you lumps no matter how long you mix it.
Granulated sugar (½ cup): Sweetens the filling and creates that smooth, creamy texture we’re after.
Light brown sugar (⅛ cup, packed): Adds a subtle caramel note and extra moisture to the cheesecake.
Unsweetened cocoa powder (1 tablespoon): Deepens the chocolate flavor without adding extra sweetness. Dutch-processed or natural both work fine.
Eggs (2 large): These give the cheesecake its structure. Room temperature eggs blend much better than cold ones.
Heavy cream (½ cup): Makes the filling extra rich and creamy. Don’t substitute with milk or it won’t set properly.
Vanilla extract (1 teaspoon): Always use pure vanilla if possible. It really does make a difference in the final flavor.
- For the Chocolate Ganache:
Semi-sweet chocolate chips (6 oz): Use good quality chocolate like Ghirardelli or Baker’s chocolate. The better your chocolate, the better your ganache will taste.
Heavy whipping cream (½ cup): This creates that silky, pourable ganache. Full-fat is essential here, so don’t try to use half-and-half.
- For Topping:
Chocolate shavings: These make your bars look bakery-quality. Use a vegetable peeler on a chocolate bar to create beautiful curls.
Whipped cream (optional): For serving alongside the bars.
Directions
- First, preheat your oven to 350°F. Line a 9×13 inch baking pan with heavy-duty aluminum foil or parchment paper, leaving some overhang on the sides. This overhang is your secret weapon for lifting the bars out later. Lightly coat with nonstick spray and set aside.
- Place the Oreo cookies in a food processor and pulse until fine crumbs form. Add the melted butter and pulse again until the mixture is evenly moistened and looks like wet sand.
- Press the crumb mixture firmly into the bottom of the prepared pan using the back of a spoon or a flat surface. Bring the crumbs about ½ to 1 inch up the sides of the pan. The firmer you press, the better your crust will hold together when you cut the bars.
- Bake for 10 minutes, then remove from the oven and allow the crust to cool on a wire rack. Lower the oven temperature to 325°F while you prepare the filling.
- Place the bittersweet chocolate chips in a microwave-safe bowl. Heat in 30-second intervals, stirring between each, until fully melted and smooth. Set aside to cool slightly while you work on the cream cheese mixture.
- In the bowl of a stand mixer fitted with the paddle attachment (or using a hand mixer), beat the cream cheese on medium speed for 2 to 3 minutes, until smooth and free of lumps. Make sure there are absolutely no lumps because they won’t disappear once you add the other ingredients.
- Add the granulated sugar, brown sugar, and cocoa powder, mixing just until combined. Then beat in the eggs and heavy cream, again mixing only until incorporated. Don’t overmix after adding the eggs because that can create too much air and cause cracks.
- Gently fold in the melted chocolate and vanilla extract until the batter is smooth and uniform. The batter should be thick but pourable, with a beautiful rich chocolate color.
- Pour the cheesecake mixture over the cooled crust and spread evenly. Bake for 30 minutes, or until the center has a slight jiggle, similar to Jell-O, not liquid. The edges should be set, but that little jiggle in the middle is perfect.
- Remove the pan from the oven. Carefully loosen the foil, then immediately run the tip of a hot butter knife around the edges to help prevent cracking. This little trick really does make a difference.
- Allow the cheesecake to cool completely in the pan, then refrigerate for at least 6 hours or overnight to fully set. I know waiting is hard, but this step is crucial for getting the perfect texture.
- Pour the heavy cream into a microwave-safe bowl or measuring cup and heat for about 1 minute, until just boiling. You’ll see it start to bubble around the edges.
- Pour the hot cream over the chocolate chips and let sit for 3 to 5 minutes, allowing the chocolate to melt. Don’t stir it yet because this waiting time is important. Then whisk until the ganache is smooth and glossy.
- Spread the ganache evenly over the chilled cheesecake bars using an offset spatula. Work relatively quickly because ganache starts to set as it cools. Return to the refrigerator until ready to serve.
- When you’re ready to serve your Chocolate Cheesecake Bars with Chocolate Ganache, use the foil overhang to lift the whole thing out of the pan. Cut into squares with a sharp knife, wiping it clean between cuts. Finish with whipped cream and chocolate shavings if desired.
Notes
- Room temperature ingredients are essential: I can’t stress this enough. Cold cream cheese creates lumps, and cold eggs don’t incorporate as smoothly. Set everything out at least an hour before you start.
Don’t skip the parchment paper or foil: Those overhang flaps are lifesavers when it comes time to remove the bars from the pan. Without them, you’ll be scooping out mangled squares instead of beautiful bars.
Press the crust firmly: A loose crust will crumble when you cut the bars. Really pack it down and bring it slightly up the sides for extra stability.
Watch for the jiggle: Cheesecake should still jiggle slightly in the center when you take it out. It continues cooking as it cools, and if you bake it until completely firm, it’ll be overdone.
Use the hot knife trick: Running a hot butter knife around the edges right after baking really does help prevent cracks. It’s a small step that makes a big difference.
Clean cuts every time: Dip your knife in hot water and wipe it dry between each cut. This gives you those professional-looking clean edges.
Make ahead friendly: These Chocolate Cheesecake Bars with Chocolate Ganache actually taste better the next day because the flavors have time to meld together. Make them up to 2 days ahead.
Freeze for later: Wrap individual bars in plastic wrap and freeze for up to 2 months. They thaw perfectly in the fridge overnight.