Chocolate Fudge Layer Cake is the ultimate chocolate lover’s dream, and I’m not exaggerating when I say this is the most requested dessert in my entire repertoire. The first time I made this towering beauty with its multiple layers of moist chocolate cake and rich fudge frosting, my partner Joe actually said it was better than any bakery cake he’d ever tried. Coming from someone who usually isn’t big on desserts, that’s saying something. The combination of tender chocolate layers with that thick, creamy fudge filling creates this incredibly satisfying texture that keeps you coming back for just one more bite.
Understanding This Chocolate Masterpiece
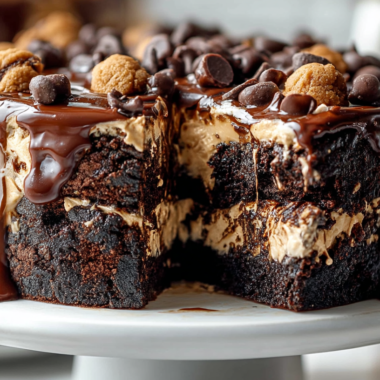
So what makes a Chocolate Fudge Layer Cake different from regular chocolate cake? It’s all about the fudge frosting and the layering technique. You get multiple thin layers of incredibly moist chocolate cake separated by generous amounts of rich, creamy chocolate fudge frosting. The cake itself is soft and tender with a deep chocolate flavor, while the fudge frosting is thick, smooth, and intensely chocolatey. Those piped rosettes on top aren’t just for show either because they add extra fudgy goodness to every slice. It’s basically chocolate on chocolate on chocolate, and it’s absolutely glorious.
Ingredients You’ll Need
Let’s go through everything that goes into making this incredible Chocolate Fudge Layer Cake. I’ve broken it down by component so you know exactly what you’re working with.
For the Chocolate Cake Layers:
- All-purpose flour (2½ cups): Forms the structure of your cake. Spoon it into your measuring cup rather than scooping to avoid packing in too much.
- Granulated sugar (2 cups): Sweetens the cake and helps keep it incredibly moist. Sugar also tenderizes the crumb.
- Unsweetened cocoa powder (¾ cup): Use high-quality cocoa for the best flavor. Dutch-processed gives a darker color and mellower taste, while natural cocoa is more acidic and bright.
- Baking powder (2 teaspoons): Provides lift and creates a light, fluffy texture.
- Baking soda (1½ teaspoons): Reacts with the buttermilk to create tenderness and help the cake rise.
- Salt (1 teaspoon): Essential for balancing sweetness and making the chocolate flavor more pronounced.
- Eggs (3 large): Room temperature eggs blend better and create a more uniform texture. They add richness and structure.
- Buttermilk (1½ cups): The secret to incredibly moist chocolate cake. The acidity tenderizes the gluten and creates that perfect crumb. No buttermilk? Add a tablespoon of vinegar to regular milk.
- Vegetable oil (¾ cup): Oil-based cakes stay moist longer than butter-based ones. You could use melted coconut oil for a subtle flavor twist.
- Vanilla extract (2 teaspoons): Always use pure vanilla if possible because it makes such a difference in chocolate desserts.
- Hot coffee or water (1 cup): This is what makes the chocolate flavor absolutely sing. The hot liquid blooms the cocoa and creates incredible depth.
For the Chocolate Fudge Frosting:
- Butter (1 cup, softened): The base of your fudge frosting. Make sure it’s truly softened to room temperature for smooth mixing.
- Unsweetened cocoa powder (1 cup): This creates that intense chocolate flavor in the frosting. Sift it to avoid lumps.
- Powdered sugar (4 cups): Sweetens and thickens the frosting. You might need slightly more or less depending on desired consistency.
- Heavy cream (⅓ to ½ cup): Thins the frosting to spreadable consistency. Add it gradually until you get the perfect texture.
- Vanilla extract (2 teaspoons): Rounds out the chocolate flavor beautifully.
- Salt (½ teaspoon): Just a pinch to balance the sweetness and intensify the chocolate.
- Espresso powder (1 teaspoon, optional): Deepens the chocolate flavor without making it taste like coffee.
For Decoration:
- Extra frosting for piping: Those gorgeous rosettes on top need about a cup of additional frosting.
- Chocolate shavings or sprinkles (optional): For extra visual appeal and texture.
Creating Your Chocolate Fudge Layer Cake
Alright, let’s make this stunning dessert. The process might seem involved because of the multiple layers, but each individual step is actually quite simple. Just take your time and enjoy the process.
Prep Your Pans
Preheat your oven to 350°F. Grease three 8-inch or 9-inch round cake pans and line the bottoms with parchment paper circles. This ensures your cakes release perfectly without any sticking. You could also use two pans and slice each layer in half later for four total layers.
Mix the Cake Batter
In a large bowl, whisk together your flour, sugar, cocoa powder, baking powder, baking soda, and salt until everything is well combined and there are no cocoa lumps. In another bowl, whisk the eggs, buttermilk, oil, and vanilla until smooth and well blended.
Pour the wet ingredients into the dry ingredients and mix on medium speed until just combined. Don’t overmix because that creates tough cake. The batter will be fairly thick at this point. Slowly add the hot coffee or water while mixing on low speed. The batter will become much thinner and more liquidy, which is exactly what you want for Chocolate Fudge Layer Cake.
Bake the Layers
Divide the batter evenly among your prepared pans. I like to use a kitchen scale to make sure they’re equal, but eyeballing it works too. Bake for 25-30 minutes for three pans, or 30-35 minutes for two pans, until a toothpick inserted in the center comes out with just a few moist crumbs.
Let the cakes cool in the pans for 10 minutes, then carefully turn them out onto wire racks to cool completely. This cooling step is crucial because frosting warm cake creates a melty mess instead of beautiful layers.
Make the Fudge Frosting
While your cakes cool, make the chocolate fudge frosting. Beat the softened butter on medium-high speed for about 2 minutes until it’s light and fluffy. Add the cocoa powder and mix on low speed until combined. It’ll look dry and crumbly at this point, which is normal.
Add the powdered sugar one cup at a time, mixing on low speed after each addition. Once all the sugar is incorporated, add the vanilla, salt, and espresso powder if using. Then gradually add the heavy cream, starting with ⅓ cup and adding more as needed until you reach a smooth, spreadable consistency. Beat on high speed for 2-3 minutes until the frosting is light and fluffy.
Assemble the Layers
Place your first cake layer on a serving plate or cake stand. Spread about a cup of fudge frosting evenly over the top, going all the way to the edges. Add the second cake layer and repeat with more frosting. Continue until all layers are stacked with frosting between each one.
Use the remaining frosting to cover the top and sides of your Chocolate Fudge Layer Cake. I like to do a crumb coat first, which is a thin layer that seals in any loose crumbs. Refrigerate for 15 minutes, then add a final smooth layer of frosting over everything.
Pipe and Decorate
If you want those gorgeous piped rosettes like in the photo, reserve about a cup of frosting before frosting the cake. Transfer it to a piping bag fitted with a large star tip. Pipe rosettes or swirls around the top edge of the cake for that professional bakery look. Finish with chocolate shavings or sprinkles if desired.
How to Serve
This Chocolate Fudge Layer Cake is incredibly rich, so slices can be on the smaller side and still be satisfying. I love serving it with a cold glass of milk because there’s something so nostalgic about that combination. Vanilla ice cream on the side is also fantastic because the cold creaminess contrasts beautifully with the rich chocolate. Fresh raspberries or strawberries add a nice tart element that cuts through the sweetness. For special occasions, serve it alongside other chocolate desserts like my Black Velvet Cake with Dark Chocolate Ganache or Tuxedo Cake for an impressive chocolate lover’s spread.
Tips for the Best Results
- Room temperature ingredients are essential: Cold eggs and buttermilk don’t blend as smoothly into the batter. Set everything out an hour before you start baking.
- Don’t skip the hot liquid: Whether you use coffee or water, the hot liquid blooms the cocoa powder and creates incredible chocolate depth in your Chocolate Fudge Layer Cake.
- Measure flour correctly: Spoon flour into your measuring cup and level it off. Scooping directly from the bag packs in too much flour and creates dry cake.
- Cool cakes completely: I know it’s tempting to frost them while warm, but patience here prevents melted frosting disasters.
- Crumb coat saves the day: That thin first layer of frosting traps crumbs so your final coat is smooth and professional-looking.
- Chill between layers: If your layers are sliding around, pop the cake in the fridge for 15 minutes between adding layers to help everything set.
- Adjust frosting consistency: Too thick? Add more cream. Too thin? Add more powdered sugar. The perfect consistency should spread easily without being runny.
- Make it ahead: This cake actually tastes better the next day after the flavors meld. You can bake layers up to 2 days ahead and store them wrapped at room temperature.
Common Questions Answered
Can I make this cake without coffee?
Absolutely! If you don’t want to use coffee, just substitute hot water instead. The coffee doesn’t make the cake taste like coffee at all because it just intensifies the chocolate flavor. However, hot water works perfectly fine and still blooms the cocoa powder to create a delicious Chocolate Fudge Layer Cake. You won’t taste any coffee flavor either way.
How do I store this cake?
Store your Chocolate Fudge Layer Cake covered at room temperature for up to 3 days, or in the refrigerator for up to a week. If you refrigerate it, let it sit at room temperature for about 30 minutes before serving because the frosting tastes better when it’s not cold. The cake actually stays incredibly moist for days thanks to the oil in the batter.
Can I freeze this cake?
Yes! You can freeze the unfrosted cake layers wrapped tightly in plastic wrap for up to 3 months. Thaw them overnight in the fridge before frosting. You can also freeze the fully frosted cake, but the texture of the frosting might change slightly when thawed. For best results, freeze just the layers and frost fresh when ready to serve.
Why is my cake dry?
Dry cake usually comes from overbaking or measuring too much flour. Check your cake a few minutes before the timer goes off because every oven is different. The toothpick should come out with a few moist crumbs, not completely clean. Also, make sure you’re measuring flour by spooning it into the cup rather than scooping, which packs in excess flour and creates dry, dense cake.
Why This Cake Is Amazing
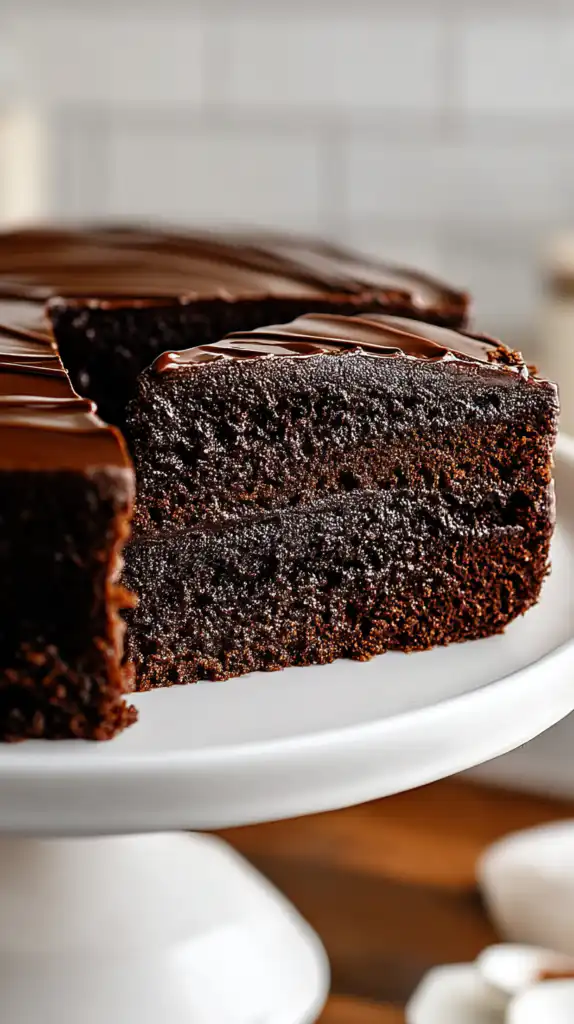
Chocolate Fudge Layer Cake is the kind of dessert that makes people’s eyes light up when you bring it to the table. The multiple layers create this impressive height that looks incredibly professional, while the rich chocolate flavor satisfies even the most intense chocolate cravings. It’s moist, tender, and packed with deep chocolate taste in every bite. The fudge frosting is thick and creamy without being too sweet, creating the perfect balance. Whether you’re celebrating a birthday, hosting a dinner party, or just want to treat yourself, this cake delivers every single time.
How This Recipe Came Together
This Chocolate Fudge Layer Cake actually has a really special story behind it. Joe’s parents were visiting us from out of town, and I really wanted to impress them with a homemade dessert. I decided to go all in and make this cake from scratch, which looking back was a bit ambitious for a first-time guest situation! My main challenge was getting the frosting right because my first batch was so stiff it literally tore through the cake layers when I tried to spread it. Joe just stood there trying not to laugh while I frantically googled what went wrong. Adding the heavy cream gradually and beating it longer was the fix I needed, and the final result was that perfect silky, fudgy texture. His parents absolutely loved it, and his mom actually asked me for the recipe before she left. Now this is my go-to celebration cake for every special occasion. For more show-stopping cake recipes and decorating ideas, check out my Pinterest page where I share all my favorite baking inspiration.
Chocolate Fudge Layer Cake
Course: DessertCuisine: AmericanDifficulty: Intermediate12
servings30
minutes40
minutes300
kcal60
minutesIngredients
- For the Chocolate Cake Layers:
All-purpose flour (2½ cups): Forms the structure of your cake. Spoon it into your measuring cup rather than scooping to avoid packing in too much.
Granulated sugar (2 cups): Sweetens the cake and helps keep it incredibly moist. Sugar also tenderizes the crumb.
Unsweetened cocoa powder (¾ cup): Use high-quality cocoa for the best flavor. Dutch-processed gives a darker color and mellower taste, while natural cocoa is more acidic and bright.
Baking powder (2 teaspoons): Provides lift and creates a light, fluffy texture.
Baking soda (1½ teaspoons): Reacts with the buttermilk to create tenderness and help the cake rise.
Salt (1 teaspoon): Essential for balancing sweetness and making the chocolate flavor more pronounced.
Eggs (3 large): Room temperature eggs blend better and create a more uniform texture. They add richness and structure.
Buttermilk (1½ cups): The secret to incredibly moist chocolate cake. The acidity tenderizes the gluten and creates that perfect crumb. No buttermilk? Add a tablespoon of vinegar to regular milk.
Vegetable oil (¾ cup): Oil-based cakes stay moist longer than butter-based ones. You could use melted coconut oil for a subtle flavor twist.
Vanilla extract (2 teaspoons): Always use pure vanilla if possible because it makes such a difference in chocolate desserts.
Hot coffee or water (1 cup): This is what makes the chocolate flavor absolutely sing. The hot liquid blooms the cocoa and creates incredible depth.
- For the Chocolate Fudge Frosting:
Butter (1 cup, softened): The base of your fudge frosting. Make sure it’s truly softened to room temperature for smooth mixing.
Unsweetened cocoa powder (1 cup): This creates that intense chocolate flavor in the frosting. Sift it to avoid lumps.
Powdered sugar (4 cups): Sweetens and thickens the frosting. You might need slightly more or less depending on desired consistency.
Heavy cream (⅓ to ½ cup): Thins the frosting to spreadable consistency. Add it gradually until you get the perfect texture.
Vanilla extract (2 teaspoons): Rounds out the chocolate flavor beautifully.
Salt (½ teaspoon): Just a pinch to balance the sweetness and intensify the chocolate.
Espresso powder (1 teaspoon, optional): Deepens the chocolate flavor without making it taste like coffee.
- For Decoration:
Extra frosting for piping: Those gorgeous rosettes on top need about a cup of additional frosting.
Chocolate shavings or sprinkles (optional): For extra visual appeal and texture.
Directions
- Prep Your Pans
- Preheat your oven to 350°F. Grease three 8-inch or 9-inch round cake pans and line the bottoms with parchment paper circles. This ensures your cakes release perfectly without any sticking. You could also use two pans and slice each layer in half later for four total layers.
- Mix the Cake Batter
- In a large bowl, whisk together your flour, sugar, cocoa powder, baking powder, baking soda, and salt until everything is well combined and there are no cocoa lumps. In another bowl, whisk the eggs, buttermilk, oil, and vanilla until smooth and well blended.
- Pour the wet ingredients into the dry ingredients and mix on medium speed until just combined. Don’t overmix because that creates tough cake. The batter will be fairly thick at this point. Slowly add the hot coffee or water while mixing on low speed. The batter will become much thinner and more liquidy, which is exactly what you want for Chocolate Fudge Layer Cake.
- Bake the Layers
- Divide the batter evenly among your prepared pans. I like to use a kitchen scale to make sure they’re equal, but eyeballing it works too. Bake for 25-30 minutes for three pans, or 30-35 minutes for two pans, until a toothpick inserted in the center comes out with just a few moist crumbs.
- Let the cakes cool in the pans for 10 minutes, then carefully turn them out onto wire racks to cool completely. This cooling step is crucial because frosting warm cake creates a melty mess instead of beautiful layers.
- Make the Fudge Frosting
- While your cakes cool, make the chocolate fudge frosting. Beat the softened butter on medium-high speed for about 2 minutes until it’s light and fluffy. Add the cocoa powder and mix on low speed until combined. It’ll look dry and crumbly at this point, which is normal.
- Add the powdered sugar one cup at a time, mixing on low speed after each addition. Once all the sugar is incorporated, add the vanilla, salt, and espresso powder if using. Then gradually add the heavy cream, starting with ⅓ cup and adding more as needed until you reach a smooth, spreadable consistency. Beat on high speed for 2-3 minutes until the frosting is light and fluffy.
- Assemble the Layers
- Place your first cake layer on a serving plate or cake stand. Spread about a cup of fudge frosting evenly over the top, going all the way to the edges. Add the second cake layer and repeat with more frosting. Continue until all layers are stacked with frosting between each one.
- Use the remaining frosting to cover the top and sides of your Chocolate Fudge Layer Cake. I like to do a crumb coat first, which is a thin layer that seals in any loose crumbs. Refrigerate for 15 minutes, then add a final smooth layer of frosting over everything.
- Pipe and Decorate
- If you want those gorgeous piped rosettes like in the photo, reserve about a cup of frosting before frosting the cake. Transfer it to a piping bag fitted with a large star tip. Pipe rosettes or swirls around the top edge of the cake for that professional bakery look. Finish with chocolate shavings or sprinkles if desired.