This Chocolate, Cream and Caramel Cold Dessert honestly changed my dessert game forever. I made it for the first time on a whim for a family gathering, and by the end of the night, the whole dish was scraped clean. Not a single crumb left. That is when I knew I had to share this recipe with everyone I care about, including you.
What Is This Chocolate, Cream and Caramel Cold Dessert?
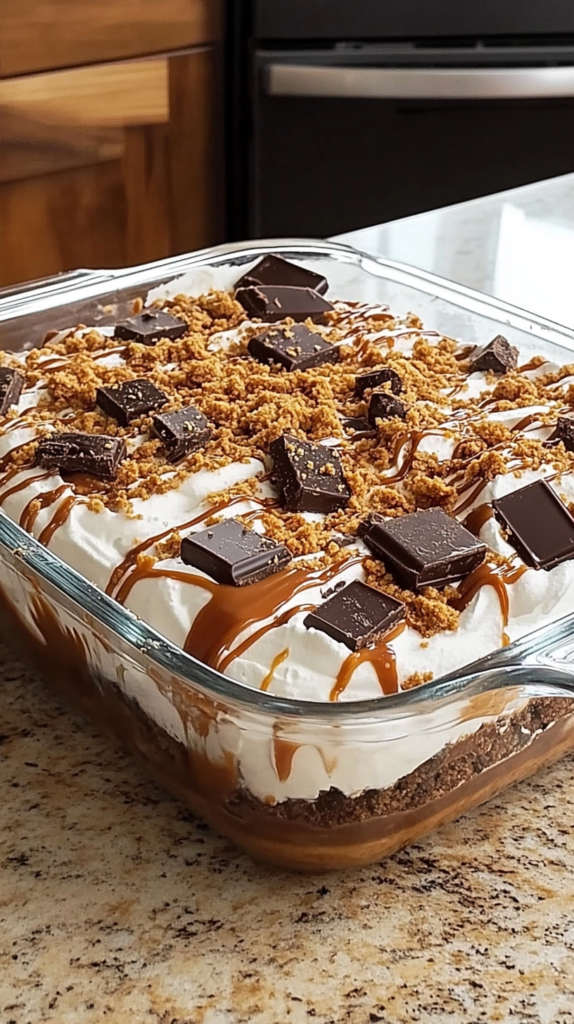
Simply put, it is a chilled layered dessert that starts with a rich, fudgy chocolate brownie base baked in a Pyrex dish. Then comes a thick cloud of whipped cream, followed by generous drizzles of caramel sauce and chocolate fudge sauce. Finally, it gets topped with cookie crumble and chunky chocolate bars. Think of it as a cold brownie trifle meets ice cream sundae, all in one beautiful dish. It is the kind of chocolate caramel cream dessert that makes everyone at the table quietly gasp before diving in.
What You Will Need for This Chocolate, Cream and Caramel Cold Dessert
Here is a full breakdown of everything you need. I kept the substitution notes practical so you can swap things out without stressing.
Chocolate Brownie Base
- 200g unsalted butter (1 3/4 sticks / 7 oz) — This is the fat base that keeps the brownies moist and dense. Salted butter works too, just skip the added salt.
- 200g granulated sugar (1 cup) — Gives structure and a slight crisp top. Coconut sugar is a fine swap if you want a more caramel-like flavor.
- 100g brown sugar (1/2 cup) — Adds moisture and a deeper toffee note. Do not skip this one.
- 3 large eggs — These bind everything together. Room temperature eggs blend in more smoothly.
- 1 tsp pure vanilla extract — Rounds out the chocolate flavor beautifully.
- 80g unsweetened cocoa powder (3/4 cup) — Use good quality cocoa for the best flavor. Dutch-process cocoa makes it even richer.
- 120g all-purpose flour (1 cup) — Just enough to hold things together without making the brownie cakey.
- 1/2 tsp salt — Balances the sweetness. Never skip salt in chocolate bakes.
Whipped Cream Layer
- 480ml heavy whipping cream, very cold (2 cups) — Must be cold for the cream to whip up properly into stiff peaks. Do not try this with room temperature cream.
- 60g powdered sugar (1/2 cup) — Sweetens the cream gently. Adjust to taste if you prefer it less sweet.
- 1 tsp pure vanilla extract — Adds warmth and flavor to the cream layer.
Toppings
- 150ml caramel sauce (1/2 cup + 2 tbsp) — Store-bought is totally fine here. Homemade salted caramel takes it to another level if you have time.
- 150ml chocolate fudge sauce (1/2 cup + 2 tbsp) — Thick, glossy, and dreamy. A good quality jarred fudge sauce works perfectly.
- 100g golden cookie crumble (3/4 cup) — Crushed Lotus Biscoff biscuits are my personal favorite here. Graham crackers work just as well for a more classic taste.
- 6 to 8 chocolate bars, roughly chopped — Kit Kat, Twix, or Snickers all work. Mix and match for fun variety. Roughly chop them into large satisfying chunks.
Step-by-Step Instructions for This Chocolate, Cream and Caramel Cold Dessert
Make the Chocolate Brownie Base
Step 1: Preheat and prep. Preheat your oven to 175°C (350°F). Grease a 23x33cm (9×13-inch) glass Pyrex baking dish well. You will be serving straight from this dish, so no need to line it.
Step 2: Melt the butter and mix in sugar. Melt the butter in a medium saucepan over medium-low heat. Once melted, remove from heat and whisk in both the granulated sugar and brown sugar until they are combined and the mixture looks glossy.
Step 3: Add the eggs and vanilla. Add the eggs one at a time, whisking well after each one. Then stir in the vanilla extract. The batter should look smooth and slightly thickened by now.
Step 4: Add the dry ingredients. Sift in the cocoa powder, flour, and salt. Fold everything together gently with a spatula until just combined. Please do not overmix, because that will make the brownie dense and tough instead of fudgy and tender.
Step 5: Bake it. Pour the batter into your prepared dish and spread it evenly. Bake for 22 to 25 minutes. You want a toothpick inserted in the center to come out with moist crumbs, not clean. That means perfectly fudgy brownies.
Step 6: Cool completely. This part requires patience, I know. Let the brownies cool to room temperature, then refrigerate for at least 1 hour before adding any toppings. A warm brownie will melt your cream layer and the whole thing will slide around. Trust the process here.
Make the Whipped Cream Layer
Step 7: Whip the cream. In a large, chilled bowl, beat the heavy cream, powdered sugar, and vanilla with an electric mixer on high speed until stiff peaks form. This usually takes about 3 to 4 minutes. The cream should be thick, glossy, and hold its shape when you lift the beater.
Step 8: Spread it on. Spread the whipped cream generously and evenly over the cooled brownie base. Do not be shy here. A thick, luxurious layer is exactly what makes this dessert so satisfying.
Assemble and Add the Toppings
Step 9: Drizzle the caramel. Drizzle the caramel sauce generously over the whipped cream in a back-and-forth motion. Do not be neat about it. Messy drizzles look amazing and taste even better.
Step 10: Add the chocolate fudge sauce. Drizzle the chocolate fudge sauce over the caramel layer in the same sweeping motion. At this point it already looks stunning, and you are not even done yet.
Step 11: Scatter the cookie crumble. Sprinkle the crushed Biscoff or graham crackers evenly across the entire surface. They add a gorgeous golden contrast and a satisfying crunch against the soft cream.
Step 12: Add the chocolate bar chunks. Distribute the roughly chopped chocolate bars all over the top. Press them in slightly so they stay in place once you refrigerate the dish. I love mixing Kit Kats and Twix pieces for different textures and flavors.
Step 13: Chill and serve. Refrigerate the assembled dessert for at least 3 hours before serving. Overnight is even better because all the layers settle and the flavors meld together beautifully. Serve directly from the Pyrex dish with a large spoon or spatula. Easy and impressive.
Serving Ideas for This Chilled Chocolate Caramel Dessert
This cold chocolate dessert is honestly perfect as-is, but here are a few fun ways to serve it depending on the occasion. For a dinner party, I like to scoop it into individual glass cups so each guest gets a beautiful layered portion. For casual family nights, just leave it in the dish and let everyone dig in. You can also add a small scoop of vanilla ice cream on the side if you want extra indulgence. A light dusting of cocoa powder or a few flaky sea salt crystals on top make it look gorgeous too.
Tips for the Perfect Chocolate, Cream and Caramel Cold Dessert
- Chill the bowl before whipping: Pop your mixing bowl and beaters into the freezer for 10 minutes before whipping the cream. Cold equipment means faster, more stable peaks.
- Do not skip the refrigerator rest: The brownies must be completely cold before you add the cream layer. Even slightly warm brownies will cause the cream to slide and melt. An hour in the fridge is the minimum.
- Use thick sauces: Runny caramel or chocolate sauce will seep into the cream and make the surface wet. Go for a thick, spoonable sauce for the best drizzle effect.
- Add toppings just before serving if you want extra crunch: The cookie crumble softens slightly after sitting overnight. If you love that texture, sprinkle a bit of extra crumble right before serving.
- Make it ahead: This dessert actually tastes better the next day. Make it the night before and let it chill overnight for the ultimate flavor and texture.
- Cut with a hot knife: If you want cleaner slices, run a sharp knife under hot water and dry it before each cut. It slices through the cream and brownie layers much more neatly.
Your Questions Answered
Can I make this Chocolate, Cream and Caramel Cold Dessert a day ahead?
Absolutely, and I actually recommend it! Making it the night before allows all the layers to set properly. The brownie base softens slightly from the cream, which makes it taste even more like a rich, chilled brownie pudding. Just add the cookie crumble fresh before serving if you want it extra crunchy.
Can I use a boxed brownie mix instead of making the base from scratch?
Yes, totally! If you are short on time, a good quality boxed brownie mix baked in the same 9×13 dish works perfectly. Just bake it according to the package directions and let it cool completely before building the rest of the dessert. No judgment here at all, life gets busy and this shortcut still tastes amazing.
How long does this cold dessert keep in the fridge?
It keeps well in the fridge for up to 3 days, tightly covered with plastic wrap or a lid. After day 3, the cream starts to weep a little and the cookie crumble gets very soft. It is still edible, but the texture is best within the first two days. I have never had it last longer than that in my house anyway.
What chocolate bars work best as a topping?
Kit Kat, Twix, and Snickers are my go-to choices because they each bring something different. Kit Kat adds a light wafer crunch, Twix brings extra caramel and cookie goodness, and Snickers adds a chewy nougat bite. You can honestly use any chocolate bar you love. Kinder Bueno pieces and Milky Way work beautifully here too. Mix and match for the most fun combination.
Why You Will Keep Coming Back to This Recipe
This chocolate, cream and caramel cold dessert is one of those recipes that hits every single note. It is rich but not heavy. Sweet but balanced by that hint of salt. Soft and creamy with just the right amount of crunch from the cookie bits and chocolate bar chunks. Because it is made ahead and served cold, it is also one of the most stress-free desserts you can bring to any gathering. Once you make it, people will ask for it again and again. I promise you that.
If you want to see more dessert inspiration like this and save your favorites, come follow me on Pinterest. I share new ideas there all the time and you will find plenty of cold dessert recipes to inspire you year-round.

Chocolate, Cream and Caramel Cold Dessert
Course: DessertsCuisine: AmericanDifficulty: Medium6
servings30
minutes40
minutes356
kcalIngredients
- Chocolate Brownie Base
200g unsalted butter (1 3/4 sticks / 7 oz) — This is the fat base that keeps the brownies moist and dense. Salted butter works too, just skip the added salt.
200g granulated sugar (1 cup) — Gives structure and a slight crisp top. Coconut sugar is a fine swap if you want a more caramel-like flavor.
100g brown sugar (1/2 cup) — Adds moisture and a deeper toffee note. Do not skip this one.
3 large eggs — These bind everything together. Room temperature eggs blend in more smoothly.
1 tsp pure vanilla extract — Rounds out the chocolate flavor beautifully.
80g unsweetened cocoa powder (3/4 cup) — Use good quality cocoa for the best flavor. Dutch-process cocoa makes it even richer.
120g all-purpose flour (1 cup) — Just enough to hold things together without making the brownie cakey.
1/2 tsp salt — Balances the sweetness. Never skip salt in chocolate bakes.
- Whipped Cream Layer
480ml heavy whipping cream, very cold (2 cups) — Must be cold for the cream to whip up properly into stiff peaks. Do not try this with room temperature cream.
60g powdered sugar (1/2 cup) — Sweetens the cream gently. Adjust to taste if you prefer it less sweet.
1 tsp pure vanilla extract — Adds warmth and flavor to the cream layer.
- Toppings
150ml caramel sauce (1/2 cup + 2 tbsp) — Store-bought is totally fine here. Homemade salted caramel takes it to another level if you have time.
150ml chocolate fudge sauce (1/2 cup + 2 tbsp) — Thick, glossy, and dreamy. A good quality jarred fudge sauce works perfectly.
100g golden cookie crumble (3/4 cup) — Crushed Lotus Biscoff biscuits are my personal favorite here. Graham crackers work just as well for a more classic taste.
6 to 8 chocolate bars, roughly chopped — Kit Kat, Twix, or Snickers all work. Mix and match for fun variety. Roughly chop them into large satisfying chunks.
Directions
- Make the Chocolate Brownie Base
- Step 1: Preheat and prep. Preheat your oven to 175°C (350°F). Grease a 23x33cm (9×13-inch) glass Pyrex baking dish well. You will be serving straight from this dish, so no need to line it.
- Step 2: Melt the butter and mix in sugar. Melt the butter in a medium saucepan over medium-low heat. Once melted, remove from heat and whisk in both the granulated sugar and brown sugar until they are combined and the mixture looks glossy.
- Step 3: Add the eggs and vanilla. Add the eggs one at a time, whisking well after each one. Then stir in the vanilla extract. The batter should look smooth and slightly thickened by now.
- Step 4: Add the dry ingredients. Sift in the cocoa powder, flour, and salt. Fold everything together gently with a spatula until just combined. Please do not overmix, because that will make the brownie dense and tough instead of fudgy and tender.
- Step 5: Bake it. Pour the batter into your prepared dish and spread it evenly. Bake for 22 to 25 minutes. You want a toothpick inserted in the center to come out with moist crumbs, not clean. That means perfectly fudgy brownies.
- Step 6: Cool completely. This part requires patience, I know. Let the brownies cool to room temperature, then refrigerate for at least 1 hour before adding any toppings. A warm brownie will melt your cream layer and the whole thing will slide around. Trust the process here.
- Make the Whipped Cream Layer
- Step 7: Whip the cream. In a large, chilled bowl, beat the heavy cream, powdered sugar, and vanilla with an electric mixer on high speed until stiff peaks form. This usually takes about 3 to 4 minutes. The cream should be thick, glossy, and hold its shape when you lift the beater.
- Step 8: Spread it on. Spread the whipped cream generously and evenly over the cooled brownie base. Do not be shy here. A thick, luxurious layer is exactly what makes this dessert so satisfying.
- Assemble and Add the Toppings
- Step 9: Drizzle the caramel. Drizzle the caramel sauce generously over the whipped cream in a back-and-forth motion. Do not be neat about it. Messy drizzles look amazing and taste even better.
- Step 10: Add the chocolate fudge sauce. Drizzle the chocolate fudge sauce over the caramel layer in the same sweeping motion. At this point it already looks stunning, and you are not even done yet.
- Step 11: Scatter the cookie crumble. Sprinkle the crushed Biscoff or graham crackers evenly across the entire surface. They add a gorgeous golden contrast and a satisfying crunch against the soft cream.
- Step 12: Add the chocolate bar chunks. Distribute the roughly chopped chocolate bars all over the top. Press them in slightly so they stay in place once you refrigerate the dish. I love mixing Kit Kats and Twix pieces for different textures and flavors.
- Step 13: Chill and serve. Refrigerate the assembled dessert for at least 3 hours before serving. Overnight is even better because all the layers settle and the flavors meld together beautifully. Serve directly from the Pyrex dish with a large spoon or spatula. Easy and impressive.