This Mothers Day Strawberry Cheesecake Dump Cake came into my life at exactly the right moment, and honestly, it might be the best thing I have ever pulled out of my oven for a special occasion. It is ridiculously simple, shockingly delicious, and it looks like you spent way more time on it than you actually did. If you are trying to make mom feel like a queen without spending hours in the kitchen, this is your recipe.
What Is a Mothers Day Strawberry Cheesecake Dump Cake?
So if you have never made a dump cake before, let me give you the quick rundown. A dump cake is basically what happens when a fruit cobbler and a sheet cake fall in love. You layer your ingredients into a baking dish, literally dump the dry cake mix on top, add butter, and bake. No mixing bowls of batter, no electric mixer running for ten minutes. This version has a cheesecake twist layered in the middle that makes it feel extra special and totally worthy of a Mother’s Day celebration.
What You Will Need for This Mothers Day Strawberry Cheesecake Dump Cake
One of my favorite things about this recipe is that the ingredient list is short and sweet. You probably have most of this in your kitchen already. Here is what you will need and why each ingredient matters.
- 2 cans (15 ounces each) strawberry pie filling: This is your juicy, jammy base. It bubbles up from the bottom and creates that gorgeous strawberry layer. You could swap it for cherry or mixed berry filling if needed, but strawberry really is the star here.
- 8 ounces cream cheese, softened: This is the cheesecake magic in the middle. Make sure it is truly softened at room temperature so it beats smooth without lumps. Low-fat cream cheese works too, though full-fat gives you that rich, creamy texture.
- 1 large egg: This helps bind the cream cheese mixture so it sets up nicely in the oven rather than just melting everywhere.
- 1/4 cup granulated sugar: Just a little sweetness to make the cream cheese layer taste like actual cheesecake filling. You could try powdered sugar as a swap for an even silkier texture.
- 1 package vanilla or white cake mix: This is the magic dump cake layer on top. Vanilla and white cake mix both work beautifully here. Yellow cake mix is another option if that is all you have.
- 1/2 cup salted butter, cold: Thin slices of cold butter go over the dry cake mix and melt down as it bakes, creating that golden, slightly crispy topping. Salted butter adds a tiny bit of flavor contrast that I personally love.
- Fresh strawberries, whole or halved, for serving (optional): These are totally optional but they make the finished cake look absolutely beautiful. Especially on Mother’s Day, a few fresh berries on top feel like a little love note.
Step-by-Step Instructions for the Perfect Dump Cake
Okay, so here is the part where I promise you this is going to be easier than you think. Even if you are a total beginner in the kitchen, you can absolutely nail this recipe. Just follow these steps and you will be golden.
Step 1: Preheat the oven. Get your oven going at 350 degrees F. While it heats up, you can get everything else ready. Grease your 9×13 inch baking dish lightly if you want, though the butter in the recipe generally keeps things from sticking too badly.
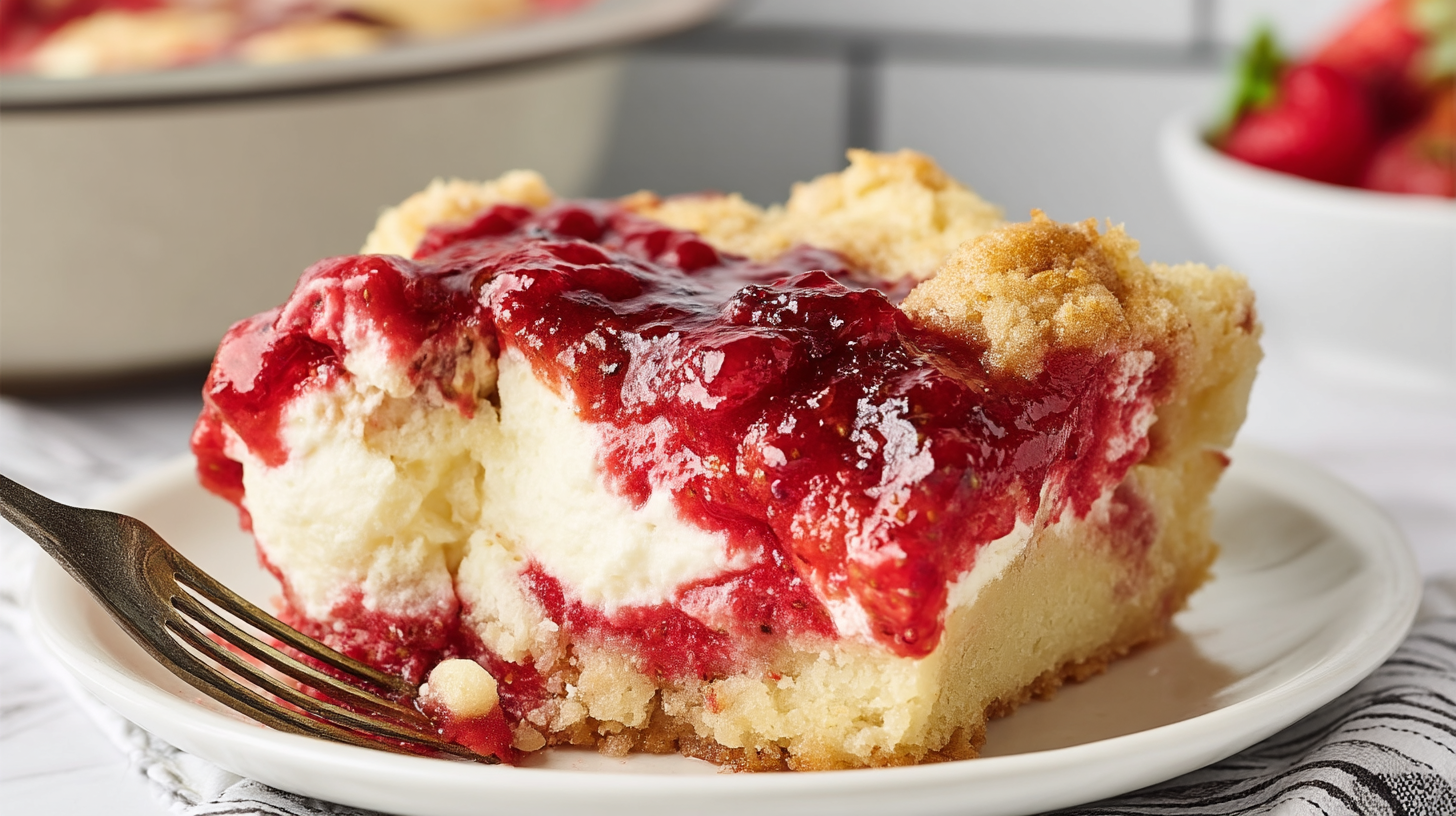
Step 2: Add the strawberry filling. Open both cans of strawberry pie filling and spread them evenly across the bottom of your baking dish. Try to get a nice, even layer so every bite has that jammy strawberry goodness underneath. This layer is going to bubble and get beautifully thick as it bakes.
Step 3: Make the cheesecake layer. In a medium bowl, beat together the softened cream cheese, egg, and granulated sugar until it is smooth, creamy, and well combined. A hand mixer makes this super quick, but a whisk works too if your cream cheese is truly soft. You want no lumps in this mixture at all.
Step 4: Layer the cream cheese mixture. Scoop dollops of the cream cheese mixture all across the surface of the strawberry filling. Then, gently try to spread it out as evenly as you can. It does not need to be perfect because the oven will do the rest of the work. Just try to get decent coverage so every slice has some of that cheesecake layer in it.
Step 5: Add the cake mix. Open your box of vanilla or white cake mix and sprinkle it evenly over the entire surface of the cream cheese and strawberry layers. Do not mix it in. Just let it sit on top in an even, dry layer. This is the dump cake way and it works like a charm.
Step 6: Add the butter. Slice your cold butter into very thin pats and lay them across the top of the dry cake mix. Try to cover as much of the surface as possible. The more coverage you get, the more evenly the top will bake and brown. Some spots may still look a little powdery right before baking, but do not stress about it.
Step 7: Bake it up. Pop the dish in the oven and bake for 40 to 45 minutes. You are looking for a golden brown topping that is set even in the center, and you should see the strawberry filling bubbling up around the edges and through the topping. That bubbling is your sign that everything is cooking through perfectly.
Step 8: Serve and enjoy. You can serve this warm straight from the oven or let it cool completely first. Both ways are honestly incredible. Top with fresh strawberries if you are going for that beautiful Mother’s Day presentation.
Serving Suggestions for Your Strawberry Cheesecake Dump Cake
This cake is amazing on its own, but if you want to take it up a notch for Mother’s Day, here are a few ideas. Serve it warm with a big scoop of vanilla ice cream on top. The cold ice cream melting into the warm strawberry filling is absolutely dreamy. A dollop of whipped cream and a few fresh strawberries also looks gorgeous and takes about thirty seconds to put together. For a fancier presentation, slice it into neat squares and plate individually with a drizzle of strawberry sauce. Mom will feel totally spoiled.
Tips for the Perfect Mothers Day Strawberry Cheesecake Dump Cake
- Soften your cream cheese fully: This is non-negotiable. Cold cream cheese will leave lumps in your cheesecake layer and it will not spread properly. Leave it out for at least an hour before starting.
- Slice the butter thin: The thinner your butter pats, the better the coverage, and the more evenly the top will brown. Use a sharp knife and work quickly so the butter stays cold.
- Do not stir or mix the layers: I know it is tempting to swirl things together but resist! The layers are meant to stay separate so you get that distinct strawberry, cheesecake, and cake topping experience in every bite.
- Check the center: The middle of the cake should not look wet or doughy when it is done. If it does, give it another five minutes and check again.
- Make it ahead: This cake actually reheats really well. You can make it the day before Mother’s Day and warm individual slices in the microwave for about 30 to 45 seconds. It tastes just as good the next day.
- Store it properly: Because of the cream cheese layer, keep leftovers covered in the refrigerator for up to four days. Reheat before serving for the best texture.
Your Questions Answered
Can I use fresh strawberries instead of pie filling?
You can, but the texture and sweetness will be different. Fresh strawberries release a lot of juice as they bake, which can make the bottom layer watery. If you want to use fresh berries, toss them with some sugar and a little cornstarch first to help thicken the liquid as it bakes. Canned pie filling really does give you the most reliable, jammy result though, so I usually stick with it for this one.
Can I make this recipe ahead of time for Mother’s Day?
Absolutely, and this is actually one of my favorite things about this recipe. You can bake the whole thing the evening before, let it cool completely, cover it tightly, and refrigerate overnight. On the morning of Mother’s Day, just pull it out and let it come to room temperature for about 30 minutes, or warm it in the oven at 300 degrees for about 15 minutes. It tastes just as wonderful the next day.
What if my cake mix top does not fully bake through?
This usually happens when the butter does not cover enough of the dry mix on top. If you notice dry powdery spots after baking, you can melt a little extra butter and drizzle it over those spots, then pop the cake back in the oven for another five to ten minutes. Next time, make sure your butter slices are as thin as possible and cover as much surface area as you can.
Can I use a different flavor of pie filling?
Yes! This recipe is wonderfully flexible. Cherry pie filling is a classic choice for dump cakes and works really well here. Blueberry or mixed berry filling are also gorgeous options. You can even do a mix of strawberry and rhubarb filling if you want a slightly tart twist. The cheesecake layer pairs beautifully with almost any fruit filling, so feel free to get creative.
Why You Are Going to Fall in Love With This Recipe
Honestly, what is not to love? This Mothers Day Strawberry Cheesecake Dump Cake is the kind of recipe that makes you look like an amazing baker with barely any effort at all. It is warm, gooey, fruity, creamy, and has that golden buttery topping that is just irresistible. It is also completely beginner-friendly and uses simple pantry ingredients. Plus, it feeds a crowd, which is perfect when the whole family is gathering to celebrate mom. One pan, minimal dishes, maximum happiness.
By the third test, everything clicked. The cream cheese spread beautifully, the strawberry filling bubbled up in the most gorgeous way, and the top was perfectly golden all the way through the center. I actually jumped a little when I pulled it out of the oven because it looked so good. If you love easy dessert recipes like this one, you will also find so many more ideas on my Pinterest page, where I share all my favorite recipes and baking inspiration. Go check it out, you will not regret it!
Print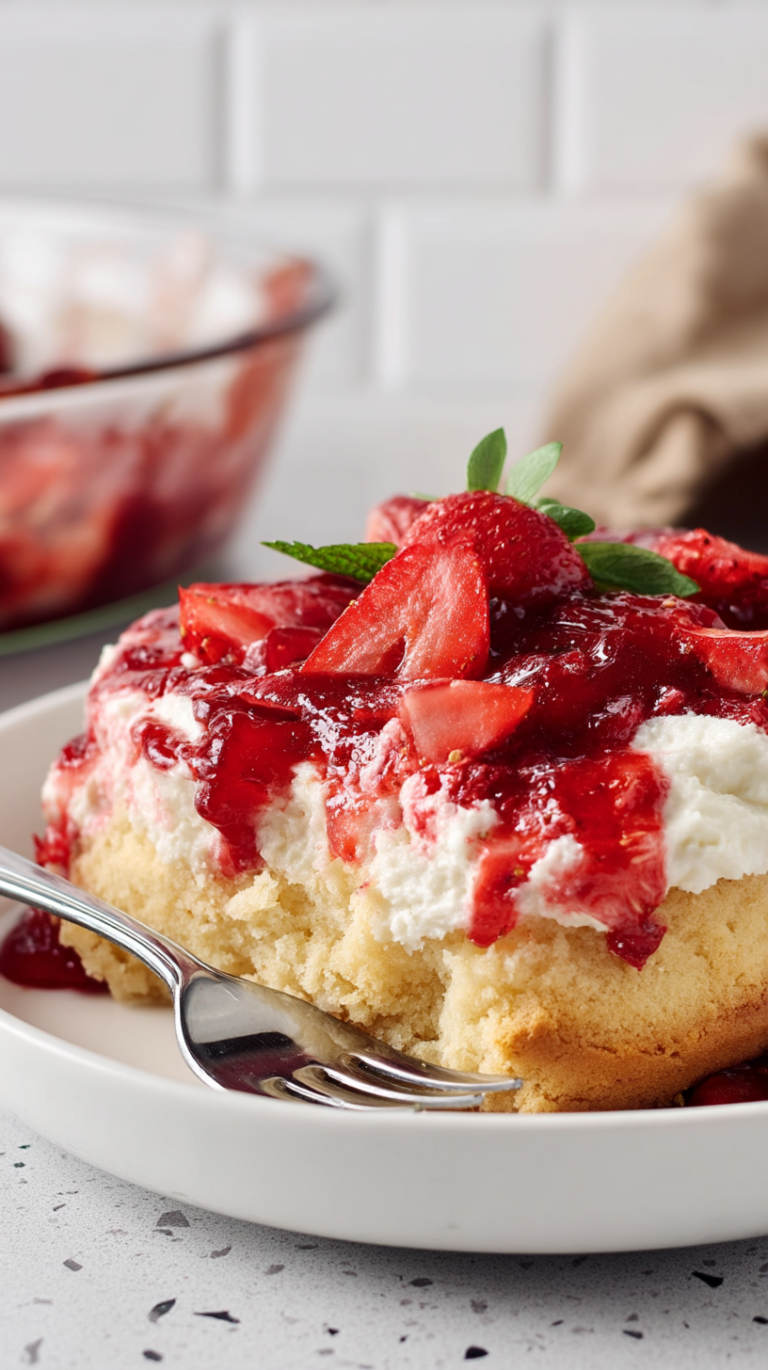
Mother’s Day Strawberry Cheesecake Dump Cake
A show-stopping, no-mixer dump cake with a layered strawberry pie base, creamy cheesecake center, and golden vanilla cake topping. Effortlessly elegant for Mother’s Day.
- Total Time: 60
- Yield: 8 servings 1x
Ingredients
2 cans (15 ounces each) strawberry pie filling
8 ounces cream cheese, softened
1 large egg
1/4 cup granulated sugar
1 package (14–16 ounces) vanilla or white cake mix
1/2 cup salted butter, cold and cut into slices
Fresh strawberries, sliced or whole for garnish (optional)
Instructions
Preheat oven to 350°F (175°C)
Pour one can of strawberry pie filling into a 9×13 inch baking dish
Spread half the remaining pie filling over the bottom layer
In a bowl, combine cream cheese, egg, and sugar until smooth
Spread the cream cheese mixture evenly on top of the pie filling
Sprinkle the entire cake mix over the cream cheese layer
Dot the cold butter slices across the cake mix
Bake for 40-45 minutes until golden and bubbly
Cool slightly before serving with fresh strawberries
Notes
For a non-dairy option: Use vegan cream cheese and dairy-free cake mix with plant-based butter
Serve with a dollop of dairy-free whipped topping if desired
Store leftovers in an airtight container for up to 3 days
- Prep Time: 15
- Cook Time: 45
- Category: Desserts
- Method: Baking
- Cuisine: American
- Diet: Vegetarian
Nutrition
- Serving Size: 1 slice
- Calories: 320
- Sugar: 28g
- Sodium: 320mg
- Fat: 16g
- Saturated Fat: 9g
- Carbohydrates: 44g
- Fiber: 1g
- Protein: 5g
- Cholesterol: 45mg