Strawberry dump cake has honestly saved me more times than I can count when I needed a last-minute dessert that looked like I actually tried. I first made this on a busy weeknight when I had two cans of strawberry pie filling sitting in my pantry and zero energy to do anything complicated. The result? Pure golden, bubbly, strawberry magic. And I have been making it on repeat ever since.

What Is Strawberry Dump Cake?
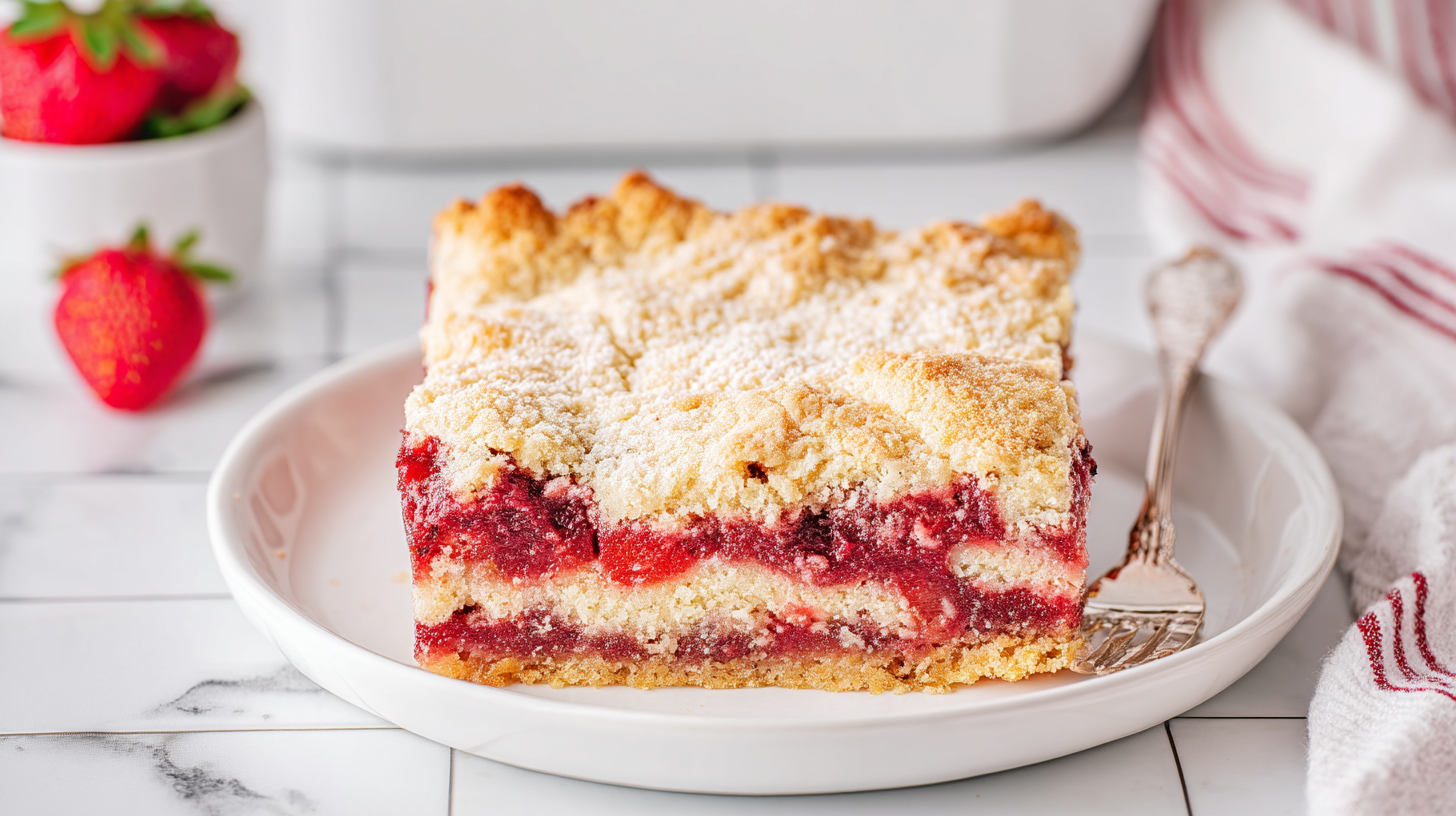
A strawberry dump cake is exactly what it sounds like. You basically dump everything into a baking dish, layer it up, and let the oven do all the work. No mixing bowls, no electric mixer, no fancy techniques. It is the kind of dessert that feels like a cross between a fruit cobbler and a crumble, with a golden buttery top that gets perfectly crispy while the strawberry filling underneath stays soft and jammy. It is honestly one of the easiest desserts you will ever put together, and it tastes absolutely incredible warm from the oven.
What You Will Need for Strawberry Dump Cake
The ingredient list here is super short, which is part of why I love this recipe so much. You probably already have most of this stuff on hand. Here is everything you need along with a few quick swap ideas just in case.
- 3 cups fresh strawberries, chopped or sliced – Fresh is best here because they add a bright, juicy pop under the filling. If strawberries are not in season, frozen ones work too, just thaw and drain them first so you do not end up with a watery base.
- 42 ounces strawberry pie filling (2 cans) – This is your sweet, gooey base layer. It gives the cake that luscious, thick strawberry flavor everyone loves. You can also use cherry or mixed berry pie filling if you want to mix things up.
- 15.25 ounces butter cake mix – One box of golden butter cake mix creates that gorgeous, slightly crispy golden top. Yellow cake mix works as a substitute if you cannot find butter cake mix specifically.
- 3/4 cup salted butter, cold – Cold butter is key here. You slice it thin and lay it across the dry cake mix, and as it melts in the oven it creates that beautiful crisp, buttery crust on top. Do not use melted butter here, it changes the texture completely.
For toppings, I highly recommend these two classics. They take the whole thing to the next level.
- Whipped cream – A big fluffy dollop of cool whip or fresh whipped cream makes every bite feel extra indulgent.
- Vanilla ice cream – Serving this warm dessert with a scoop of vanilla ice cream is honestly a game changer. The way the ice cream melts into the warm strawberry filling is just everything.
Step-by-Step Instructions for the Best Strawberry Dump Cake
OK so here is where the magic happens, and trust me it is almost too easy. Follow these steps and you will have a gorgeous bubbly dessert ready in under an hour.
Step 1: Preheat and prep your pan. Start by preheating your oven to 350 degrees Fahrenheit. Grab a 9×13-inch baking pan and give it a good spray with baking spray. This step is important so the edges do not stick and cleanup stays easy.
Step 2: Add the fresh strawberries. Sprinkle your chopped or sliced fresh strawberries evenly across the bottom of the prepared baking dish. Try to spread them out in a single layer so every bite gets some of that fresh fruity goodness.
Step 3: Layer on the strawberry pie filling. Open both cans of strawberry pie filling and scoop them right on top of the fresh strawberries. Use a rubber spatula to spread it out into an even layer across the whole pan. This is where the deep, sweet strawberry flavor really comes from.
Step 4: Sprinkle the dry cake mix. Now sprinkle the entire box of dry butter cake mix as evenly as possible over the strawberry filling. You want good coverage all the way to the edges. If it looks a little uneven, use a spatula to gently smooth it out. Do not stir or mix it in, just lay it flat on top.
Step 5: Add the cold butter slices. Cut your cold butter into thin, even squares or slices. Then place them all across the top of the dry cake mix, covering as much surface area as you can. The more coverage you get, the fewer dry spots you will have on top after baking. This step is honestly the secret to that perfect golden crust.
Step 6: Bake until golden and bubbly. Pop it into the preheated oven and bake for 35 to 45 minutes. You are looking for the top to turn a beautiful golden brown color and the strawberry filling to be bubbling up around the edges. That bubbling is your sign that everything is perfectly cooked through underneath.
Step 7: Cool and serve. Once it comes out of the oven, let it cool for about 10 to 15 minutes before digging in. This gives the filling a chance to settle a tiny bit so it is not scalding hot. Then serve it warm with a big dollop of cool whip or a generous scoop of vanilla ice cream and enjoy every single bite.
Serving Suggestions for Strawberry Dump Cake
This easy strawberry dessert is incredibly versatile when it comes to serving. I love it warm straight from the oven with a big scoop of vanilla ice cream. But it is also really lovely at room temperature if you are bringing it to a potluck or family gathering. You can serve it in individual bowls or scoop it into little mason jars for a cute presentation. If you want to keep things simple, a generous swirl of whipped cream on top is all you really need. This cake also tastes amazing the next day, so do not stress if you have leftovers.
Tips for the Perfect Strawberry Dump Cake
- Use cold butter, not melted. This is probably the most important tip I can give you. Cold butter slices placed on top melt slowly in the oven and create those gorgeous crispy patches. Melted butter poured over the top makes the cake mix clump and sink into the filling instead.
- Cover as much of the top as possible with butter. Any dry spots that the butter does not reach will not crisp up the same way. Try to tile the butter slices close together without any big gaps for the best golden top.
- Do not stir the layers. I know it might be tempting but seriously, resist. The whole magic of a dump cake comes from keeping the layers separate so each one does its own thing in the oven.
- Check at 35 minutes. Ovens vary a lot, so start checking around the 35-minute mark. You want golden brown on top and visible bubbling around the edges. If the top is browning too quickly, tent it loosely with foil for the last few minutes.
- Let it rest before serving. I know waiting is hard but giving it at least 10 minutes out of the oven makes a big difference. The filling thickens slightly as it cools and the scooping gets much cleaner.
- Store leftovers properly. Cover the pan with plastic wrap or transfer to an airtight container and refrigerate for up to 4 days. Reheat individual portions in the microwave for about 30 to 45 seconds.
Your Questions Answered About Strawberry Dump Cake
Can I use frozen strawberries instead of fresh ones?
Yes, absolutely. Frozen strawberries work great as a substitute for fresh ones in this recipe. Just make sure to thaw them completely and drain off any excess liquid before adding them to the pan. Too much extra moisture can make the base a little watery, which affects the final texture of your strawberry dump cake.
Can I make this dump cake ahead of time?
You can definitely bake it a day ahead. It still tastes amazing reheated. However, the crispy top will soften a bit after being covered and refrigerated overnight. If you want to keep that crunch, consider reheating individual portions in a toaster oven or regular oven at 325 degrees for about 10 minutes instead of using the microwave.
What other cake mix flavors can I use?
So many options work well here. Yellow cake mix and vanilla cake mix are the most common swaps if you cannot find butter golden cake mix. Some people also love using white cake mix or even a lemon cake mix with strawberry filling for a fun citrusy twist. Each one gives a slightly different flavor to the top crust but they all taste delicious.
Can I double the recipe for a bigger crowd?
If you are feeding a big crowd, you can double the recipe and bake it in two separate 9×13-inch pans. I would not recommend trying to fit a doubled batch into one pan because the layers will be too thick and it will not bake evenly. Keeping it in two pans ensures everything cooks through properly and you get that golden top on both.
Why You Are Going to Absolutely Love This Recipe
This strawberry dump cake checks every single box for a go-to dessert. It takes about 10 minutes of actual hands-on time, uses simple pantry ingredients, and always gets rave reviews. The combination of jammy strawberry filling, fresh fruit, and that buttery golden crust is just ridiculously good. Whether you are making it for a summer potluck, a weeknight treat, or a holiday dessert table, this easy strawberry cake never disappoints. I genuinely cannot think of a simpler way to make something that tastes this special.
I have also tested this with cherry pie filling and lemon cake mix as a variation, and it turned out absolutely amazing if you want to switch things up sometime. But the classic strawberry version is still my personal favorite by a wide margin. If you want to see more of my testing process and recipe ideas, I share a ton of behind-the-scenes content and step-by-step photos over on my Pinterest page. Come find me there for more easy dessert inspiration.
Print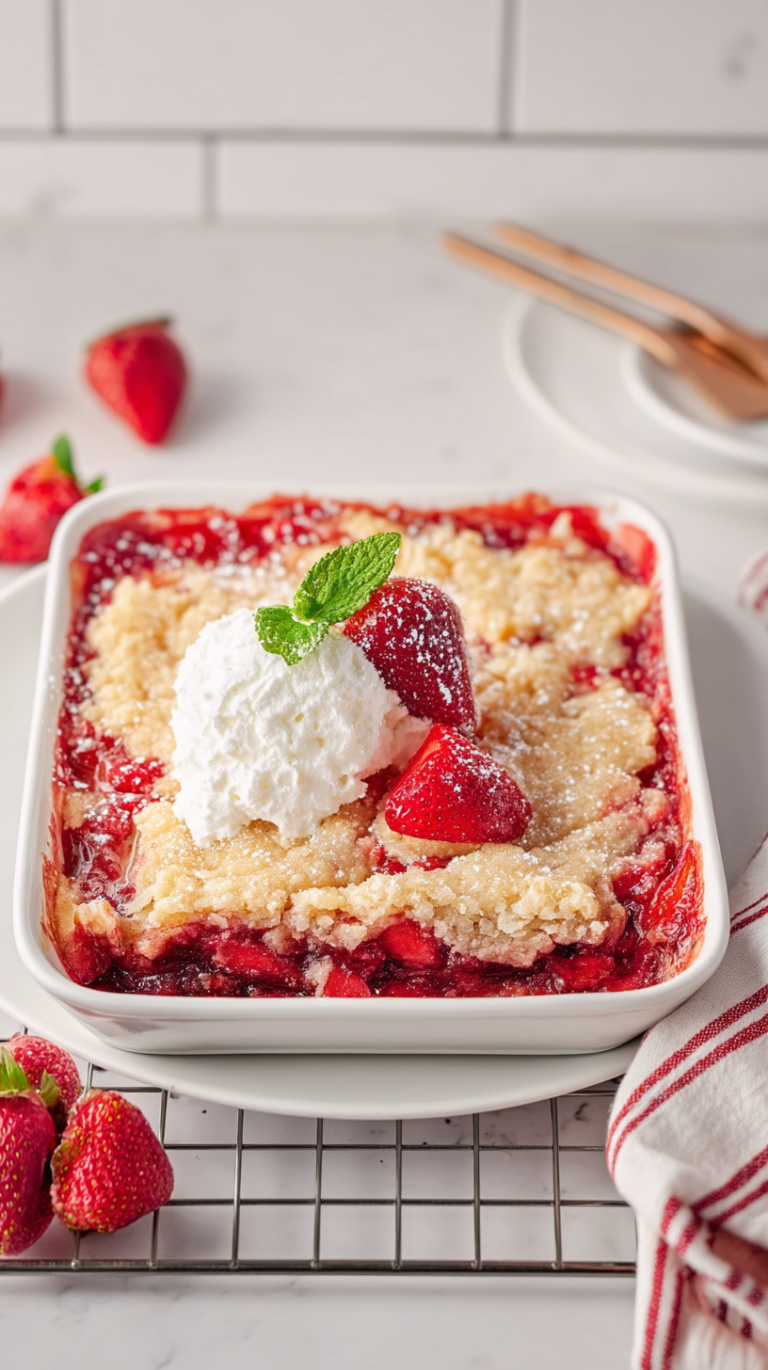
Strawberry Dump Cake: The Easiest Dessert You’ll Ever Make
A no-fuss, layer-up dessert featuring fresh strawberries, sweet strawberry pie filling, and a gooey golden cake top. Perfect for busy nights or sweet cravings.
- Total Time: 50
- Yield: 8 servings 1x
Ingredients
3 cups fresh strawberries, chopped
2 (21 oz) cans strawberry pie filling
1 box (15.25 oz) butter cake mix
3/4 cup salted butter, cold and cubed
Instructions
Preheat oven to 350°F (175°C)
Layer chopped strawberries in a 9×13-inch baking dish
Top with undrained strawberry pie filling
Evenly spread cake mix over the filling
Evenly distribute cold butter cubes atop the cake mix
Bake for 35-40 minutes until golden and bubbly
Let cool slightly before serving
Notes
Use frozen strawberries if fresh unavailable—thaw and drain before layering
Swap with cherry or mixed berry pie filling for variety
Add 1/2 cup halved almonds for a crunchy twist (optional)
Serving warm with whipped cream or vanilla ice cream is ideal
- Prep Time: 10
- Cook Time: 40
- Category: Desserts
- Method: Baking
- Cuisine: American
- Diet: Vegetarian
Nutrition
- Serving Size: 1 serving
- Calories: 420
- Sugar: 28g
- Sodium: 450mg
- Fat: 20g
- Saturated Fat: 12g
- Carbohydrates: 58g
- Fiber: 2g
- Protein: 4g
- Cholesterol: 65mg