Cookies and Cream Cold Cake honestly changed the way I think about dessert. I used to spend hours in the kitchen baking layer cakes from scratch, and one summer day I just did not want to turn on the oven. So I threw together this chilled, no-bake beauty, and my family absolutely lost their minds over it. It is cool, creamy, and loaded with that irresistible chocolate cookie crunch we all love. Trust me, once you make this, you will want to make it on repeat all year long.
What Is Cookies and Cream Cold Cake?
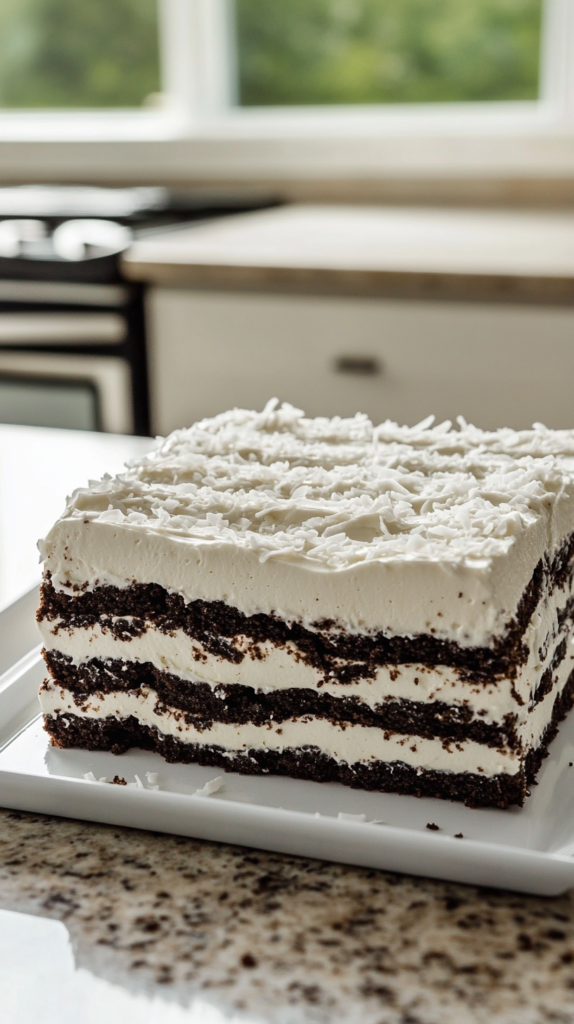
A Cookies and Cream Cold Cake is a no-bake layered dessert made by stacking chocolate cookies with a luscious homemade pastry cream filling. It is often called an icebox cake because it sets in the fridge instead of the oven. As the cake chills, the cookies soften into tender, almost cake-like layers that melt right into the cream. The result is this gorgeous, sliceable dessert that looks like it took forever but honestly comes together in under 30 minutes of hands-on time. It is one of my absolute favorite things to bring to gatherings because everyone thinks it is way more complicated than it is.
What You Will Need for This Cookies and Cream Cold Cake
One of the best things about this recipe is that the ingredients are super simple. Nothing fancy, nothing hard to find. Here is exactly what goes into this dreamy no-bake chocolate cookie cake, along with a few easy swap ideas so you can work with what you already have at home.
Cookie Layers
- Chocolate cookies (3 packages, 400g / 14 oz total) – I use dark chocolate wafer-style cookies or Oreo thins. You want thin, crisp cookies that soak up the cream beautifully without falling apart too fast. Any chocolate wafer cookie works great here.
- Whole milk (240ml / 1 cup), for dipping (optional) – This is optional but I highly recommend it. A quick 1 to 2 second dip in milk softens the cookies just slightly before layering, which makes the final texture even more silky. You can skip it if you prefer a bit more crunch in your layers.
Pastry Cream Filling
- Whole milk (1 liter / 4 1/4 cups) – Full-fat milk makes the creamiest, richest pastry cream. I would not swap this for skim milk because the texture just will not be the same.
- 1 large egg – This adds richness and helps the cream set to that lovely thick consistency. Room temperature works best.
- Granulated sugar (120g / 1/2 cup + 1 tbsp) – Classic white sugar sweetens the cream perfectly without any overpowering flavor. You can reduce it slightly if you prefer a less sweet filling.
- Cornstarch (60g / 1/2 cup) – This is the thickening agent for the pastry cream. Do not skip it or swap it for flour without adjusting the amount, because cornstarch gives that glossy, smooth finish.
- Pure vanilla extract (1 tsp) – Just a teaspoon makes such a big difference in flavor. Use good quality pure vanilla if you can, but imitation works in a pinch.
- Unsalted butter (1 tbsp) – Stirred in at the end, this gives the cream a beautiful glossy finish and a rich, velvety mouthfeel. Salted butter works too, it just adds a tiny hint of salt which I actually love.
Whipped Cream Fold-In
- Heavy whipping cream (200ml / 3/4 cup + 1 tbsp), very cold – Make sure this is really cold before whipping. Cold heavy cream whips up to stiff peaks much faster and holds its shape better when folded into the pastry cream. This step is what makes the filling light and fluffy instead of dense.
Garnish
- Shredded sweetened coconut (80g / 1 cup) – This topping is honestly so unique and unexpected on a cookies and cream cake. It adds a sweet, chewy texture on top of the smooth cream and looks absolutely stunning. You can toast it lightly for a deeper flavor, or use it plain for a snowy look.
Step-by-Step Instructions for Cookies and Cream Cold Cake
Okay, let me walk you through this whole thing from start to finish. I promise it is easier than it looks. Just follow each step carefully, and you will have a beautiful no-bake cold cake ready to wow everyone at the table.
Make the Pastry Cream Filling
Step 1: Whisk your ingredients cold. In a medium saucepan, combine the cold milk, egg, sugar, and cornstarch before placing the pan on the stove. Whisk everything really well until there are absolutely no lumps. This step matters a lot because if you add cornstarch to hot milk you will get lumps immediately, and those are a nightmare to get rid of.
Step 2: Cook and stir constantly. Place the pan over medium heat and stir constantly with a whisk. Do not walk away from the stove here. Within about 8 to 10 minutes, you will feel the mixture starting to thicken up. Keep going until it reaches a smooth, thick pastry cream consistency that coats the back of a spoon nicely.
Step 3: Finish the cream. Remove the pan from the heat immediately and stir in the vanilla extract and butter until fully melted and mixed in. The butter adds that gorgeous glossy shine you will notice right away.
Step 4: Cool completely. Let the pastry cream cool down to room temperature. Stir it occasionally while it cools to prevent a skin from forming on top. If you are in a hurry, you can press a piece of plastic wrap directly onto the surface of the cream to speed things up. Do not fold in the whipped cream until the pastry cream is fully cooled or it will just melt.
Make the Whipped Cream Fold-In
Step 5: Whip the cream to stiff peaks. In a large chilled bowl, beat the very cold heavy cream using an electric hand mixer on high speed. Beat just until stiff peaks form. Do not over-whip or it will turn grainy. A chilled metal bowl works best for this step because it helps the cream whip up faster.
Step 6: Fold together gently. Using a rubber spatula, fold the whipped cream into the cooled pastry cream in two additions. Be gentle here because you want to keep the airiness of the whipped cream intact. Fold just until smooth, thick, and glossy. The final cream should be light but still hold its shape when spread.
Assemble the Cake
Step 7: Dip the cookies (optional but worth it). If you are using the milk dip method, briefly dip each chocolate cookie into milk for just 1 to 2 seconds per side. You want them lightly moistened, not soggy. This little trick makes a huge difference in the final texture of your cookies and cream cold cake.
Step 8: First cookie layer. Arrange a tight single layer of chocolate cookies on the bottom of a medium rectangular mold or directly on a flat white rectangular serving plate. Make sure the cookies are touching edge to edge with no big gaps.
Step 9: First cream layer. Spread a thick, generous layer of cream over the cookies using an offset spatula or the back of a spoon. Smooth it out evenly so every cookie is covered with a consistent layer of that dreamy filling.
Step 10: Keep layering. Repeat the process, alternating cookie layers and cream layers until you have built 4 to 5 visible layers total. Always finish with a thick layer of cream on the very top. The more layers you have, the more dramatic and beautiful the slices look when you cut into it.
Step 11: Add the coconut topping. Once the top cream layer is smooth, generously cover the entire surface with shredded sweetened coconut. Press it in very gently so it sticks to the cream. The coconut garnish is such a stunning touch and gives every bite a slightly chewy, sweet contrast.
Step 12: Refrigerate. Cover the cake loosely and place it in the fridge for a minimum of 4 hours. Overnight is honestly the best because the cookies fully soften into those gorgeous, melt-in-your-mouth layers. I usually make this the night before serving so I have nothing to stress about the next day.
Step 13: Slice and serve cold. When you are ready to serve, take the cake straight from the fridge and slice it with a sharp knife. Clean the knife between slices for the prettiest cuts. Serve immediately and well chilled for the best flavor and texture.
Serving Ideas for Your Cold Cake
This Cookies and Cream Cold Cake is stunning on its own, but there are so many fun ways to serve it. For a more festive presentation, I love placing each slice on a small dessert plate with a drizzle of chocolate sauce alongside. You can also serve it with a scoop of vanilla ice cream on the side for the ultimate indulgent treat. For summer gatherings, it pairs beautifully with fresh berries like sliced strawberries or raspberries, which add a bright pop of color and flavor against all that creamy white and dark chocolate. This dessert is great for birthdays, potlucks, or just a cozy Friday night at home.
Tips for the Perfect Cookies and Cream Cold Cake
- Cool the pastry cream completely before folding: If the cream is even slightly warm when you fold in the whipped cream, it will deflate and become runny. Patience here is everything.
- Use thin cookies: Thicker cookies take much longer to soften in the fridge. Oreo thins or classic dark chocolate wafer cookies give the best results for this no-bake icebox cake style recipe.
- Chill your bowl before whipping: Pop your mixing bowl and beaters into the freezer for 10 minutes before whipping the cream. Cold tools mean faster, more stable peaks.
- Do not skip the overnight chill: The longer this cake sits in the fridge, the better the layers meld together. Four hours is the minimum, but overnight transforms the texture entirely.
- Make neat slices: Wipe the knife clean between every cut for picture-perfect slices. A warm knife run under hot water and dried also helps cut through the layers smoothly.
- Press the coconut in gently: Just a light press with your hand helps the shredded coconut stick to the cream without smashing the top layer flat.
- Cover loosely in the fridge: Avoid wrapping it too tightly or the coconut can get pressed down and look messy. A loose tent of foil or a large container lid works great.
Your Questions Answered
Can I make Cookies and Cream Cold Cake ahead of time?
Absolutely, and honestly this is one of the best make-ahead desserts out there. You can assemble the entire cake up to 24 hours in advance and keep it covered in the fridge. In fact, making it the night before is ideal because the flavors deepen and the layers set beautifully. Just add the coconut topping right after assembly so it has time to stick.
Can I use store-bought whipped cream instead of making it from scratch?
You can in a pinch, but homemade is so much better here. Store-bought canned whipped cream tends to deflate quickly once folded into the pastry cream, which can make your filling looser than you want. If you need a shortcut, try using a tub of thawed non-dairy whipped topping instead, which holds its structure better than the canned spray kind.
How long does this cold cake keep in the fridge?
This cake keeps well in the fridge for up to 3 days. After that, the cookies can become too soft and the cream may start to weep a little. To be honest though, it rarely lasts more than a day in my house because everyone goes back for seconds. Just keep it well covered to prevent it from absorbing any fridge odors.
Can I freeze this Cookies and Cream Cold Cake?
Freezing is not something I recommend for this particular recipe. The pastry cream filling does not thaw well and can become grainy and watery once defrosted. The cookies also turn mushy rather than softening nicely. This dessert is really at its best fresh from the fridge, so stick with the refrigerator method and make it close to when you plan to serve it.
Why You Are Going to Absolutely Love This Recipe
Honestly, this Cookies and Cream Cold Cake is the kind of dessert that feels a little special without requiring any baking skills at all. It is creamy, chocolatey, and has those gorgeous soft layers that make every bite satisfying. The coconut topping gives it a texture twist that keeps things interesting. Plus it is a total crowd-pleaser, and you can prep it the night before so there is nothing to do when your guests arrive except slice and enjoy. Whether you are a total beginner or a seasoned home baker, this recipe is for you.
If you want to see more behind-the-scenes recipe testing moments like this, come find me on Pinterest where I share all my latest creations, food inspo, and recipe ideas. You can follow along at my Pinterest page for even more delicious dessert inspiration. I would love to see your version of this cold cake too, so please share it if you make it!
Print
Cookies and Cream Cold Cake
A no-bake, chilled dessert with layers of chocolate cookies soaked in milk and rich pastry cream. Perfect for summer or anytime you want a creamy, cookie-filled treat without turning on the oven.
- Total Time: 420
- Yield: 12 slices
Ingredients
Dark chocolate wafer-style cookies (3 packages, 400g / 14 oz total)
Whole milk (240ml / 1 cup, for dipping, optional)
Whole milk (1 liter / 4 1/4 cups)
1 large egg
Granulated sugar (120g / 1/2 cup + 1 tbsp)
All-purpose flour (50g / 1/3 cup)
Non-alcoholic vanilla extract (1 tbsp)
Salt (a generous pinch)
Instructions
Whisk together 1 liter of whole milk, egg, 1/2 cup + 1 tbsp granulated sugar, flour, non-alcoholic vanilla extract, and salt in a large bowl until smooth. Chill for 15 minutes.
Layer dark chocolate wafer cookies in a 9×9-inch dish. Dip each cookie briefly in 1 cup of milk (optional) before stacking to soften slightly.
Pour half of the milk mixture over the cookies. Sprinkle half of the remaining cookies on top.
Repeat with the remaining milk mixture and cookies. Press gently to settle.
Refrigerate for 4-6 hours or until firm. Serve chilled, chilled for 1 hour before slicing.
Notes
Use any thin chocolate wafer cookies like Oreo thins or store-bought wafers.
Substitute non-alcoholic vanilla extract for traditional vanilla.
Cover and refrigerate for up to 24 hours. Best served within 24 hours for optimal texture.
- Prep Time: 15
- Category: Desserts
- Method: Refrigeration
- Cuisine: American
- Diet: Vegetarian
Nutrition
- Serving Size: 1 slice (1/12 of the cake)
- Calories: 260
- Sugar: 18g
- Sodium: 150mg
- Fat: 9g
- Saturated Fat: 4g
- Carbohydrates: 23g
- Fiber: 1g
- Protein: 5g
- Cholesterol: 30mg