
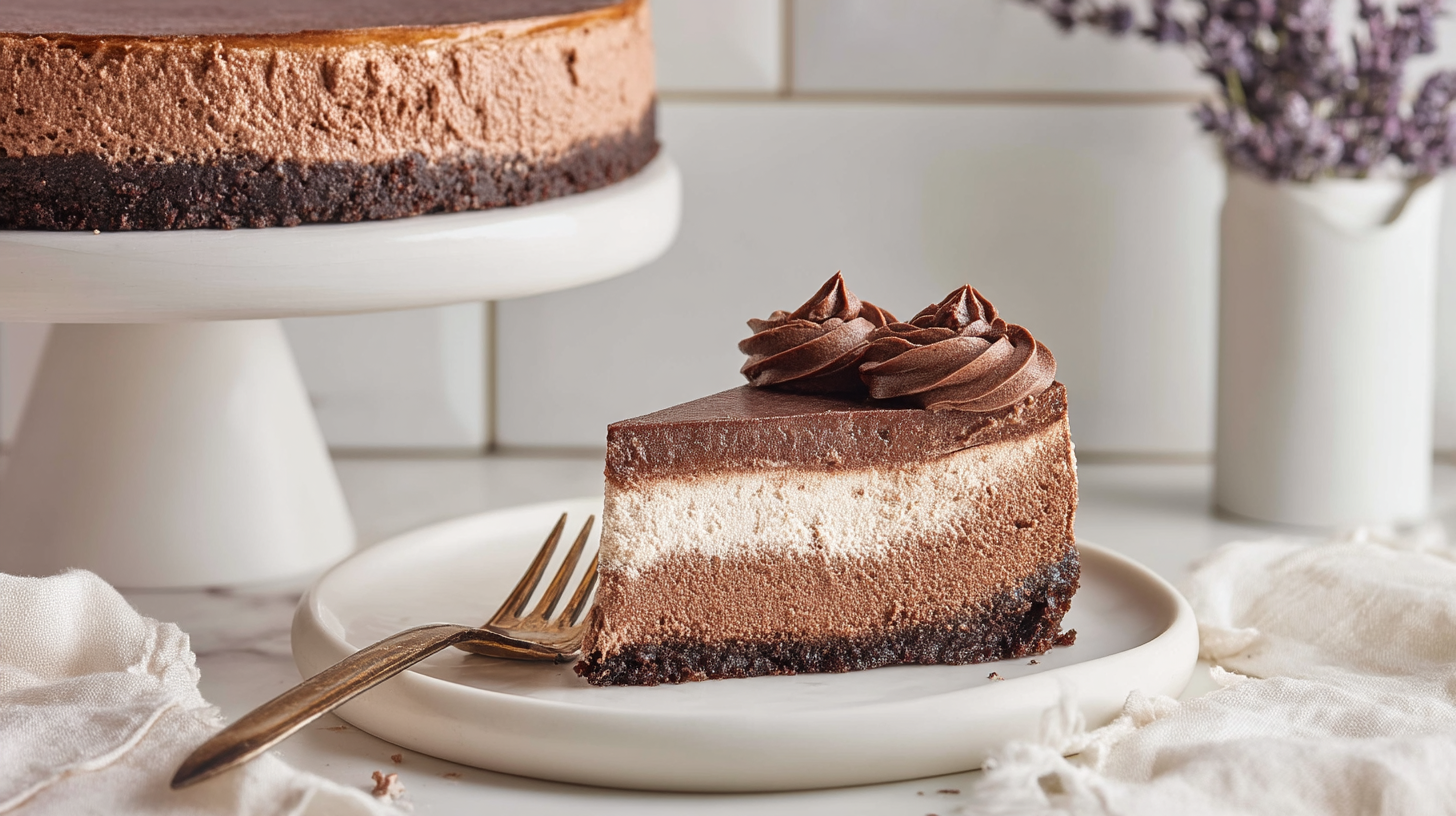
Chocolate cheesecake has my whole heart, honestly. The first time I made this, I stood over the counter and just stared at it because I could not believe something that beautiful came out of my own oven. It is rich, it is velvety, it is deeply chocolatey, and it has that dreamy Oreo crust that makes everything better. If you are looking for a showstopper dessert that will have everyone asking for seconds and thirds, this is absolutely the one.
What Is Chocolate Cheesecake?
Chocolate cheesecake is basically a classic baked cheesecake taken to a whole new level of decadence. Instead of a plain cream cheese filling, you fold in rich melted chocolate to get that deep, fudgy flavor. Think of it as the love child of a chocolate truffle and a New York-style cheesecake. It sits on a buttery cookie crust, bakes low and slow, and comes out with the most gorgeous silky texture you have ever tasted. It is the kind of dessert that makes people go completely quiet at the table, in the best way.
What You Will Need for Chocolate Cheesecake
Before we dive into the steps, let me walk you through everything you need. I promise the ingredient list is not as scary as it looks. Each part of this chocolate cheesecake builds on the next, and together they create something truly magical.
For the Crust
- 24 Oreo cookies (270g) – These are the base of everything. The cream filling stays in, trust me, it adds flavor and helps bind the crust. No need to scrape it out.
- 4 tablespoons unsalted butter, melted (56g) – This holds the crushed cookies together and gives the crust a rich, slightly crispy texture after baking. You can use salted butter in a pinch, just skip any added salt elsewhere.
For the Filling
- 2 bars bittersweet chocolate, chopped (4 oz/113g each) – This gives the cheesecake its deep, intense chocolate flavor. I love the slight bitterness it brings to balance the sweetness.
- 1 bar semi-sweet chocolate, chopped (4 oz/113g) – Adding this alongside the bittersweet chocolate gives you a more rounded, smooth chocolate taste. You can use all semi-sweet if you prefer a milder flavor.
- 1/4 cup hot brewed coffee (60ml) – Do not skip this! Coffee does not make it taste like coffee, it just intensifies the chocolate flavor in the most amazing way. If you absolutely cannot use coffee, substitute with hot water.
- 3 packages cream cheese, room temperature (8 oz/227g each) – This is the heart of the cheesecake. Room temperature is non-negotiable here for a smooth, lump-free batter.
- 1 cup granulated sugar (200g) – Just the right amount of sweetness to balance all that rich chocolate.
- 1/4 teaspoon salt – A little pinch of salt makes the chocolate flavor pop even more.
- 1/4 cup sour cream, room temperature (60g) – This adds a subtle tang and makes the filling extra creamy. Greek yogurt works as a substitute.
- 1 tablespoon vanilla extract – Pure vanilla rounds out all the flavors beautifully.
- 4 large eggs, room temperature – Eggs give the cheesecake its structure and that perfectly custardy texture. Cold eggs can cause the batter to seize, so let them sit out first.
- 3 tablespoons all-purpose flour – Just a small amount helps stabilize the filling and prevent cracking. You can use cornstarch as a gluten-free swap.
For the Ganache
- 1/2 cup semisweet chocolate chips (90g) – These melt into a glossy, smooth ganache that takes this cheesecake over the top.
- 1/3 cup heavy cream (80ml) – Warm cream poured over the chips creates that silky ganache texture we all love.
For the Chocolate Whipped Cream
- 1 cup heavy cream (240ml) – The base of the whipped cream. Make sure it is cold straight from the fridge for the best results.
- 1/4 cup powdered sugar (30g) – This sweetens and stabilizes the whipped cream without making it grainy.
- 1 tablespoon natural unsweetened cocoa powder – This is what transforms regular whipped cream into a chocolate lover’s dream topping.
- 1 teaspoon vanilla extract – A little vanilla makes everything taste better, always.
Step-by-Step Instructions for Chocolate Cheesecake
Okay, let us get into it. I know this looks like a lot of steps, but I promise each one is straightforward. Take it section by section, and you will be totally fine.
Making the Oreo Crust
Step 1: Preheat and prep. Start by preheating your oven to 350 degrees F. Then grab your food processor and add the Oreo cookies. Pulse for about 30 seconds until the cookies look like dark, fine sand. While the processor is running, slowly drizzle in the melted butter. The mixture should hold together when you squeeze a little between your fingers. If it feels too dry, just add one more tablespoon of melted butter and stir it in.
Step 2: Press and bake the crust. Transfer the cookie mixture into a 9-inch springform pan. Use a flat-bottomed glass or measuring cup to firmly press it into an even layer across the bottom and about one inch up the sides. Bake for 10 minutes until it smells amazing and looks dry. Then set it on a cooling rack. Reduce the oven temperature to 300 degrees F, and position one rack at the bottom and one in the middle of your oven.
Making the Chocolate Cheesecake Filling
Step 3: Melt the chocolate. Place the bittersweet and semi-sweet chopped chocolate into a microwave-safe bowl. Pour the hot brewed coffee right over the top. Microwave in short 10 to 20 second bursts, stirring between each one, until the chocolate is completely melted and smooth. This should take about 35 to 45 seconds total. Set it aside to cool slightly while you work on the rest.
Step 4: Beat the cream cheese. In your stand mixer with a paddle attachment (or a large bowl with a hand mixer), beat the cream cheese on medium speed for two full minutes until it is super creamy. Then add the sugar and salt and mix for another minute until everything is well combined. Add the sour cream and vanilla extract and mix until just incorporated.
Step 5: Add the eggs and chocolate. With the mixer on medium-low, add the eggs one at a time, making sure to scrape down the sides of the bowl between each addition. Once all the eggs are in, pour in your melted chocolate mixture and mix until almost fully combined. Scrape down the bowl, then sift the flour directly over the batter. Mix on low speed just until the flour disappears completely. Do not overmix at this stage.
Step 6: Fill and prep for baking. Pour the chocolate batter into your prepared crust and smooth the top with an offset spatula. Tightly wrap the pan with foil, making sure the foil does not touch the top of the cheesecake. Place a large baking dish on the bottom oven rack and fill it halfway with hot water. This creates steam and helps the cheesecake bake evenly. Place the cheesecake on a rimmed baking sheet on the center rack above the water.
Step 7: Bake low and slow. Bake at 300 degrees F for one hour. Then carefully remove the foil and continue baking for another 40 to 50 minutes. You are looking for the edges to look puffed and matte about two inches in, while the center still has a slight shiny wobble. If you notice any cracking starting at the edges after 40 minutes, go ahead and turn the oven off right then. The center may still look a little sunken, and that is completely okay!
Step 8: Cool it down slowly. Once done, turn the oven off completely. Crack the oven door open slightly by wedging a wooden spoon in the opening and let the cheesecake cool inside for one full hour. This slow cooling process is what keeps cracks from forming. After that, take it out and let it cool at room temperature for another hour before covering it and refrigerating overnight. I know waiting is the hardest part, but it is absolutely worth it.
Making the Ganache
Step 9: Make and spread the ganache. Once the cheesecake is fully chilled, place the semisweet chocolate chips in a small microwave-safe bowl. Heat the heavy cream in the microwave for about 35 seconds until steaming. Pour it over the chocolate chips and stir until the mixture is completely melted and glossy. If there are still a few unmelted bits, microwave at half power in 30 second bursts, stirring in between. Let it cool for five minutes, then spread it in an even layer over the top of the cheesecake. Return it to the fridge to set while you make the whipped cream.
Making the Chocolate Whipped Cream
Step 10: Whip and pipe. Add the cold heavy cream, powdered sugar, and vanilla extract to your stand mixer bowl with the whisk attachment. Sift in the cocoa powder and give it a quick stir to combine before you turn the mixer on. Whip on medium speed for about one to one and a half minutes until stiff peaks form. Transfer the whipped cream to a piping bag fitted with a closed star tip (an Ateco 846 works perfectly). Pipe a ring of beautiful rosettes or dollops around the edge of the cheesecake. Slice and enjoy! This chocolate cheesecake keeps beautifully in the fridge for up to five days.
How to Serve This Beauty
This chocolate cheesecake truly shines on its own, but a few little extras can make it even more special. Serve each slice with a scoop of vanilla ice cream on the side for a hot-cold contrast that is absolutely incredible. You can also add a drizzle of warm caramel sauce or a few fresh berries on top for a pop of color and freshness. For a party or special occasion, I love plating slices individually with a small dusting of cocoa powder and a mint leaf. Simple, gorgeous, and so impressive.
Tips for the Perfect Chocolate Cheesecake
- Room temperature everything: Cold cream cheese leads to lumpy batter. Let your cream cheese, eggs, and sour cream sit out for at least an hour before you start.
- Do not skip the water bath: The steam from the hot water in the bottom dish keeps the baking environment humid and gentle, which prevents cracks and dryness.
- Low and slow is key: Baking at 300 degrees F might feel too low, but high heat is the enemy of smooth cheesecake. Be patient with the process.
- Chill overnight: I know it is tempting to slice into it the same day, but overnight chilling in the refrigerator gives the cheesecake time to set properly. The texture the next day is completely different in the best way.
- Use good quality chocolate: Since chocolate is the star here, use bars of good baking chocolate rather than cheap chips for the filling. It makes a huge difference in flavor.
- Do not overmix after the eggs: Once you add the eggs, mix gently and only until combined. Overmixing adds too much air and can cause cracking.
Your Questions About Chocolate Cheesecake, Answered
Can I make chocolate cheesecake without a water bath?
Technically yes, but I really do not recommend it. Without the steam from the water bath, the top tends to crack and the texture can turn out a bit dry. I actually tried it once without the water bath because I was in a rush, and while it still tasted amazing, the surface cracked quite a bit. The water bath method gives you that perfectly smooth, creamy result every single time, so it is worth the extra step.
Can I freeze chocolate cheesecake?
Absolutely! This creamy chocolate cheesecake freezes really well. After it has chilled in the fridge overnight, wrap it tightly in plastic wrap and then in foil before freezing. It will keep for up to two months. When you are ready to serve it, thaw it overnight in the refrigerator. Add the ganache and whipped cream after thawing rather than before freezing for the best results.
Why did my cheesecake crack on top?
Cracks in cheesecake usually happen for one of a few reasons. Overmixing the batter after adding the eggs incorporates too much air. Baking at too high a temperature causes the outside to set before the inside is done. Cooling the cheesecake too quickly also causes the top to crack. The good news is that even if yours cracks a little, the ganache layer covers it beautifully. Nobody will ever know!
Can I make this chocolate cheesecake ahead of time?
Yes, and honestly this is the perfect make-ahead dessert. The cheesecake actually tastes better after sitting in the fridge overnight because the flavors have time to meld and deepen. You can make it up to three days in advance and just add the ganache and whipped cream on the day you plan to serve it. It is a total lifesaver for dinner parties and holidays.
Why You Are Going to Fall in Love With This Recipe
This chocolate cheesecake is the kind of recipe that becomes your signature dessert. The layers of flavor are incredible, from the crunchy Oreo base to the rich, fudgy filling, the glossy ganache, and that pillowy chocolate whipped cream on top. It looks stunning, it tastes even better, and it is genuinely not as difficult as it looks once you break it into steps. Whether you are making it for a birthday, a holiday, or just because it is Tuesday and you deserve something amazing, this recipe is going to be your new go-to.
If you love seeing the process behind recipes like this, come find me over on our Pinterest page where I share all kinds of dessert inspiration and behind-the-scenes moments from my kitchen adventures.
Print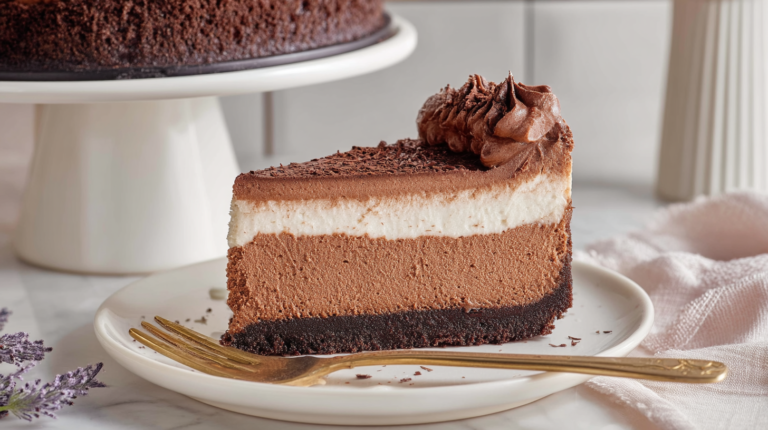
Chocolate Cheesecake
A rich and velvety chocolate cheesecake with a dreamy Oreo crust that brings together the best of fudgy chocolate and creamy texture in one decadent dessert.
- Total Time: 100
- Yield: 12 slices 1x
Ingredients
24 Oreo cookies (270g)
4 tablespoons unsalted butter, melted (56g)
2 bars bittersweet chocolate, chopped (4 oz/113g each)
1 bar semi-sweet chocolate, chopped (4 oz/113g)
1/4 cup hot brewed coffee (60ml)
3 packages cream cheese, room temperature (8 oz/227g each)
2 cups heavy whipping cream
1 cup granulated sugar
2 teaspoons vanilla extract
1/4 teaspoon salt
1/2 cup unsweetened cocoa powder
Instructions
Preheat oven to 325°F (160°C) and grease a 9-inch springform pan.
Crush Oreo cookies in a food processor, add melted butter, and mix until fully combined and sticky.
Press the mixture evenly into the bottom of the prepared pan to form the crust.
Chop bittersweet and semi-sweet chocolate into small pieces and melt over a double boiler or in the microwave at 50% power, stirring frequently.
In a separate bowl, whisk together heavy cream, sugar, and vanilla extract until soft peaks form.
In another large bowl, beat cream cheese until smooth, then gradually add cooled melted chocolate and mix until fully combined.
Fold in the whipped cream gently to avoid deflating it.
Pour the chocolate filling mixture over the Oreo crust and smooth it out with a spatula.
Cover the springform pan with aluminum foil and place it in a roasting pan filled with hot water (bain-marie method) to bake evenly.
Bake for 65–70 minutes or until the edges are set and the center still jiggles slightly.
Remove from the oven and let cool to room temperature, then refrigerate for at least 4 hours or overnight.
Before serving, top with optional chocolate shavings, whipped cream, or cocoa dust for a finishing touch.
Notes
For an alcohol-free version, skip any additions like coffee almande or liqueurs.
Ensure all ingredients are at room temperature to avoid lumps in the filling.
If using salted butter, skip added salt in the filling.
For a halal crust, use halal-certified butter and Oreo cookies.
Store in the refrigerator for up to 5 days or freeze for up to 2 months.
- Prep Time: 30
- Cook Time: 70
- Category: Desserts
- Method: Baking
- Cuisine: American
- Diet: Vegetarian
Nutrition
- Serving Size: 1 slice
- Calories: 520
- Sugar: 45g
- Sodium: 300mg
- Fat: 37g
- Saturated Fat: 23g
- Carbohydrates: 40g
- Fiber: 3g
- Protein: 10g
- Cholesterol: 150mg


